Vim is one of the most popular text editors among Linux users. Linux System Administrators prefer to use it more than Linux users. In this article, let’s explore a short history of vim and as a developer how you can quickly get your hands on vim.
What history says?
Vim is an acronym for Vi IM proved. It is a free and open-source cross-platform text editor. It was first released by Bram Moolenaar in 1991 for UNIX variants. Vim is based on the original Vi editor, which was created by Bill Joy in 1976. Around 90’s Vi was lacking behind in some features when compared with Emacs editor. So Bram implemented many missing features and released it with the name vim.
Installation
As I said earlier, Vim runs across platforms such as Windows, Linux, Mac, etc.
To install on Windows, download the executable file from the Vim site and run the file. Follow the instructions shown on the screen and you’ll be good to go.
Vim comes pre-installed on most *nix operating systems. But if it’s installed on your system, you can install it with a package manager of your choice.
Adding the installation command for Debian-based operating systems.
sudo apt-get update
sudo apt-get install vim
To ensure that it’s installed properly, run which vim and you should get /usr/bin/vim in your output.
Getting Started with Vim
You can get started with Vim by typing its name on the terminal.
Once you enter the above command, you’ll be able to see a screen displaying info about Vim and some instruction to find help and exit from Vim.
Vim Modes
You should be aware of the most important concept in Vim, before moving on further. That’s modes on Vim.
Everything in Vim is considered a mode. You can achieve whatever you want if you master the modes in Vim. There are many modes in Vim. But, we’ll be looking at the top 4 most important modes.
They are,
Command Mode
Command-Line Mode
Insert Mode
Visual Mode
Let’s explore them one by one.
Command Mode
This is the default mode (also called Normal mode) in Vim. Whenever Vim starts, you’ll be left in this mode. You’ll be able to switch to any mode from this mode. You cannot achieve this on any other modes. Basically, to switch from one mode to another, you have to come to Command Mode first and then navigate to the other mode. The commands that you run without any prefix (colon) indicate that you’re running the command in command mode.
Insert Mode
This mode is used to edit the contents of the file. You can switch to insert mode by pressing i from the command mode. You can use Esc key to switch back to command mode.
Command Line Mode
This mode is also used to play with some commands. But the commands in this mode are prefixed with a colon (:). You can switch to this mode by pressing : (colon) in command mode.
Visual Mode
This mode is used to visually select some text and run commands over that section of code. You can switch to this mode by pressing v from the command mode.
The above 4 modes are enough to do some set of file operations in Vim. Theories are done. Let’s explore Vim practically.
Typical Text Editor Operations
Create a new file
Creating a new file with Vim is so simple. You can do that from the command line mode.
Run the following command to create a new file
:edit sample.txt
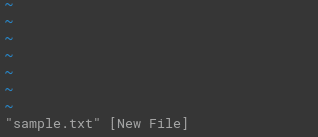
The above command opens sample.txt file in edit mode if it exists, creates a new file otherwise.
After running that command, you’ll be in command mode (as shown in below screenshot), and you’ll not be able to enter any text
To add some text to the created file, press i in the keyboard. i command is used to enter some text in the file. Once you press i, you'll be able to see that you entered the Insert mode of Vim by looking at the bottom left of the file.
In this mode, you can type whatever you want into the file.
We’re done with writing the content. We want to save the file now. If you do not save and just close the terminal at this point, all your contents will be lost.
Save a file
To save a file, you have to switch from Insert mode to Command Line mode. Remember I told you earlier, whenever you want to switch from one mode to another, you have to first switch to Command mode and then you can easily switch to whatever mode you want.
To switch to the Command mode from Insert mode, you have to press Esc key.
After you press Esc key, you'll not be able to see the --INSERT-- at the bottom left and this indicates that you're not on Insert mode and you're on Command mode.
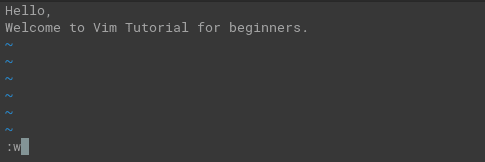
To save the file, type the following command now,
:w
Close a file and Exit Vim
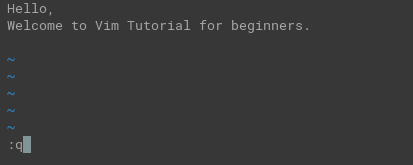
Once you save the file, you can close vim by closing the terminal. But, the proper way to close the file and Vim editor, is by using the following command.
:q
The above command closes the file and quits the vim editor.
Alternatively, people use a command, that’s the combination of the above 2 commands (save & quit) to quickly save and quit Vim. The command is,
The above command quits the Vim editor immediately after saving the file.
Edit a file
To edit a file, you have to open the file using Vim and switch to the Insert mode.
Let’s open the sample.txt file we created above
vim sample.txt
We are in Command mode now. To edit the file, we have to switch to Insert mode. As we saw earlier, pressing i from the Command mode will switch to the Insert mode.
Follow the same procedure for saving the file and quitting Vim. Press Esc on the keyboard and type :w to save the file and :q to quit Vim.
You may raise an obvious question here.
What if I want to close the file without saving my changes? (Ignore the changes I made and bring the file back to the old state).
How to close the file without saving the changes?
To close the file without saving the changes, you have to run :q! from Command mode.
Let’s explore this with an example
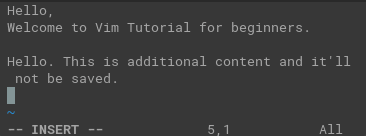
I’ve added some more content to the file.
But, I don’t want to save the changes I made now. To close the file without saving this change, we have to switch to Command mode (by pressing Esc key). Type :q! in the Command mode. This will close the file ignoring the changes made now.
Let’s view the file and confirm if we get the expected output.
Yeah. The file does not have the last line which we added recently. So, the changes are not saved.
How to cut, copy, and paste a text from the file using Vim?
Cut, Copy, and Paste can be achieved in 2 ways in Vim. They are,
Using Visual mode
Using keyboard
Out of these 2, the Visual mode is simple to understand. Since we’re focussing on beginners, let’s explore cut, copy, & paste in Visual mode.
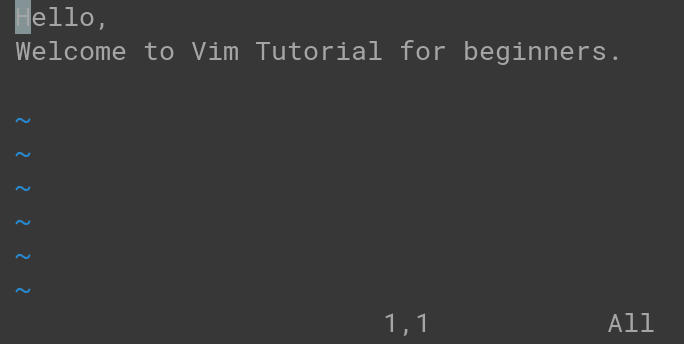
Let’s open the file in the command mode before we proceed
Let’s assume you want to copy the word “Hello” from the 1st line and paste it into the 3rd line.
The first step is to place your cursor in the place from where you want to copy the text (being in the command mode).
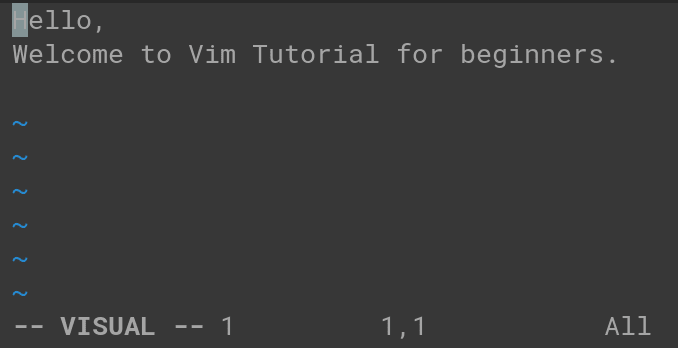
Enter Visual mode by pressing v key in the keyboard.
The -- VISUAL -- text at the bottom left indicates that we're in visual mode.
Move the cursor to the place where the text you want to copy ends.
In this case, I’m moving the cursor to the letter o of the word Hello.
While you move your cursor, Visual mode highlights the text from the beginning till your cursor.
Once you’re done moving your cursor to the right place, hit y to copy the text or hit d to cut the text.
In this case, I’m copying the text. So, I press y in my keyboard.
Move the cursor to the place where you want to paste the text.
In our case, we have to move the cursor to the 3rd line.
Press p (in lowercase) to paste the text after the cursor and P (in uppercase) to paste the text before the cursor.
Press :wq to save and close the file
How to find and replace text in Vim?
Finding a text and replacing it with some other text is simple and straightforward in Vim. There’s a one-line command that simplifies this entire process.
Here’s the syntax,
:[range]s/{pattern}/{string}/[flags]
Let’s dismantle each part and understand them.
[range] indicates that you can pass the range of lines. Pass % to find and replace in all lines. The range is separated by a comma. To find and replace between lines 5 to 10, pass 5,10. Use . to represent the current line and $ the last line of the file.
{pattern} indicates the pattern to find the text. You can pass regex patterns here.
{string} is the string to replace in the found text.
[flags] indicates if you wish to pass any additional flags (Eg. The flag c is passed to confirm before replacing the text). By default, this does a case-sensitive search, you can change it to do a case-insensitive search by passing a i flag.
Alright, let’s explore this with an example.
Our sample.txt file has 2 "Hello". Let's replace "Hello" with "Hi" at both places.
The command to do that is,
:%s/Hello/Hi/g
%s indicates replacing the content in the entire file
Hello is the search text
Hi is the text to replace
g indicates making the change globally
Let’s understand this with another example.
This time, I want to change the word “Hi” (case-insensitive search) that occurs between lines 2 and 3 and replace it with “Hello and Welcome”, with a confirmation to change each occurrence.
The command to do that is,
:2,3s/Hi/Hello and Welcome/gci
Here’s a description for each option,
y - Replace the match
n - Skip the match
a - Substitutes the match and all remaining occurrences of the match
q or Esc - Quit substitution
l - Replace the match and quit
CTRL+Y - Scroll the screen down
CTRL+E - Scroll the screen up
I want to accept the change. So, I press y. Here's the output after pressing y.
Since we have only one occurrence of “Hi” between lines 2 and 3, it did not ask for any further confirmation and the operation is complete.
How to undo/redo in Vim?
To undo a change in Vim, press u in command mode. To redo, press CTRL + R. You can prepend a number (n) with u to undo n times. Eg. 2u will undo 2 times. To list the available undo options, type :undolist in command mode.
Let’s understand this with an example.
Here’s the current state of our sample.txt file.
I have my cursor at “a” in the “Hello and Welcome” text on 3rd line. Let’s remove the word “and” by typing dw on command mode.
Let’s undo to bring the word “and” back into the file. To do so, press u in command mode.
Let’s redo and take away the word “and” by typing CTRL + R in command mode.
Conclusion
In this article, you have learnt the basics of Vim. This article will be enough to get your hands on Vim and do some basic file read/write operations with Vim. Literally, I’ve not even covered 1% of Vim. But I’m sure this basics will help you explore Vim quickly and confidently.
Drop a ❤️ if you liked the post. Follow me to receive more articles like this!
To learn more about Vim, subscribe to my newsletter.










Top comments (0)