If you're an Apify user, you're no doubt familiar with the serverless cloud programs (or micro-apps) we call Actors.
You're also probably aware that you can integrate Actors and their tasks with your favorite web apps and cloud services. But now it's possible to integrate Actors with other Actors. That means you can reuse existing Actors instead of building your own to complete certain processes.
Say you have one Actor with a dataset containing URLs and another that takes URLs and downloads them as images. Integrating the two makes the whole process of retrieving and downloading images so much easier than it used to be.
Connecting two Actors can simplify your workflow
You may have noticed that some Actors have an Actor-specific integration available. For example, Google Maps Scraper has the AI Text Analyzer for Google Reviews as a recommended integration.
AI Text Analyzer under Google Maps Scraper's integration tab
But this doesn't mean you're limited to integrating just this one Actor. You can connect any Actor or task with the Apify integration.
In this step-by-step guide, we're going to show you an example by connecting two Actors via the Apify integration.
Prefer video? Watch this instead:
Step 1. Choose an Actor
Start by going straight to Apify Console. If you're not an Apify user, you'll need to sign up for a free account before you start.
We're going to choose Cheerio Scraper with the purpose of connecting it with the Download Images from Dataset Actor.
What we want to do is grab all image URLs from the Apify Blog (because it's awesome) with Cheerio Scraper (because it's super fast) and then download them into a zip file using Download Images from Dataset. So, we're using one Actor to grab the URLs of the images, and with the other, we're downloading the images (not just the URLs) as a zip file.
Step 2. Create a task with the Actor
First, you need to create a task. Tasks are great for organizing your inputs, especially if you want to connect more than two Actors.
In this example, we'll create a task with Cheerio Scraper, which we'll call Apify Blog Image Grabber.
Hit "Create new task" at the top of the Actor input page
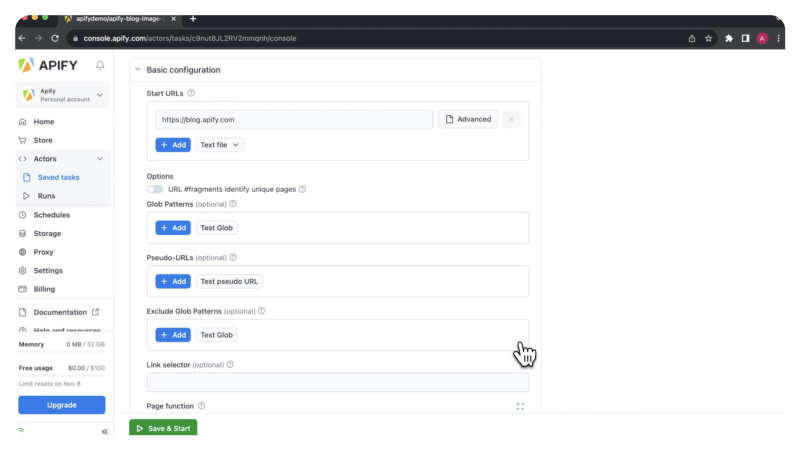
Next, we'll put the URL for the Apify Blog in the Start URLs field.
We have no need for Glob patterns or Link selectors, so we'll leave those blank. What we do need is code in the Page function.
Edit your scraper's input accordingly
Here, we're creating a pageFunction where we're iterating through all images on the page, getting a URL of each image, and pushing the full image URL to a dataset.
Our code will push image URLs found on the website to a dataset
Step 3. Choose the Actor to integrate with
Now go to Integrations , click the Apify integration , and then choose the Actor you want to integrate it with.
Connect the Actor you want to integrate
The first Actors you'll see (in alphabetical order) are integration-ready Actors. You can also find these in Apify Store under the Integrations category.
You can find integration-ready Actors in Apify Store
We'll select Download Images From Dataset and click Connect.
Step 4. Choose a trigger
Now you can choose the Trigger that will start the Download Images Actor. We'll stick with Run succeeded.
Because we're using an integration, the dataset ID field is already prefilled with the datasetID that Cheerio Scraper will generate.
Choose a trigger to run the second Actor: note the Dataset ID is prefilled from Cheerio Scraper!
Step 5. Save and test settings
Now you can save the integration settings. Once saved, you can test the integration with the test button. You have multiple test settings. We'll test it with last run.
Test your integrations via the Test button
You can see the test results in the log underneath.
If you go back to the integrations tab, you can see how the Actors and tasks are connected.
View the schema of your Actor connections in the task's Integrations tab
So now, when we start the Apify Blog Image Grabber task and go to our runs, we can see that the image downloader was also triggered.
See how the relevant Actors are triggered in the Runs tab
Since the run is finished, lets look at the results. If we go to Storage and the key-value store, we can see our images archive.
You can find your pictures in the image-archive file in the run's Key-value store
Now we can download it to our device.
Bonus step: schedule tasks
If you want to automate your workflow further, you can schedule your integration-infused tasks to run at specific times.
See how to set up a schedule in our video on the topic:
Which Actors do you want to integrate?
So, now you know how it works, which Actors will you choose to integrate first? There are well over a thousand pre-built web scraping and automation tools in Apify Store to choose from. Take your pick!
Create integration-ready Actors
Don't forget, you can build your own Actors, run them locally on Apify's cloud platform, and publish them in Apify Store to reach people who need your solution and get paid.
If you want to know how to build integration-ready Actors, the guidelines in our documentation will show you what to do.


Top comments (0)