
Thousands, if not millions, of people on the internet need access to receipts, reports, statements, and many other files daily. This makes generating PDF files a common task in web applications because PDFs provide a convenient way to format and present information in a consistent, cross-platform manner. In this article, we'll see how to generate PDFs on the client side by using the jsPDF library.
Session Replay for Developers
Uncover frustrations, understand bugs and fix slowdowns like never before with OpenReplay — an open-source session replay suite for developers. It can be self-hosted in minutes, giving you complete control over your customer data.

Happy debugging! Try using OpenReplay today.
jsPDF is a JavaScript library specifically built for client-side PDF generation. Its key features include:
- Client-side operation: Generates PDFs without server-side dependencies.
- Customization: Offers control over PDF layout, styling, and content.
- Ease of use: A straightforward API for creating PDFs from HTML.
Installation and setup of jsPDF in a web project
To start using jsPDF, you can install it using two options:
- CDN: Include the library directly in your HTML head tag using a CDN link as follows:
<script src="https://cdnjs.cloudflare.com/ajax/libs/jspdf/2.5.1/jspdf.umd.min.js"></script>
- Package Manager (npm or yarn): Install jsPDF as a project dependency using the command below:
npm install jspdf
# or
yarn add jspdf
Setting up a simple HTML structure to convert into a PDF
For this tutorial, we will write a simple HTML invoice code that we will use to demonstrate how jsPDF works.
<!DOCTYPE html>
<html lang="en">
<head>
  <meta charset="UTF-8">
  <meta name="viewport" content="width=device-width, initial-scale=1.0">
  <title>Invoice Receipt</title>
  <link rel="stylesheet" href="https://maxcdn.bootstrapcdn.com/bootstrap/4.5.2/css/bootstrap.min.css">
</head>
<body>
  <div class="container mt-5">
    <div class="row">
      <div class="col-md-8 offset-md-2">
        <div class="card">
          <div class="card-header bg-primary text-white">
            <h3 class="mb-0 text-center" >Invoice Receipt</h3>
          </div>
          <div class="card-body">
            <div class="row mb-3">
              <div class="col-md-6">
                <img src="https://i.imgur.com/rSVYXhJ.png" alt="Company Logo" class="img-fluid">
              </div>
              <div class="col-md-6 text-right">
                <h5>E-Commerce Store</h5>
                <p>123 Main Street<br>Anytown, USA 12345</p>
                <p>Phone: (123) 456-7890</p>
                <p>Email: info@ecommercestore.com</p>
              </div>
            </div>
            <div class="row mb-3">
              <div class="col-md-6">
                <h5>Billed To:</h5>
                <p>John Doe<br>456 Oak Street<br>Anytown, USA 12345</p>
              </div>
              <div class="col-md-6 text-right">
                <h5>Invoice #: 1234</h5>
                <p>Invoice Date: March 20, 2024</p>
              </div>
            </div>
            <table class="table table-striped">
              <thead>
                <tr>
                  <th>Product</th>
                  <th>Price</th>
                  <th>Quantity</th>
                  <th>Total</th>
                </tr>
              </thead>
              <tbody>
                <tr>
                  <td>
                    <img src="https://i.imgur.com/qMRYgDi.png" alt="Product Image" class="img-fluid mr-2" width="70" height="50">
                    Hisense TV 55"
                  </td>
                  <td>$599.99</td>
                  <td>1</td>
                  <td>$599.99</td>
                </tr>

              </tbody>
              <tfoot>
                <tr>
                  <th colspan="3" class="text-right">Subtotal:</th>
                  <td>$599.99</td>
                </tr>
                <tr>
                  <th colspan="3" class="text-right">Shipping:</th>
                  <td>$10.00</td>
                </tr>
                <tr>
                  <th colspan="3" class="text-right">Total:</th>
                  <td>$609.99</td>
                </tr>
              </tfoot>
            </table>
          </div>
          <div class="card-footer text-muted text-center">
            Thank you!
          </div>
        </div>
      </div>
    </div>
    <a href="javascript:void(0)" class="btn btn-primary btn-block mt-3 btn-download">Download PDF</a>
  </div>
</body>
</html>
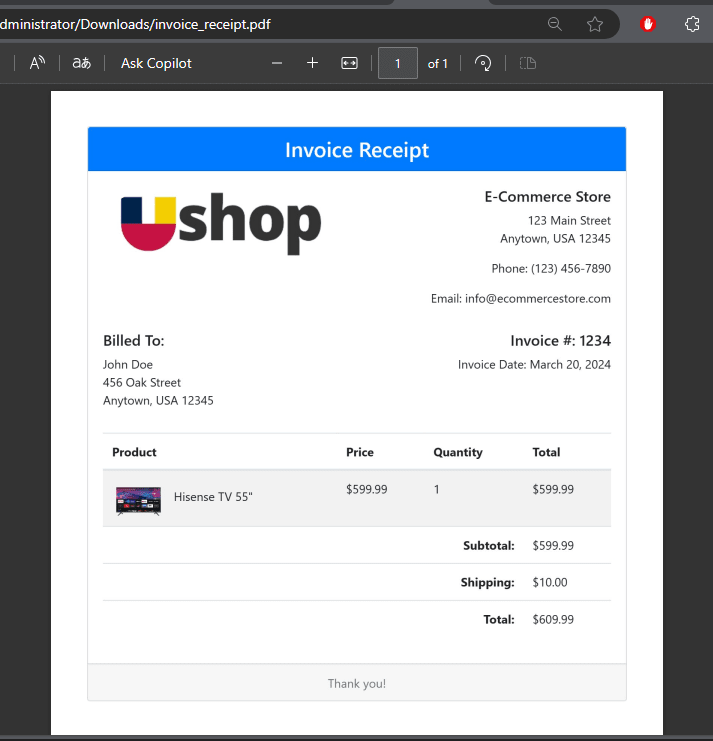
The expected output:

We will be generating a PDF file from the receipt div element.
Step-by-step guide on using jsPDF to convert HTML content into a PDF
To convert the receipt div to HTML, we will add the jsPDF CDN link in the head tag of our HTML page:
<script src="https://cdnjs.cloudflare.com/ajax/libs/jspdf/2.5.1/jspdf.umd.min.js"></script>
We will use jsPDF version 2.5.1 together with html2canvas and html2pdf libraries to aid in the PDF generation.
html2canvas is a JavaScript library that enables developers to take screenshots of web pages and convert them into a canvas element. It is mostly used in tasks like PDF generation since it captures the visual design of an HTML element and then converts it into an image that can be included in the PDF.
html2pdf is a JavaScript library that combines the functionality of jsPDF and html2canvas to provide a comprehensive solution for generating PDFs from HTML content. It simplifies the process of creating PDFs by handling the conversion of HTML to a PDF format, including the inclusion of images, tables, and other elements.
<script type='text/javascript' src='https://html2canvas.hertzen.com/dist/html2canvas.js'></script>
<script type='text/javascript' src= "https://html2canvas.hertzen.com/dist/html2canvas.min.js"></script>
<script type='text/javascript' src="https://cdnjs.cloudflare.com/ajax/libs/html2pdf.js/0.8.0/html2pdf.min.js" integrity="sha512-2ziYH4Qk1Cs0McWDB9jfPYzvRgxC8Cj62BUC2fhwrP/sUBkkfjYk3142xTKyuCyGWL4ooW8wWOzMTX86X1xe3Q==" crossorigin="anonymous" referrerpolicy="no-referrer"></script>
NOTE: If the CDN links fail to work, download these js files and run them locally as follows:
<script src="js/jspdf.debug.js"></script>
<script src="js/html2canvas.min.js"></script>
<script src="js/html2pdf.min.js"></script>
Next, we will write javascript code to download the PDF using the jsPDF library we previously setup using the instructions below:
- Set up an object called
optionsthat contains various configuration settings for the HTML-to-PDF conversion process.
const options = {
  margin: 0.5,
  filename: 'invoice_receipt.pdf',
  image: {
    type: 'jpeg',
    quality: 500
  },
  html2canvas: {
    scale: 1
  },
  jsPDF: {
    unit: 'in',
    format: 'letter',
    orientation: 'portrait'
  }
}
Here's what each property does:
-
margin: 0.5:Sets the margin around the PDF document to 0.5 inches. -
filename: 'receipt.pdf': Specifies the filename of the generated PDF file. -
image: { type: 'jpeg', quality: 500 }: Configures the image type and quality for any images included in the PDF. -
html2canvas: { scale: 1 }: Sets the scale factor for rendering the HTML content to a canvas element. -
jsPDF: { unit: 'in', format: 'letter', orientation: 'portrait' }: Configures the settings for the generated PDF file, including the measurement unit ('in' for inches), paper format ('letter'), and orientation ('portrait').
- Next, listen for a click event on an element with the class
btn-download.
$('.btn-download').click(function(e) {
  e.preventDefault();
  const element = document.getElementById('receipt');
  html2pdf().from(element).set(options).save();
});
When the click event occurs, it performs the following actions:
-
e.preventDefault();: Prevents the default behavior of the click event (e.g., if the button is a link, it prevents navigation). -
const element = document.getElementById('receipt');: Retrieves a reference to an HTML element with thereceiptID. -
html2pdf().from(element).set(options).save();: Uses the html2pdf library to generate a PDF from the element. It applies the options object to configure the PDF generation process and then saves the PDF file.
- Next, write a function,
printDiv, to print the contents of a specific HTML element directly from the browser. It takes adivNameparameter, which is the ID of the HTML element to print.
function printDiv(divName) {
  var printContents = document.getElementById(divName).innerHTML;
  var originalContents = document.body.innerHTML;

  document.body.innerHTML = printContents;
  window.print();
  document.body.innerHTML = originalContents;
}
Here's how it works:
-
var printContents = document.getElementById(divName).innerHTML;: Retrieves the inner HTML content of the specified element. -
var originalContents = document.body.innerHTML;: Stores the current HTML content of the entire document body. -
document.body.innerHTML = printContents;: Sets the document body's HTML content to the content of the specified element. -
window.print();: Triggers the browser's print dialog, allowing the user to print the current document. -
document.body.innerHTML = originalContents;: Restores the original HTML content of the document body after printing.
After adding the javascript code, download the invoice-receipt PDF file using the Download PDF link at the top right of the page.
Expected Output :

Integrating images into the PDF
As you will see in the output above, there are no images on the downloaded PDF file.
To include the images on the HTML page into the PDF file, we will add some settings to the html2canvas setting options as shown below:
  html2canvas: {
    scale: 2, // Increase scale to improve image quality
    sectors: true, // Enable CORS for loading cross-origin images
    allowTaint: true, // Allow rendering of tainted images
    logging: true // Enable logging for debugging
  },
Redownload the file again and confirm if the downloaded has images.
Expected Output:
Conclusion
In this article, we have learned to use jsPDF and other libraries like html2canvas and html2pdf to generate PDFs from a web page div. It is not only easy to customize but also very flexible for a lot of use cases.
Now, you can comfortably build your PDF download features on the client side of your projects.


Top comments (0)