
React hooks were introduced in React 16.8 and have been widely used ever since. They have improved the way components are built in ReactJS. In basic terms, they enable you to use a more functional approach to writing and handling components to access React functionalities without using the previous method—class components. This guide focuses on explaining hooks through visual cheatsheets, which are known to make understanding easier.
Session Replay for Developers
Uncover frustrations, understand bugs and fix slowdowns like never before with OpenReplay — an open-source session replay suite for developers. It can be self-hosted in minutes, giving you complete control over your customer data.

Happy debugging! Try using OpenReplay today.
As with almost all concepts in the programming world, React hooks are powerful, so they are sometimes tedious to learn and understand.
Hooks, in general, have some major similarities and differences. Some hooks, when initiated, cause components to re-render, some use dependencies to initiate re-renders, some don't even cause re-renders at all, and some don't have return values.
As for the similarities between them, for instance, they have to be used at the top level of a functional component, and they can't be used in conditional statements or loops.
Another tricky aspect of React hooks is that two hooks might seem incredibly similar with just a little difference. Look at useCallback and useMemo for example. Both primarily use the memoization technique under the hood; however, useCallback is used for memoizing functions while useMemo is used for memoizing any other type of value.
Understanding React Hooks through Visual Cheatsheets
As we all know, our brains process and easily remember visuals much faster than texts, and that's what we want to achieve in this guide.
Each React hooks explained in this guide would be grouped into core and additional hooks.
All hooks found in each group would contain a visually appealing cheatsheet (that you can download) and how the hook works, its syntax, and common use cases.
Core React Hooks
This section contains the most commonly used hooks in Reacts. These hooks are the essential building blocks for building functional components as they handle common tasks like maintaining state, passing data around, etc.
useState
useState hook is primarily for managing states in functional components. It allows declaring state variables in components, tracking and updating the state, and triggering re-renders of the component whenever the state changes.
const [state, setState] = useState(initialState);
It works simply:
- Import
useStatefromreact, then call theuseStatehook and pass an initial value (any value type) as an argument. -
useStatereturns an array of two values: the current state (state) and a function to update the state (setState). - Then use the
statevalue in your component.
Here is a simple useState cheatsheet:

useState has some common uses; for instance, it can be used to store data specific to a component, update state based on its previous value, and even update state based on how a user interacts with a component.
Let's say we want to toggle a button's theme to light or dark; we can use the useState hook:
function Button() {
  const [darkTheme, setDarkTheme] = useState(false);

  const toggleDarkTheme = () => {
    setDarkTheme(!darkTheme);
  };

  return (
    <div>
      <button onClick={toggleDarkTheme}>
        {darkTheme ? "Dark Theme" : "Light Theme"}
      </button>
    </div>
  );
}
useEffect
useEffect basically allows React code to interact with external systems. In other words, it is mainly used to manage side effects in functional components. The syntax for useEffect is:
useEffect(setup, dependencies?);
In the useEffect syntax, setup is a function that contains the logic of the component's effect. The setup function can optionally return a cleanup function. This cleanup function runs when the component unmounts by cleaning up the effect made in the setup function.
The dependencies is also optional; it is an array containing a list of reactive values that determines how the useEffect runs.
Here's a useEffect cheatsheet to remember how it works:

The rendering of useEffect depends on the dependencies provided:
- An empty dependency array
[]meansuseEffectruns only once after the first render. - No dependency array means
useEffectwould run after every component re-render, including the first render. - Dependencies specified means
useEffectruns on the first render and any time any values in the dependency array change.
The useEffect hook is generally used for fetching data from an API, manually manipulating the DOM, or keeping an external system in sync with some state or props of your components.
Remember to avoid using objects or functions created during rendering as dependencies. Instead, create them within the
useEffecthook itself.
useReducer
useReducer is a React hook that provides a more structured approach to managing complex state logic or multiple connected states. It uses a reducer function to handle the state in a component.
The image below is the useReducer cheatsheet:

The syntax for useReducer is:
const [state, dispatch] = useReducer(reducer, initialState);
useReducer returns an array of two values: the current state and the dispatch function. The dispatch function passes the action made to the reducer function to update the state.
The reducer function defines the logic for updating the state based on the current state and an action object (i.e., user interactions or events).
Now, based on the action type passed to dispatch, the reducer function updates the state and returns it, which in turn re-renders the component with the updated state.
Here's an example of useReducer handling a counter:
const initialState = { count: 0 };

const reducer = (state, action) => {
  switch (action.type) {
    case "INCREMENT":
      return { count: state.count + 1 };
    case "DECREMENT":
      return { count: state.count - 1 };
    default:
      return state;
  }
};

function Counter() {
  const [state, dispatch] = useReducer(reducer, initialState);

  return (
    <div>
      <p>Count: {state.count}</p>
      <button onClick={() => dispatch({ type: "INCREMENT" })}>Increment</button>
      <button onClick={() => dispatch({ type: "DECREMENT" })}>Decrement</button>
    </div>
  );
}
Most of the time, you'd use useReducer when dealing with multiple state values that are related to each other, as it'd make state changes easier to maintain and work with.
Also, if your component state involves complex conditional logic, a useReducer would work better than a useState.
Consider using a switch statement within your reducer as it helps with code readability especially when handling multiple action types.
useContext
The useContext hook removes the need for prop drilling, i.e., passing down data using props through multiple levels of components. useContext works by allowing components to access data stored in a shared context.
To use the useContext hook, you must first create a context object using createContext() imported from React. Then you wrap a higher-level component with a context provider (<Context.Provider>). The data passed to the provider's value prop is what would be accessible anywhere in the component tree through the useContext hook.
Here is the syntax for useContext:
const value = useContext(SomeContext);
useContext hook takes in a single argument, i.e, the context object you want to access that was created with createContext(). The useContext hook then returns the current value of that context provided by the nearest <Context.Provider>.
Here is a simple cheatsheet of useContext that illustrates further:

useContext is mainly used to manage global states or share data like authentication states, user preferences, or theme settings across your application without prop drilling.
Note that
useContextcan only read the context value and not modify it. To modify the context value, use the context provider.
Take a look at this code of useContext in action:
import { useContext, createContext, useState } from "react";

const AuthContext = createContext(null);

function Login() {
  const [isLoggedIn, setIsLoggedIn] = useState(false);

  const login = () => setIsLoggedIn(true);
  const logout = () => setIsLoggedIn(false);

  return (
    <AuthContext.Provider value={{ isLoggedIn, login, logout }}>
      {/* Authentication form here */}
    </AuthContext.Provider>
  );
}

function Profile() {
  const { isLoggedIn } = useContext(AuthContext);

  return (
    <div>
      {isLoggedIn ? <p>You're logged in!</p> : <p>You're logged out</p>}
    </div>
  );
}
As for re-rendering, components that subscribe to a context get re-rendered automatically whenever the context value changes.
useMemo
useMemo is designed to optimize a React application's performance. It does this by caching the results of expensive calculations between component re-renders.
Here is a cheatsheet for the useMemo hook:

The useMemo syntax is:
const cachedValue = useMemo(calculateValue, dependencies);
In this code, calculateValue is the function that performs the expensive calculation that should be cached. The dependencies parameter is an optional array containing all the reactive values used by' calculateValue'. So if the dependencies changes, useMemo knows that the returned cachedValue becomes outdated, so it will re-run calculateValue.
Tip:
useMemois built on a caching technique called memoization.
Here is a code example of useMemo caching a filtered list:
import { useMemo } from "react";

function HeavyProcessingList({ items }) {
  const filteredItems = useMemo(() => {
    return items.filter((item) => item.price > 100);
  }, [items]);

  return (
    <ul>
      {filteredItems.map((item) => (
        <li key={item.id}>{item.name}</li>
      ))}
    </ul>
  );
}
You'd typically use useMemo for:
- Skipping expensive calculations.
- Skipping component re-rendering when the data relied on hasn't changed.
- Memoizing dependencies for other hooks.
useCallback
In simpler terms, useCallback optimizes performance by preventing unnecessary re-renders caused by function recreation.
This is useful because when a component re-renders, React creates a new instance of any function in that component, even if the function never changed.
Always remember that
useCallbackcaches the function reference, not what the function returns. If you want to cache a function's return value, useuseMemo.
This is the syntax for useCallback:
 const cachedFn = useCallback(fn, dependencies);
// fn is the function to be cached.
// dependencies is an array of all the values `fn` relies on.
Below is an easy cheatsheet for the useCallback hook:

There are various use cases for useCallback:
- Wrap a function that's passed as a prop to a child component, thus skipping unnecessary re-rendering of the child component.
- Prevent excessive rendering of a
useEffecthook if it depends on a function that's constantly being recreated. - Optimize custom hooks, as they generally rely on internal functions.
useRef
useRef is very important in React as it is one of the major hooks that doesn't cause components to re-render.
useRef is used when you need to interact with DOM elements or store values that should persist between re-renders.
The syntax for useRef is as follows:
const ref = useRef(initialValue);
Here, the ref object returned by useRef is a container that holds the initialValue. You can access and modify the value stored in the ref object by using ref.current. And anytime the value of ref.current is changed, the component doesn't re-render.
Here is a straightforward useRef cheatsheet:

Let's look at some of its use cases:
-
useRefcan be used to reference DOM elements by attaching therefto a JSX element. -
useRefcan be used to hold onto data that isn't needed in a component's UI. - It can also be used to store information between renders like timers, measurements, or previous user selections.
Below is a useRef code example for referencing a DOM element:
function customInput() {
  const inputRef = useRef(null);

  const handleClick = () => {
    // Focus the input element on button click
    inputRef.current.focus();
  };

  return (
    <div>
      <input type="text" ref={inputRef} />
      <button onClick={handleClick}>Focus Input</button>
    </div>
  );
}
Additional Hooks
These are React hooks that are not essential but worth knowing about, as they do come in handy.
useDeferredValue
The useDeferredValue React hook lets you optimize UI performance by delaying the updates of non-essential parts of the UI. This ensures that the rendering of essential elements is prioritized.

The syntax for useDeferredValue is as follows:
const deferredValue = useDeferredValue(value);
// value is the value that should defer updating
You'd typically use useDeferredValue to indicate or temporarily display stale content while fresh content is being loaded. This helps prevent the UI from being completely blank while fresh content is loading.
useDeferredValue doesn't require setting a fixed delay to defer values, as React handles the delay in a more optimized way for a smoother user experience.
Note that useDeferredValue doesn't manage network requests, as its main focus is deferring UI updates.
useLayoutEffect
The useLayoutEffect hook aims to interact with the DOM layout before the browser repaints the screen.
Unlike its counterpart, useEffect which runs asynchronously after the DOM updates, useLayouEffect runs synchronously right before the browser repaints.
The useLayoutEffect syntax is also similar to useEffect:
useLayoutEffect(setup, dependencies?);
And here is the useLayoutEffect cheatsheet:

useLayoutEffect are useful in scenarios like:
- Measuring DOM elements, for instance, reading the exact size of elements.
- Positioning elements based on the UI layout.
- Animating and transitioning elements that rely on precise layout control.
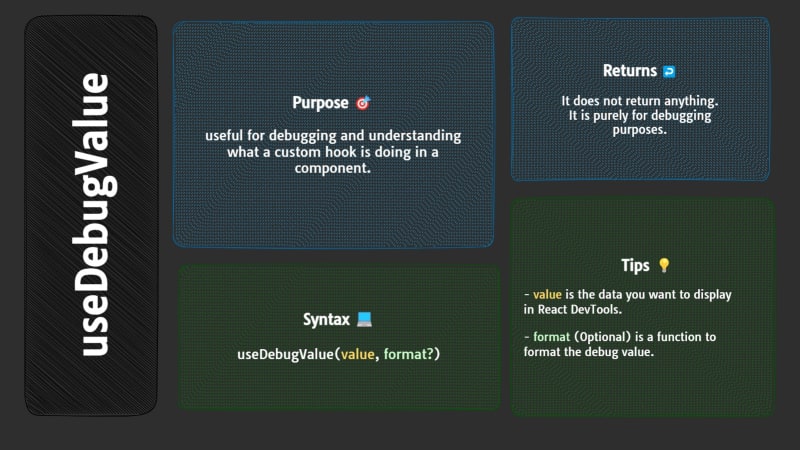
useDebugValue
This hook is mainly for debugging purposes, as it enhances the debugging experience, especially with custom hooks. Basically, it provides valuable insights into the internal state and behavior of custom hooks.
useDebugValue works together with React DevTools. Here is the syntax:
useDebugValue(value, format?);
In the useDebugValue syntax, value is the data to be displayed in React DevTools. It could be any data type, like strings or even objects. format is optional and is a formatting function for customizing how value is displayed in the DevTools.
useDebugValue is primarily used to assign labels to custom hooks to provide information about the custom hook within the DevTools.
Here is a simple cheatsheet of useDebugValue:
useId
This is the simplest of the React hooks mentioned in this guide. useId is used to generate unique identifiers, particularly for accessibility purposes.
The syntax is as follows:
const id = useId();
The useId hook takes no arguments and returns a unique string ID that persists throughout a component's lifecycle (unless unmounted and re-rendered).
The cheatsheet below captures an overview of useId:

useId can also be used to generate IDs for multiple elements that are related or styled together.
Note that it's not recommended to use
useIdto generate unique keys for list items.
Conclusion
This article focused more on providing a visual cheatsheet for each React hook mentioned, as these cheatsheets can help you quickly grasp the core functionality and syntax of each hook.


Top comments (0)