What is null_resource?
- As in the name you see a prefix
nullwhich means this resource will not exist on your Cloud Infrastructure(AWS, Google Cloud, Azure). The reason is there is no terraform state associated with it, due to you can update the
null_resourceinside your Terraform file as many times as you can.-
Terraform null_resource can be used in the following scenario -
- Run shell command.
- You can use it along with local provisioner and remote provisioner.
- It can also be used with Terraform Module, Terraform count, Terraform Data source, Local variables.
- It can even be used for output block.
resource block using a null_resource that can be used to call your script and deploy your infrastructure to complete this lab.
I am going show you how to create a null_resource that can be used to call a script health.sh to deploy your infrastructure.
This will allow you to add some functionality and flexibility to your Terraform configuration and perform useful tasks.
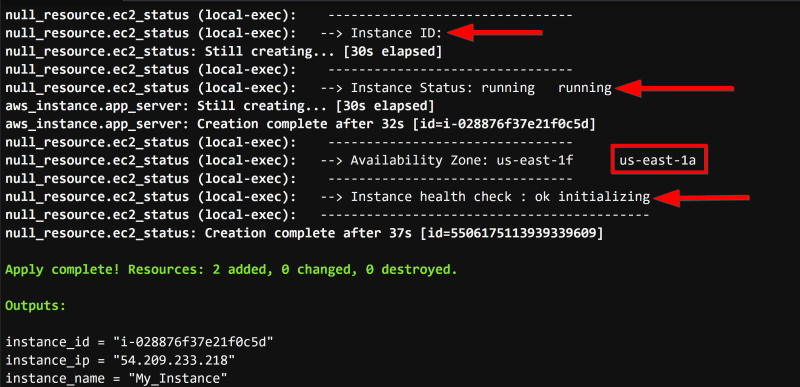
For example, we can see the status of the instance, along with the instance ID, the Availability Zone it is running in, and what state the health check is in while your instance is being deployed.
Please visit my GitHub Repository for Terraform articles on various topics being updated on constant basis.
Let’s get started!
Objectives:
1. Login to AWS Management Console
2. Create infrastructure for resources block
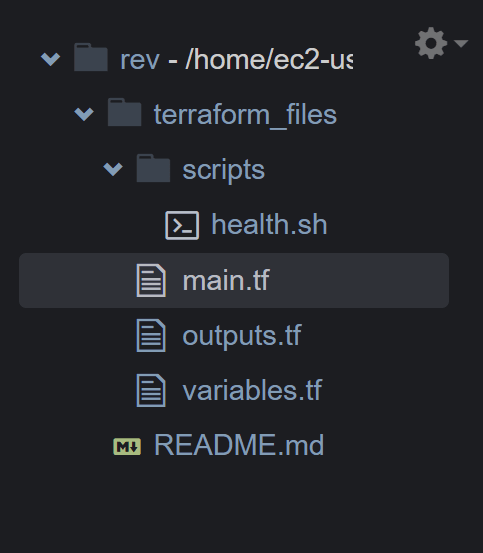
3. Under terraform_files resources directory - Create a subfolder - scripts for health.sh, and 3 files - main.tf, variables.tf, outputs.tf.
4. Configure Your null_resource
5. Initialize Terraform
6. To generate the action plans
7. Create all the resources declared in main.tf configuration file
8. Validate all resources created
Pre-requisites:
- AWS user account with admin access, not a root account.
- Cloud9 IDE with AWS CLI.
Resources Used:
Terraform documentation.
Terraform documentation for AMI.
null_resource.
Steps for implementation to this project:
1. Login to AWS Management Console
- Make sure you're in the N. Virginia (us-east-1) region
2. Create infrastructure for resources block
- Let’s create the following organizational structure as shown below.
3. Under terraform_files resources directory - Create a subfolder - scripts for health.sh, and files - main.tf, variables.tf, and outputs.tf.
-
Create a directory -
terraform-files-
Create a sub-folder -
scripts- Create a file -
health.sh
- Create a file -
-
#!/bin/bash
echo "  -------------------------------------------"
echo "  --> Fetching Instance status."
sleep 25
instance_id=$(aws ec2 describe-instances --filters "Name=tag:Name,Values=TheFastestManAlive" "Name=instance-state-name,Values=running" --query'Reservations[*].Instances[*].InstanceId' --output text)
size=${#instance_id}
echo "   -------------------------------- "
echo "  --> Instance ID: $instance_id"
sleep 2
instance_state=$(aws ec2 describe-instance-status --instance-ids $instance_id --query 'InstanceStatuses[*].InstanceState.Name' --output text)
size=${#instance_state}
echo "   -------------------------------- "
echo "  --> Instance Status: $instance_state"
sleep 2
instance_zone=$(aws ec2 describe-instance-status --instance-ids $instance_id --query 'InstanceStatuses[*].AvailabilityZone' --output text)
size=${#instance_zone}
echo "   -------------------------------- "
echo "  --> Availability Zone: $instance_zone"
sleep 2
fetch_instance_health=$(aws ec2 describe-instance-status --instance-ids $instance_id --query 'InstanceStatuses[*].InstanceStatus.Status' --output text)
echo "   -------------------------------- "
echo "  --> Instance health check : $fetch_instance_health"
echo "  -------------------------------------------"
- add executable permissions
chmod 755 health.sh
Create 3 files -
main.tf,variables.tf, andoutputs.tf.-
main.tf
-
terraform {

  required_providers {
    aws = {
      source  = "hashicorp/aws"
      version = "~> 4.23"
    }
  }

  required_version = ">= 0.14.9"
}

provider "aws" {
  profile = "default"
  region  = var.region
}

data "aws_ami" "linux" {
   most_recent = true
   owners      = ["amazon"]

  filter {
    name   = "name"
    values = ["amzn2-ami-hvm-*-x86_64-gp2"]
  }

  filter {
    name   = "virtualization-type"
    values = ["hvm"]
  }
}

resource "aws_instance" "app_server" {
  ami           = data.aws_ami.linux.id
  instance_type = var.instance_type
  availability_zone = var.az_1a

  tags = {
    Name = "My_Instance"
  }
}
- 2.
variables.tf
variable "region" {
  description = "region"
  type        = string
  default     = "us-east-1"
}

variable "az_1a" {
  description = "availability zone 1"
  type        = string
  default     = "us-east-1a"
}

variable "instance_type" {
  description = "Value of the Name tag for the EC2 instance type"
  type        = string
  default     = "t2.micro"
}
- 3.
outputs.tf
output "instance_id" {
  description = "ID of the EC2 instance"
  value       = aws_instance.app_server.id
}

output "instance_ip" {
  description = "Public IP address of the EC2 instance"
  value       = aws_instance.app_server.public_ip
}

output "instance_name" {
  description = "Name of the EC2 instance"
  value       = aws_instance.app_server.tags.Name
}
4. Configure Your null_resource
Open main.tf again in an editor:
Add the following resource block to the end of the file:
resource "null_resource" "ec2_status" {
  provisioner "local-exec" {
    command = "./scripts/health.sh"
  }
}
- main.tf after you have added the resource
null_resourceblock
terraform {

  required_providers {
    aws = {
      source  = "hashicorp/aws"
      version = "~> 4.23"
    }
  }

  required_version = ">= 0.14.9"
}

provider "aws" {
  profile = "default"
  region  = var.region
}

data "aws_ami" "linux" {
   most_recent = true
   owners      = ["amazon"]

  filter {
    name   = "name"
    values = ["amzn2-ami-hvm-*-x86_64-gp2"]
  }

  filter {
    name   = "virtualization-type"
    values = ["hvm"]
  }
}

resource "aws_instance" "app_server" {
  ami           = data.aws_ami.linux.id
  instance_type = var.instance_type
  availability_zone = var.az_1a

  tags = {
    Name = "My_Instance"
  }
}

resource "null_resource" "ec2_status" {
  provisioner "local-exec" {
    command = "./scripts/health.sh"
  }
}
- When you apply your Terraform configuration, this null_resource should launch your health.sh script.
5. Initialize Terraform
cd terraform-files
-
terraform status
terraform version
Since the Terraform version is returned, you have validated that the Terraform binary is installed and functioning properly.
Note:
If you receive a notification that there is a newer version of Terraform available, you can ignore it — it will run safely with the version installed on the VM.
-
terraform fmt
to format all of your resources
terraform fmt
-
terraform initwill check for all the plugin dependencies and download them if required, this will be used for creating a deployment plan.
terraform init
- Validate your Terraform syntax
terraform validate
6. To generate the action plans
terraform plan
7. Create all the resources declared in main.tf configuration file
Note:
The --auto-approve flag will prevent Terraform from prompting you to enter yes explicitly before it deploys the code.
terraform apply --auto-approve
- 1.
- 2.
- 3.
- 4.
terraform state list
8. Validate all resources created
- 1. instance_name, instance_id, and instance_ip
- 2. availability zone
Cleanup
- terraform destroy
What we have done so far
We have successfully created a null_resource that can be used to call a script health.sh to deploy all the resources in your infrastructure along with its status.


Top comments (2)
good article
thank you