What you will be building, see demo and git repo here…
Introduction
I’m super excited to release this web3.0 build to you, I know you’ve been looking for a great example to get you started in developing decentralized applications.
If you are new here, I’m Darlington Gospel, a Dapp Mentor helping transition developers like you from Web 2.0 to Web 3.0. Book your private classes with me.
In this tutorial, you will learn step-by-step how to implement a decentralized autonomous organization (DAO) with anonymous chat features.
If you are pumped for this build, let’s jump into the tutorial…
Check out my YouTube channel for FREE web3 tutorials now.
Prerequisite
You will need the following tools installed to successfully crush this build:
- Node
- Ganache-Cli
- Truffle
- React
- Infuria
- Tailwind CSS
- CometChat SDK
- Metamask
- Yarn
Installing Dependencies
NodeJs Installation
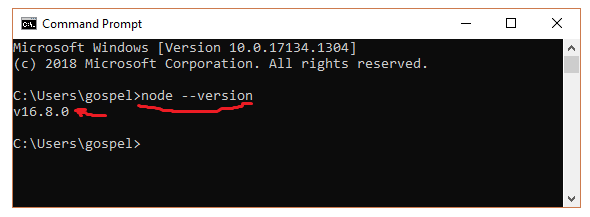
Make sure you have NodeJs installed on your machine already, and if you haven’t, install it from HERE. Next, run the code on the terminal to confirm it is installed.
Yarn, Ganache-cli and Truffle Installation
Run the following codes on your terminal to install these essential packages globally.
npm i -g yarn
npm i -g truffle
npm i -g ganache-cli
Cloning Web3 Starter Project
Using the commands below, clone the web 3.0 starter project below. This will ensure that we’re all on the same page and are using the same packages.
git clone https://github.com/Daltonic/dominionDAO
Fantastic, let us replace the package.json file with the one below:
Great, replace your package.json file with the above code and then run yarn install on your terminal.
With that all installed, let’s start with writing the Dominion DAO smart contract.
Configuring CometChat SDK
To configure the CometChat SDK, follow the steps below, at the end, you need to store these keys as an environment variable.
STEP 1:
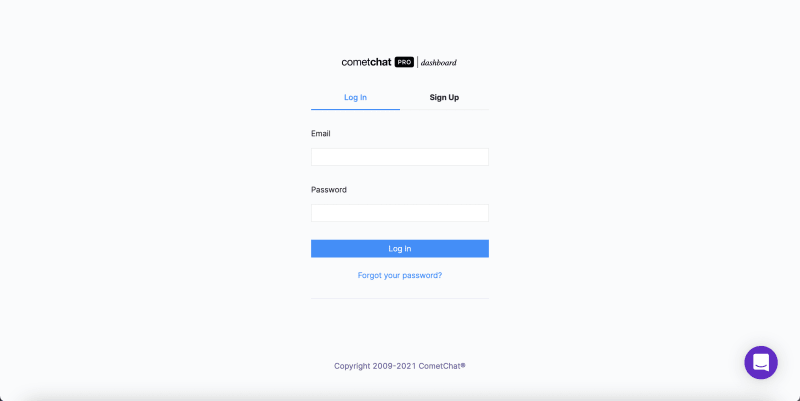
Head to CometChat Dashboard and create an account.
STEP 2:
Log in to the CometChat dashboard, only after registering.
STEP 3:
From the dashboard, add a new app called dominionDAO.
STEP 4:
Select the app you just created from the list.
STEP 5:
From the Quick Start copy the APP_ID, REGION, and AUTH_KEY, to your .env file. See the image and code snippet.
Replace the REACT_COMET_CHAT placeholders keys with their appropriate values.
REACT_APP_COMET_CHAT_REGION=**
REACT_APP_COMET_CHAT_APP_ID=**************
REACT_APP_COMET_CHAT_AUTH_KEY=******************************
Configuring Infuria App
STEP 1:
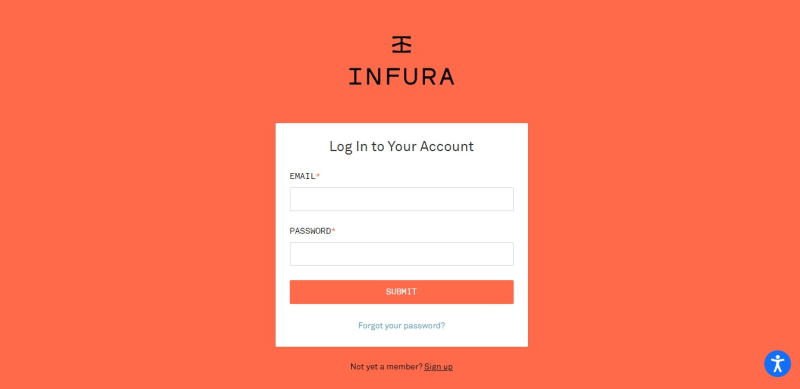
Head to Infuria, create an account.
STEP 2:
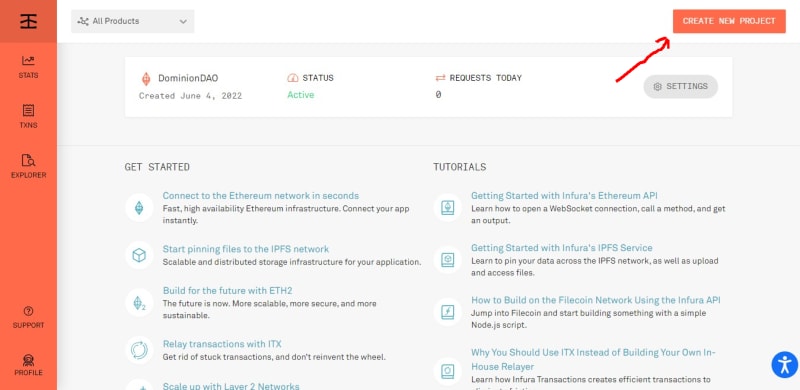
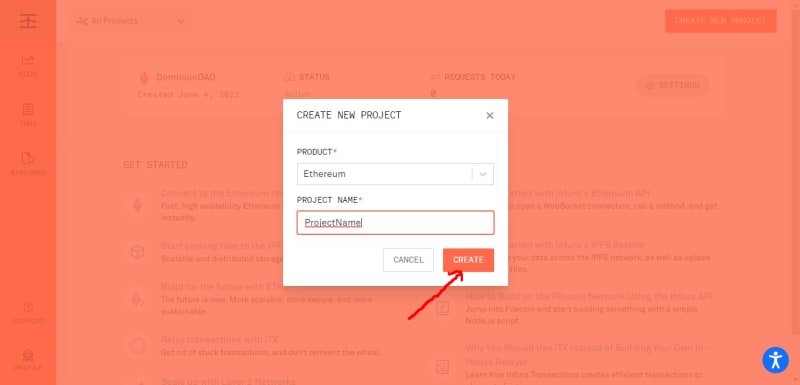
From the dashboard create a new project.
STEP 3:
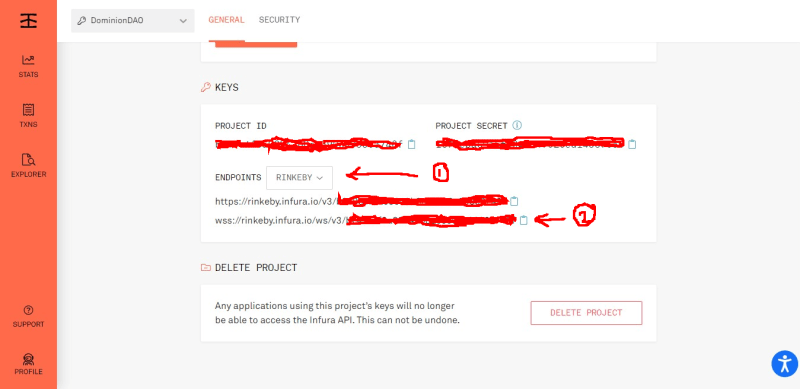
Copy the Rinkeby test network WebSocket endpoint URL to your .env file.
Next, add your Metamask secret phrase and your preferred account private key. If you have done those correctly, your environment variables should now look like this.
ENDPOINT_URL=***************************
DEPLOYER_KEY=**********************

REACT_APP_COMET_CHAT_REGION=**
REACT_APP_COMET_CHAT_APP_ID=**************
REACT_APP_COMET_CHAT_AUTH_KEY=******************************
If you don’t know how to access your private key, see the section below.
Accessing Your Metamask Private Key
STEP 1:
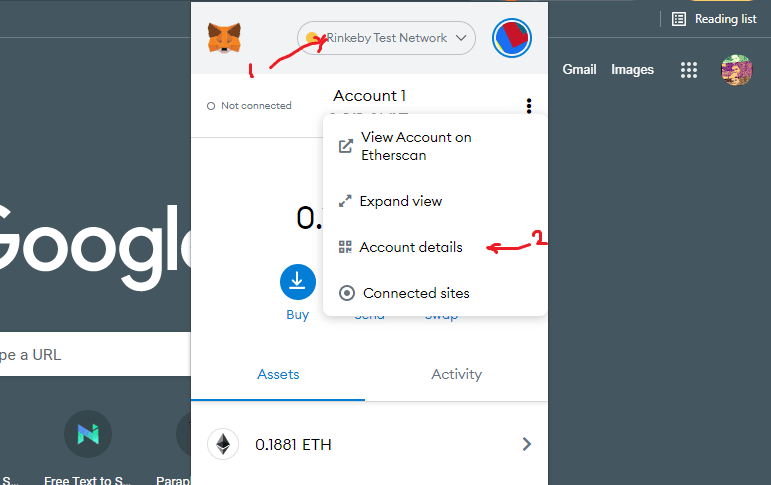
Click on your Metamask browser extension, and make sure Rinkeby is selected as the test network. Next, on the preferred account, click on the vertical dotted line and select account details. See the image below.
STEP 2:
Enter your password on the field provided and click the confirm button, this will enable you to access your account private key.
STEP 3:
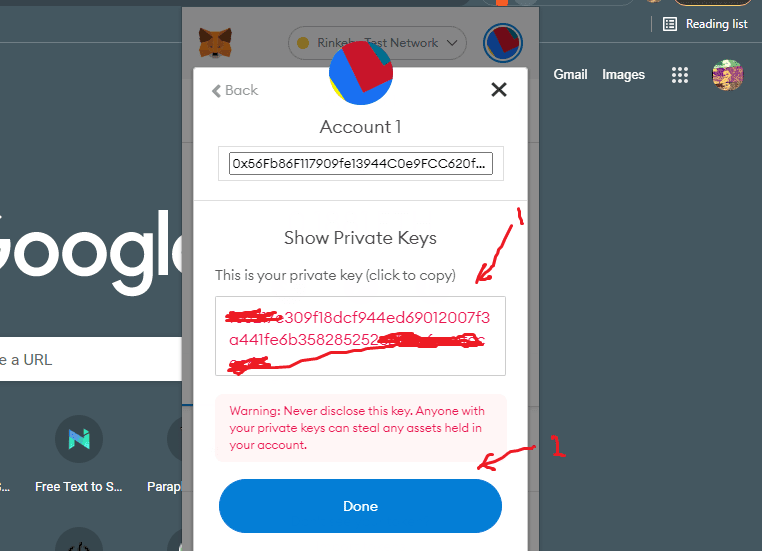
Click on "export private key" to see your private key. Make sure you never expose your keys on a public page such as Github. That is why we are appending it as an environment variable.
STEP 4:
Copy your private key to your .env file. See the image and code snippet below:
ENDPOINT_URL=***************************
SECRET_KEY=******************
DEPLOYER_KEY=**********************

REACT_APP_COMET_CHAT_REGION=**
REACT_APP_COMET_CHAT_APP_ID=**************
REACT_APP_COMET_CHAT_AUTH_KEY=******************************
As for your SECRET_KEY, you are required to paste your Metamask secret phrase in the space provided in the environment file.
The Dominion DAO Smart Contract
Here is the full code for the smart contract, I will explain all the functions and variables one after the other.
In the project you just cloned, head to src >> contract directory and create a file named DominionDAO.sol, then paste the above codes inside of it.
Explanation:
// SPDX-License-Identifier: MIT
pragma solidity ^0.8.7;
Solidity requires a license identifier to compile your code, else it will produce a warning asking you to specify one. Also, Solidity requires that you specify the version of the compiler for your smart contract. That is what the word pragma represents.
import "@openzeppelin/contracts/access/AccessControl.sol";
import "@openzeppelin/contracts/security/ReentrancyGuard.sol";
In the above code block, we are utilizing two openzeppelin's smart contracts for specifying roles and guarding our smart contract against reentrancy attacks.
bytes32 private immutable CONTRIBUTOR_ROLE = keccak256("CONTRIBUTOR");
bytes32 private immutable STAKEHOLDER_ROLE = keccak256("STAKEHOLDER");
uint32 immutable MIN_VOTE_DURATION = 1 weeks;
uint256 totalProposals;
uint256 public daoBalance;
We set up some state variables for stakeholder and contributor roles and specified the minimum vote duration to be one week. And we also initialized the total proposal counter and a variable to keep a record of our available balance.
mapping(uint256 => ProposalStruct) private raisedProposals;
mapping(address => uint256[]) private stakeholderVotes;
mapping(uint256 => VotedStruct[]) private votedOn;
mapping(address => uint256) private contributors;
mapping(address => uint256) private stakeholders;
raisedProposals keep track of all proposals submitted to our smart contract. stakeholderVotes as its name imply keep track of votes made by stakeholders. votedOn keeps track of all the votes associated with a proposal. While contributors keep track of anyone who donated to our platform, stakeholders on the other hand keep track of people that have contributed up to 1 ether.
struct ProposalStruct {
    uint256 id;
    uint256 amount;
    uint256 duration;
    uint256 upvotes;
    uint256 downvotes;
    string title;
    string description;
    bool passed;
    bool paid;
    address payable beneficiary;
    address proposer;
    address executor;
}

struct VotedStruct {
    address voter;
    uint256 timestamp;
    bool choosen;
}
proposalStruct describes the content of each proposal whereas votedStruct describes the content of each vote.
event Action(
    address indexed initiator,
    bytes32 role,
    string message,
    address indexed beneficiary,
    uint256 amount
);
This is a dynamic event called Action. This will help us enrich the information logged out per transaction.
modifier stakeholderOnly(string memory message) {
    require(hasRole(STAKEHOLDER_ROLE, msg.sender), message);
    _;
}

modifier contributorOnly(string memory message) {
    require(hasRole(CONTRIBUTOR_ROLE, msg.sender), message);
    _;
}
The above modifiers help us identify users by role and also prevent them from accessing some unauthorized resources.
function createProposal(
    string calldata title,
    string calldata description,
    address beneficiary,
    uint256 amount
)external
 stakeholderOnly("Proposal Creation Allowed for Stakeholders only")
{
    uint256 proposalId = totalProposals++;
    ProposalStruct storage proposal = raisedProposals[proposalId];

    proposal.id = proposalId;
    proposal.proposer = payable(msg.sender);
    proposal.title = title;
    proposal.description = description;
    proposal.beneficiary = payable(beneficiary);
    proposal.amount = amount;
    proposal.duration = block.timestamp + MIN_VOTE_DURATION;

    emit Action(
        msg.sender,
        CONTRIBUTOR_ROLE,
        "PROPOSAL RAISED",
        beneficiary,
        amount
    );
}
The above function takes a proposal's title, description, amount, and the beneficiary’s wallet address and creates a proposal. The function only permits stakeholders to create proposals. Stakeholders are users who have made at least a contribution of 1 ether.
function performVote(uint256 proposalId, bool choosen)
    external
    stakeholderOnly("Unauthorized: Stakeholders only")
{
    ProposalStruct storage proposal = raisedProposals[proposalId];

    handleVoting(proposal);

    if (choosen) proposal.upvotes++;
    else proposal.downvotes++;

    stakeholderVotes[msg.sender].push(proposal.id);

    votedOn[proposal.id].push(
        VotedStruct(
            msg.sender,
            block.timestamp,
            choosen
        )
    );

    emit Action(
        msg.sender,
        STAKEHOLDER_ROLE,
        "PROPOSAL VOTE",
        proposal.beneficiary,
        proposal.amount
    );
}
This function accepts two arguments, a proposal Id, and a preferred choice represented by a Boolean value. True means you accepted the vote and False represents a rejection.
function handleVoting(ProposalStruct storage proposal) private {
    if (
        proposal.passed ||
        proposal.duration <= block.timestamp
    ) {
        proposal.passed = true;
        revert("Proposal duration expired");
    }

    uint256[] memory tempVotes = stakeholderVotes[msg.sender];
    for (uint256 votes = 0; votes < tempVotes.length; votes++) {
        if (proposal.id == tempVotes[votes])
            revert("Double voting not allowed");
    }
}
This function performs the actual voting including checking if a user is a stakeholder and qualified to vote.
function payBeneficiary(uint256 proposalId)
    external
    stakeholderOnly("Unauthorized: Stakeholders only")
    returns (bool)
{
    ProposalStruct storage proposal = raisedProposals[proposalId];
    require(daoBalance >= proposal.amount, "Insufficient fund");
    require(block.timestamp > proposal.duration, "Proposal still ongoing");

    if (proposal.paid) revert("Payment sent before");

    if (proposal.upvotes <= proposal.downvotes)
        revert("Insufficient votes");

    payTo(proposal.beneficiary, proposal.amount);

    proposal.paid = true;
    proposal.executor = msg.sender;
    daoBalance -= proposal.amount;

    emit Action(
        msg.sender,
        STAKEHOLDER_ROLE,
        "PAYMENT TRANSFERED",
        proposal.beneficiary,
        proposal.amount
    );

    return true;
}
This function is responsible for paying the beneficiary attached to a proposal based on certain criteria.
- One, the beneficiary must not already be paid.
- Two, the proposal duration must have expired.
- Three, the available balance must be able to pay the beneficiary.
- Four, there must be no tie in the number of votes.
   function contribute() payable external {
        if (!hasRole(STAKEHOLDER_ROLE, msg.sender)) {
            uint256 totalContribution =
                contributors[msg.sender] + msg.value;

            if (totalContribution >= 5 ether) {
                stakeholders[msg.sender] = totalContribution;
                contributors[msg.sender] += msg.value;
                _setupRole(STAKEHOLDER_ROLE, msg.sender);
                _setupRole(CONTRIBUTOR_ROLE, msg.sender);
            } else {
                contributors[msg.sender] += msg.value;
                _setupRole(CONTRIBUTOR_ROLE, msg.sender);
            }
        } else {
            contributors[msg.sender] += msg.value;
            stakeholders[msg.sender] += msg.value;
        }

        daoBalance += msg.value;

        emit Action(
            msg.sender,
            STAKEHOLDER_ROLE,
            "CONTRIBUTION RECEIVED",
            address(this),
            msg.value
        );
    }
This function is responsible for collecting contributions from donors and those interested in becoming stakeholders.
function getProposals()
    external
    view
    returns (ProposalStruct[] memory props)
{
    props = new ProposalStruct[](totalProposals);

    for (uint256 i = 0; i < totalProposals; i++) {
        props[i] = raisedProposals[i];
    }
}
This function retrieves an array of proposals recorded on this smart contract.
function getProposal(uint256 proposalId)
    external
    view
    returns (ProposalStruct memory)
{
    return raisedProposals[proposalId];
}
This function retrieves a particular proposal by Id.
function getVotesOf(uint256 proposalId)
    external
    view
    returns (VotedStruct[] memory)
{
    return votedOn[proposalId];
}
This returns a list of votes associated with a particular proposal.
function getStakeholderVotes()
    external
    view
    stakeholderOnly("Unauthorized: not a stakeholder")
    returns (uint256[] memory)
{
    return stakeholderVotes[msg.sender];
}
This returns the list of stakeholders on the smart contract and only a stakeholder can call this function.
function getStakeholderBalance()
    external
    view
    stakeholderOnly("Unauthorized: not a stakeholder")
    returns (uint256)
{
    return stakeholders[msg.sender];
}
This returns the amount of money contributed by stakeholders.
function isStakeholder() external view returns (bool) {
    return stakeholders[msg.sender] > 0;
}
Returns True or False if a user is a stakeholder.
function getContributorBalance()
    external
    view
    contributorOnly("Denied: User is not a contributor")
    returns (uint256)
{
    return contributors[msg.sender];
}
This returns the balance of a contributor and is only accessible to the contributor.
function isContributor() external view returns (bool) {
    return contributors[msg.sender] > 0;
}
This checks if a user is a contributor or not and it is represented with True or False.
function getBalance() external view returns (uint256) {
    return contributors[msg.sender];
}
Returns the balance of the calling user regardless of his role.
function payTo(
    address to,
    uint256 amount
) internal returns (bool) {
    (bool success,) = payable(to).call{value: amount}("");
    require(success, "Payment failed");
    return true;
}
This function performs a payment with both a specified amount and account.
Configuring the Deployment Script
One more thing to do with for the smart contract is to configure the deployment script.
On the project head to the migrations folder >> 2_deploy_contracts.js and update it with the code snippet below.
const DominionDAO = artifacts.require('DominionDAO')
  module.exports = async function (deployer) {
  await deployer.deploy(DominionDAO)
}
Fantastic, we just finished up with the smart contract for our application, it's time to start building the Dapp interface.
Developing the Frontend
The front end comprises many components and parts. We will be creating all the components, views, and the rest of the peripherals.
Header Component
This component captures information about the current user and carries a theme toggling button for light and dark modes. And if you wondered how I did that, it was through Tailwind CSS, see the code below.
Banner Component
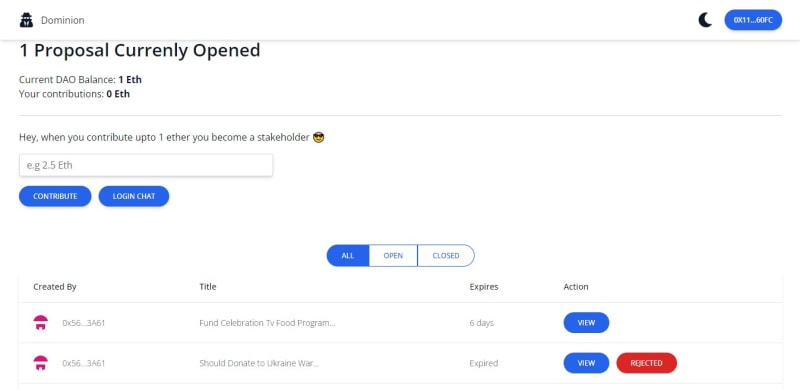
This component contains information about the DAO's current state, such as the total balance and the number of open proposals.
This component also includes the ability to use the contribute function to generate a new proposal. Look at the code below.
Proposals Component
This component contains a list of proposals in our smart contract. Also, enables you to filter between closed and open proposals. At the expiry of a proposal, a payout button becomes available which gives a stakeholder the option of paying out the amount associated with the proposal. See the code below.
The Proposal Details Component
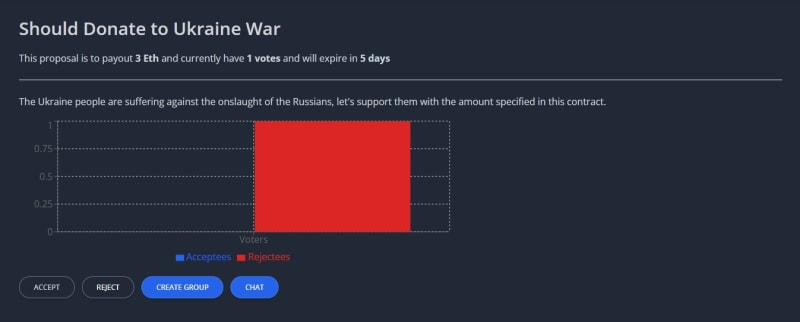
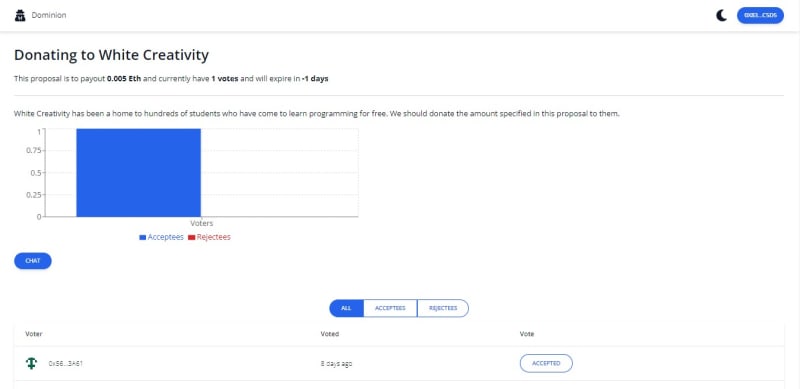
This component displays information about the current proposal, including the cost. This component allows stakeholders to accept or reject a proposal.
The proposer can form a group, and other platform users can engage in web3.0-style anonymous chat.
This component also includes a bar chat that allows you to see the ratio of acceptees to rejectees. Look at the code below.
Voters Component
This component simply lists out the stakeholders that have voted on a proposal. The component also affords a user the chance to filter between rejectees and acceptees. See the code below.
Messages Component
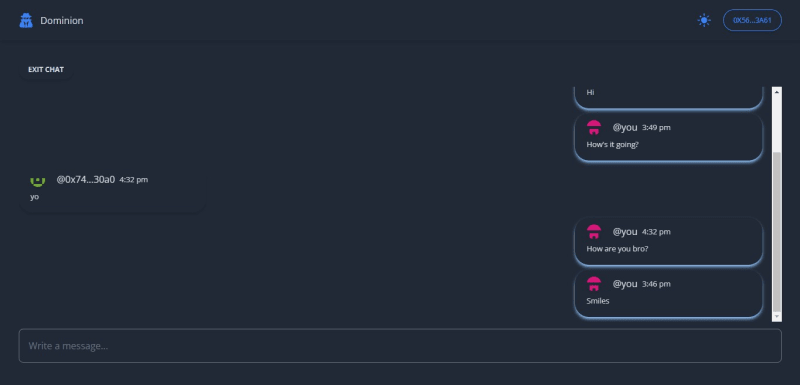
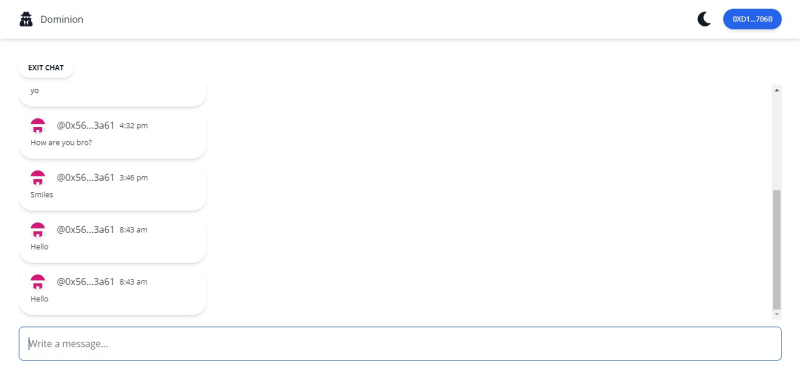
With the power of CometChat SDK combined with this component, users can engage in a one-to-many chat anonymously. Contributors and stakeholders can discuss a proposal further in their decision-making process here. All users maintain their anonymity and are represented by their Identicons.
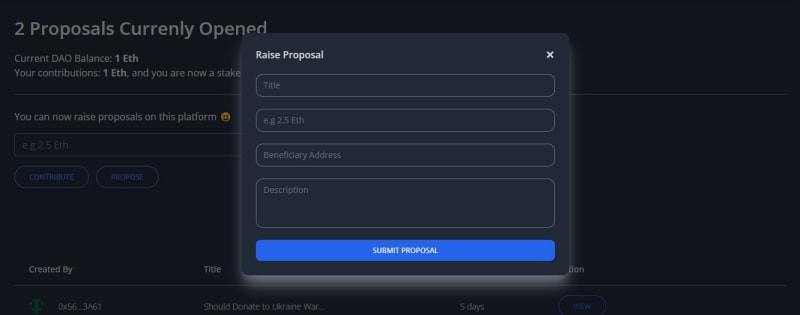
Create Proposal Component
This component simply lets you raise a proposal by supplying information on the fields seen in the image above. See the code below.
Authentication Component
This component helps you participate in the chat features. You need to create an account or login in if you’ve already signed up. By logging in, you can be able to participate in a group chat and have some anonymous talk with other participants in a proposal in a web3.0 style. See the code below.
Fantastic, let’s make sure the views are well represented…
The Home View
This view includes the header, banner, and proposals components for providing an exceptional DAO user experience. We also used the power of Tailwind CSS to achieve this look. Look at the code below.
import Banner from '../components/Banner'
import ChatLogin from '../components/ChatLogin'
import CreateProposal from '../components/CreateProposal'
import Header from '../components/Header'
import Proposals from '../components/Proposals'
const Home = () => {
  return (
    <>
      <Header />
      <Banner />
      <Proposals />
      <CreateProposal />
      <ChatLogin />
    </>
  )
}
export default Home
The Proposal View
This view couples together the header, proposal details, and voters component for rendering a smooth presentation of a singular component. See the code below.
import Header from '../components/Header'
import ProposalDetails from '../components/ProposalDetails'
import Voters from '../components/Voters'
const Proposal = () => {
  return (
    <>
      <Header />
      <ProposalDetails />
      <Voters />
    </>
  )
}
export default Proposal
The Chat View
Lastly, the chat view incorporates the header and messages component for rendering a quality chat interface. See the code below.
import { useParams, useNavigate } from 'react-router-dom'
import { useEffect, useState } from 'react'
import { getGroup } from '../CometChat'
import { toast } from 'react-toastify'
import Header from '../components/Header'
import Messages from '../components/Messages'
const Chat = () => {
  const { gid } = useParams()
  const navigator = useNavigate()
  const [group, setGroup] = useState(null)
  useEffect(() => {
    getGroup(gid).then((group) => {
      if (!!!group.code) {
        setGroup(group)
      } else {
        toast.warning('Please join the group first!')
        navigator(`/proposal/${gid.substr(4)}`)
      }
    })
  }, [gid])
  return (
    <>
      <Header />
      <Messages gid={gid} />
    </>
  )
}
export default Chat
Amazing, don’t forget to update the App.jsx file too.
The App Component
Replace the App component with the code below.
import { useEffect, useState } from 'react'
import { Routes, Route } from 'react-router-dom'
import { loadWeb3 } from './Dominion'
import { ToastContainer } from 'react-toastify'
import { isUserLoggedIn } from './CometChat'
import Home from './views/Home'
import Proposal from './views/Proposal'
import Chat from './views/Chat'
import 'react-toastify/dist/ReactToastify.min.css'

const App = () => {
  const [loaded, setLoaded] = useState(false)

  useEffect(() => {
    loadWeb3().then((res) => {
      if (res) setLoaded(true)
    })
    isUserLoggedIn()
  }, [])

  return (
    <div className="min-h-screen bg-white text-gray-900 dark:bg-[#212936] dark:text-gray-300">

      {loaded ? (
        <Routes>
          <Route path="/" element={<Home />} />
          <Route path="proposal/:id" element={<Proposal />} />
          <Route path="chat/:gid" element={<Chat />} />
        </Routes>
      ) : null}

      <ToastContainer
        position="top-center"
        autoClose={5000}
        hideProgressBar={false}
        newestOnTop={false}
        closeOnClick
        rtl={false}
        pauseOnFocusLoss
        draggable
        pauseOnHover
      />
    </div>
  )
}
export default App
On the src >> directory paste the following codes in there respective files.
Index.jsx File
import React from 'react'
import ReactDOM from 'react-dom'
import { BrowserRouter } from 'react-router-dom'
import './index.css'
import App from './App'
import { initCometChat } from './CometChat'
initCometChat().then(() => {
  ReactDOM.render(
    <BrowserRouter>
      <App />
    </BrowserRouter>,
    document.getElementById('root')
  )
})
Index.css File
@import url('https://fonts.googleapis.com/css2?family=Open+Sans:wght@300;400;500;600;700&display=swap');
* html {
  padding: 0;
  margin: 0;
  box-sizing: border-box;
}
body {
  margin: 0;
  font-family: 'Open Sans', sans-serif;
  -webkit-font-smoothing: antialiased;
  -moz-osx-font-smoothing: grayscale;
}
@tailwind base;
@tailwind components;
@tailwind utilities;
CometChat.jsx
Starting Up the Development Environment
STEP 1:
Spin up some test account with ganache-cli using the command below:
ganache-cli -a
This will create some test accounts with 100 fake ethers loaded into each account, of course, these are for testing purposes only. See the image below:
STEP 2:
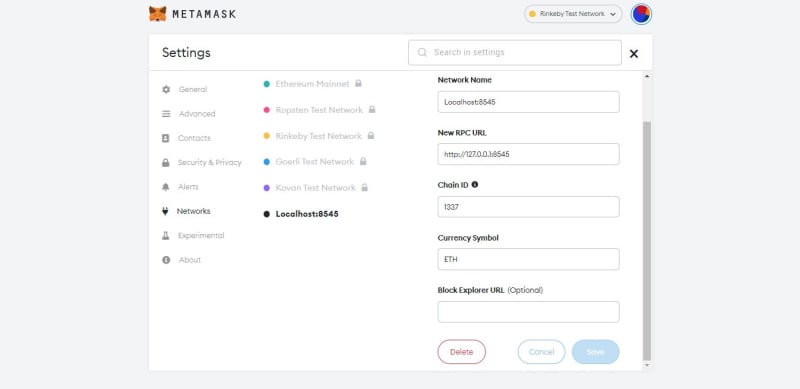
Add a local test network with Metamask as seen in the image below.
STEP 3:
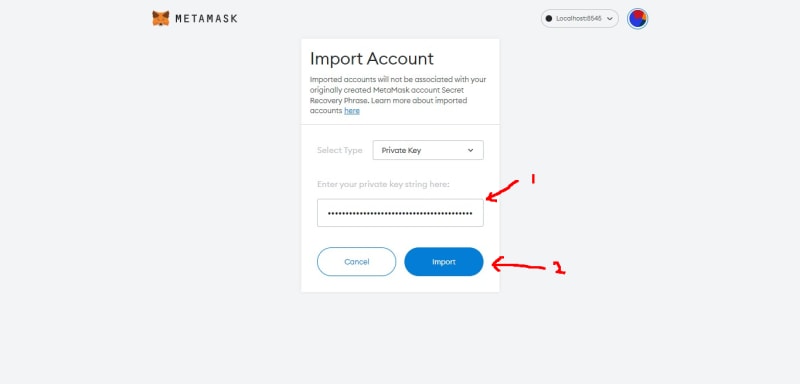
Click on the account icon and select import account.
Copy about five of the private keys and add them one after the other to your local test network. See the image below.
Observe the new account added to your local test network with 100 ETH preloaded. Make sure you add about five accounts so you can do a maximum test. See the image below.
Smart Contract Deployment
Now open a new terminal and run the command below.
truffle migrate
# or
truffle migrate --network rinkeby
The above command will deploy your smart contract to your local or the Infuria rinkeby test network.
Next, open up another terminal and spin up the react app with yarn start.
Watch my FREE web3 tutorials on Youtube now.
Conclusion
Hurray, we’ve just completed an amazing tutorial for developing a decentralized autonomous organization.
If you enjoyed this tutorial and would like to have me as your private mentor, kindly book your classes with me.
Till next time, all the best.
About the Author
Gospel Darlington is a full-stack blockchain developer with 6+ years of experience in the software development industry.
By combining Software Development, writing, and teaching, he demonstrates how to build decentralized applications on EVM-compatible blockchain networks.
His stacks include JavaScript, React, Vue, Angular, Node, React Native, NextJs, Solidity, and more.
For more information about him, kindly visit and follow his page on Twitter, Github, LinkedIn, or on his website.
















Top comments (6)
bro nice project man really cool I just hove question actually two is there anyway I can make it that wen a user buys an nft he or she has the choice to either list the nft or keep it and is there anyway I can get percentage fee from sales like for example let's say you sell your nft just like as opensea takes %2.5 percentage is there anyway I can also do that.. thanks for your help in advance I will really like if e help me ❤️
Yes, that is totally implementable. ☺
how do i go about it i dm you on twitter check
I do have a private class and a consultancy service in the link below.
You can lear or ask me any questions there when you book a time with me.
Thanks
buymeacoffee.com/web3classes
That's awesome 😎 bro nice when I have the money I will really love 😘 to buy it but another thing you can also create a YouTube channel were you make videos like this you will go viral easily because you are very talented. Another thing bro I live in port Harcourt as you ❤️❤️
Thanks man, my YouTube videos are coming soon.