Cover image from flickr, Pexels
เนื้อหาทั้งหมดเอามาจาก video ของ Okta Youtube channel และ productioncoder channel
ตั้งใจเขียน Blog นี้เพราะว่าลืม flow ของ OAuth ทุกทีว่ามันทำงานยังไง สุดท้ายต้องมานั่งดู clip ย้อนหลังใหม่เรื่อยๆ รู้สึกว่าไม่ค่อยมี time efficiency เท่าไหร่เพราะ clip ก็นานเป็นชั่วโมงอยู่เลยมาเขียน Blog ซะเลย
blog นี้พยายามจะเขียนครอบคลุมแค่เรื่อง Flow หลักๆ กับ PKCE เท่านั้นอาจจะไม่ได้ลงรายละเอียดมากเท่าไหร่
Terms
- Resource Owner: เจ้าของ Resources ที่ app เราต้องการจะ access เช่น Google, Facebook, Twitter etc
- Client: app ของเรา
- Scope: ข้อมูลที่เราอยากได้จาก Resource Owner
Flow ของ OAuth2 ในภาพใหญ่จริงๆ มีแค่ 7 ขั้นตอน
(1) Pre-register กับ Resource Owner
เราจำเป็นต้องทำการ pre register กับ Resource Owner ก่อนที่จะทำการ implement authorization ให้ลองนึกถึงการที่เราต้องไปสร้าง apps บน Facebook, Twitter, Google ก่อนเริ่ม ใน step นี้ Resource Owner อาจจะทำการสร้างsecret keyมาให้เราใช้งาน เราจำเป็นต้องเก็บไว้กับตัวเองที่ Backend server ของเรา-
(2) ส่ง request ไปที่ Authorization Server ของ Resource Owner (Front channel)
หลังจากที่เราทำการ implement ปุ่ม authorization แล้ว (Login with Facebook, Login with Google, Login with Twitter) เราจะทำการส่ง Request ไปที่ authorization Server ของ Resource Owner เพื่อทำการ authorize โดยขั้นตอนนี้เราจะทำการส่ง Scope ไปด้วยพร้อมกับ callback URI
Redirect URI; myapp.com/callback
Scope: profile, contacts
Resource Owner จะขึ้นหน้าเว็บให้เราทำการ signin
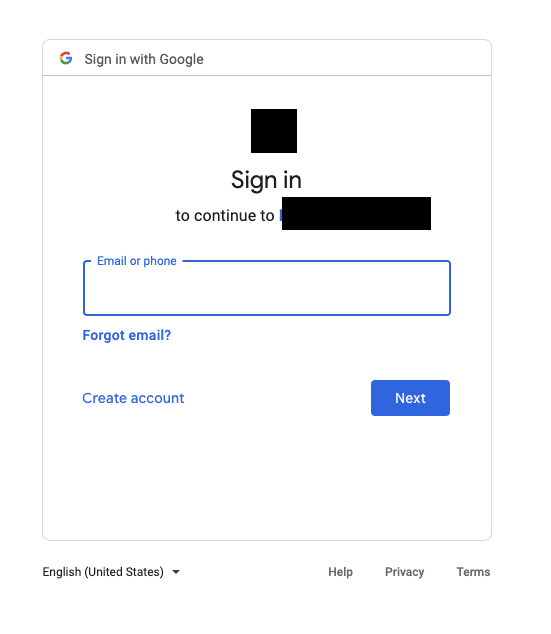
- **(3) Resource Owner ทำการ redirect เพื่อขอ permission เราเพื่อให้ข้อมูลกับ client app** (Front channel)
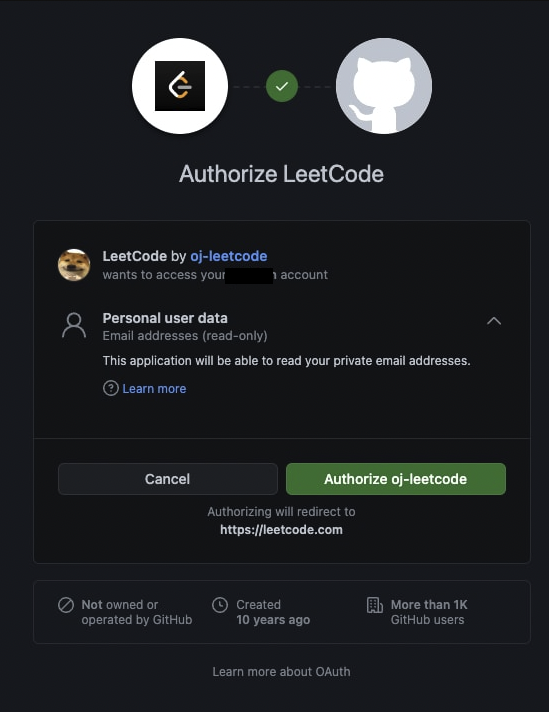
- **(4) Resource Owner redirect กลับมาที่ Callback URI** (Front channel)
เมื่อ user ทำการกดอนุญาตแล้ว Resource Owner จะทำการ redirect กลับมาที่ callback URI ที่ให้ไว้ที่ step แรก พร้อมกับ return **authorization code** กลับมาด้วย
- **(5) Exchange authorization code กับ accesstoken** (Back channel)
เราจะทำการแลกเปลียน authorization code ที่ได้มาจาก step ที่ 4 กับ accessToken โดยทำการส่ง `authorization code` + `secret key` ที่เราได้ตอน step ที่ 1 ไปที่ Authorization Server ของ Resource Owner
- **(6) Authorization Server ของ Resource Owner คืน accessToken** (Back channel)
- **(7) Client app นำ `accessToken` (Back channel) ไปใช้เพื่อเข้าถึง resource** ตามที่ได้ระบุไว้ใน scope ที่ step แรก
## Back and Front Channels
ใน step ที่ 5 เราจะไม่ได้ `accessToken` returned มากลับตรงๆ แต่จะได้เป็น authorization code มาแทน สาเหตุหลักๆมาจากเรื่อง security ถ้าเกิดว่ามี malicious software ที่ทำหน้าที่ดักข้อมูลที่เรารับส่งที่ step นี้จะให้เกิดปัญหาได้ เราเลยจำเป็นต้องให้ Server ของเราเป็นคนส่ง request (Back Channel) และแนบ secret key ไปด้วยเพื่อขอ AccessToken แต่ในบางกรณีเราอาจจะไม่มี backend server เช่น app เราเป็น Static page web site นั่นทำให้เราจำเป็นที่จะต้องได้ AccessToken มาที่ step นี้ Flow นี้จะเรียกว่า **Implicit Flow**
## Implicit Flow
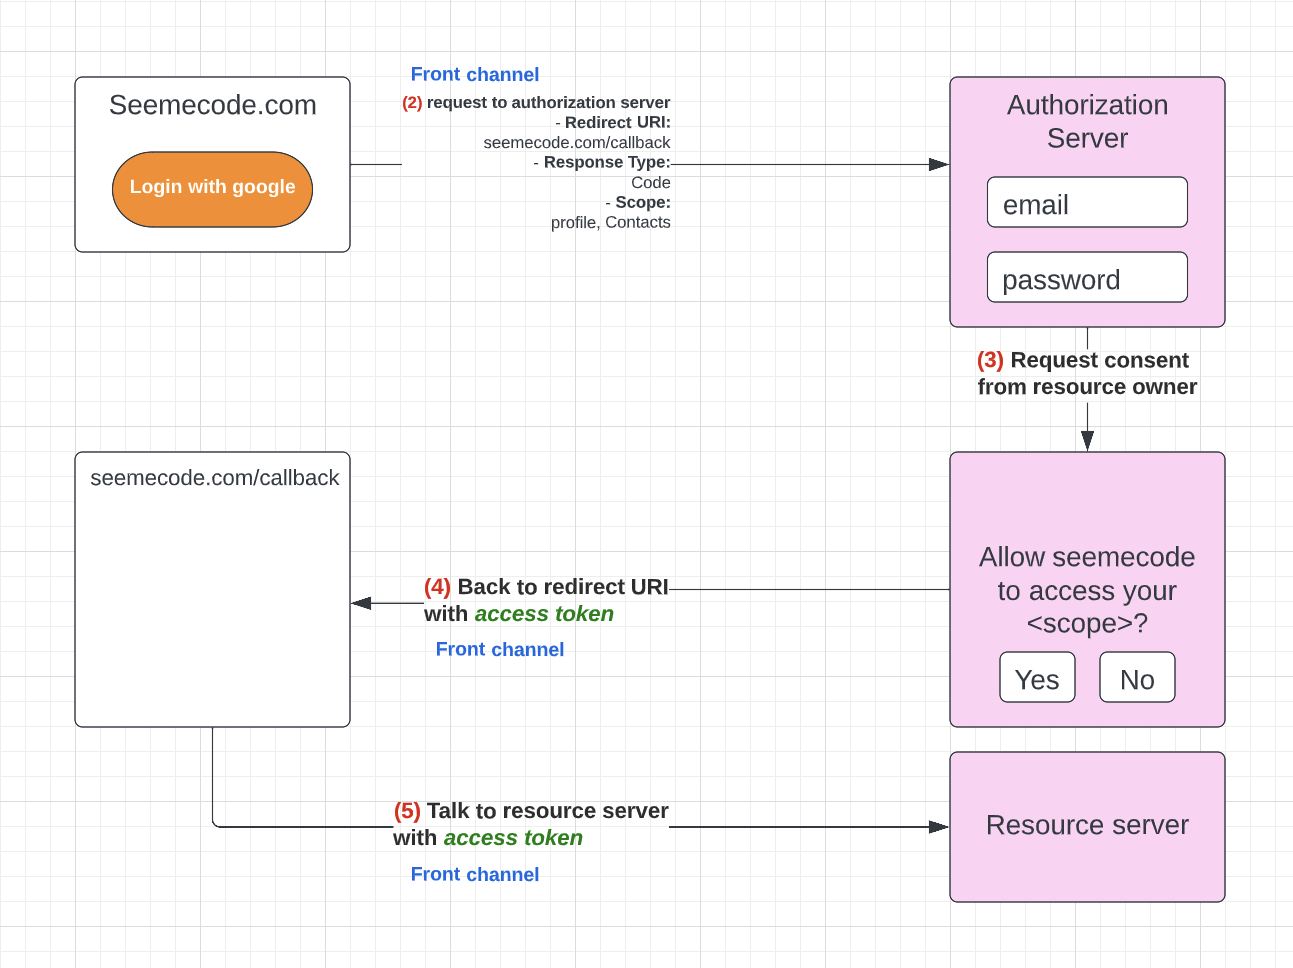
Implicit Flow จะเหมือนกันกับ Flow ปกติต่างกันตรงที่ไม่มี Back channel นั่นทำให้ที่ Step 5 เราจะได้ AccessToken มาตรงๆ
ข้อเสียที่ควรรู้ไว้คือ Implicit Flow จะมี security ที่แย่กว่า Flow ปกติ
## OpenID
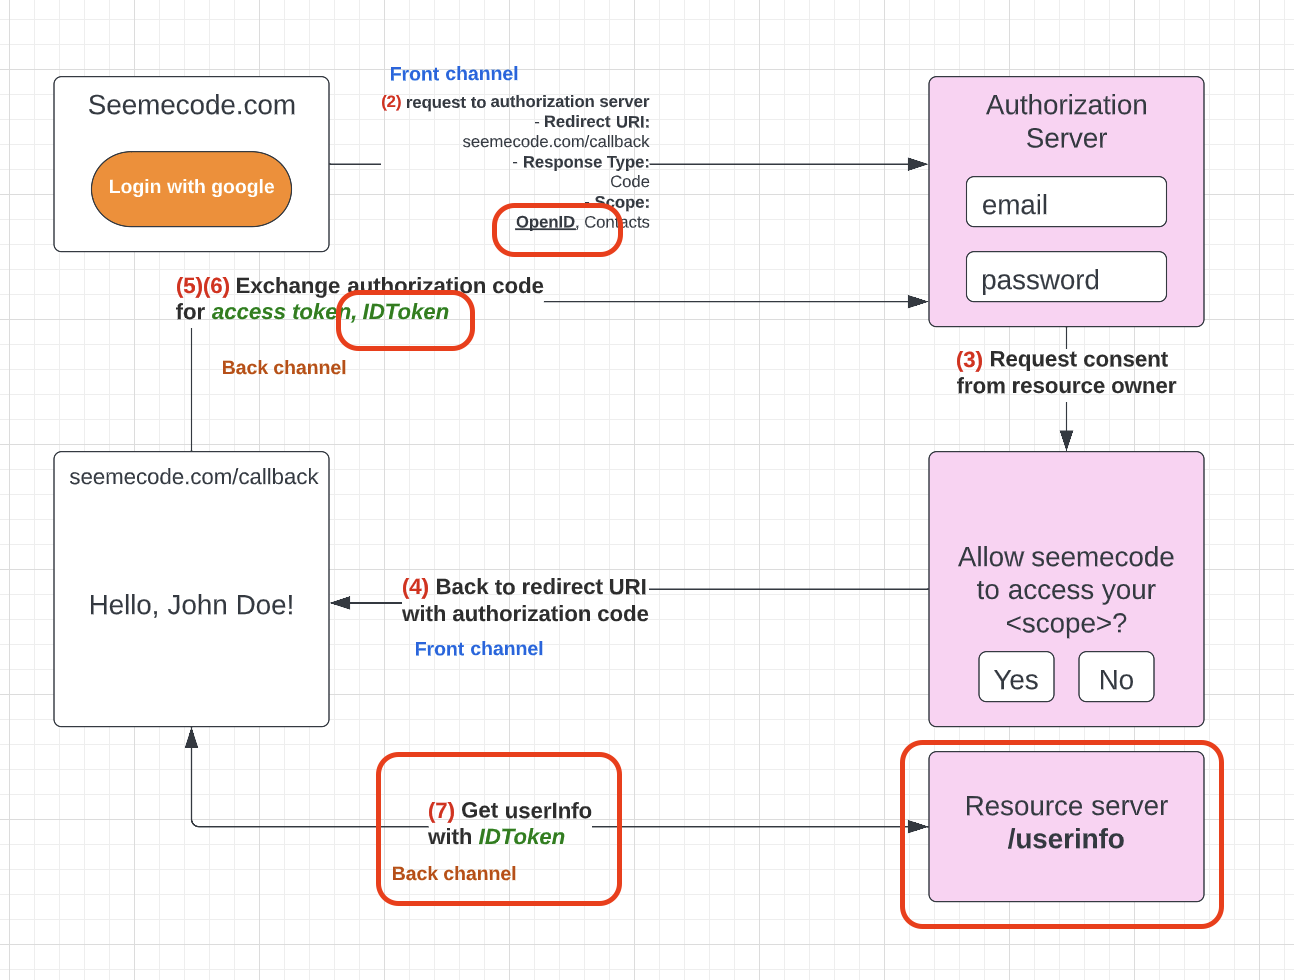
OAuth2 ถูกสร้างมาเพื่อใช้แค่สำหรับ Authorization เท่านั้น แต่การใช้งานของมันค่อนข้างแพร่หลายเลยทำให้มีการนำมาประยุกต์ใช้กับการ Authentication ด้วย โดยสิ่งที่ถูกสร้างมาเป็น extension ของ OAuth สำหรับการ Authentication คือ OpenID
สิ่งที่เพิ่มเข้ามาจาก flow ปกติคือ
- **OpenID scope**: เพื่อบอก Authorization Server ว่าเป็นการขอใช้ Authentication
- **ID Token**: สำหรับการ fetch ข้อมูล user ที่ทำการ authentication
- **UserInfo endpoint**: สำหรับดึงข้อมูล UserInfo
## PKCE (Proof Key for Code Exchange)
สมมติว่าเราต้่องการทำ OAuth บน mobile app ใน flow ปกติที่ไม่ใช่ implicit flow โดย:
- เราไม่มี backend server ที่ไว้ช่วยเก็บ secret key
- เราไม่สามารถเก็บ secret key ไว้ที่ client app เราได้
- Authorization มี option ให้เลือกว่าจะไม่ใช้ secret key
ใน step ที่ (5) ที่เราทำการส่ง authorization code ไปที่ Authorization Server เพื่อทำการแลกเปลี่ยน access token บน mobile app มีโอกาสที่ malicious app ที่มาแอบดักตัว authorization code ก่อนเราแล้วไปทำการส่งไปที่ server เพื่อขอ Access token ได้ [RFC-7636](https://www.rfc-editor.org/rfc/rfc7636)
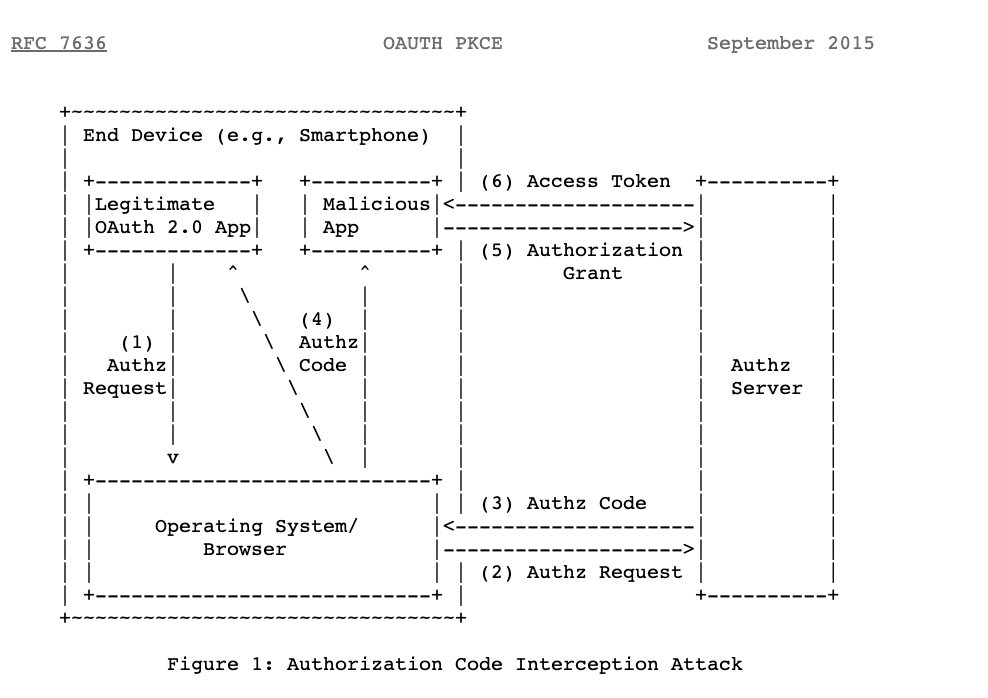
PKCE ช่วยแก้ปัญหานี้ด้วยการ
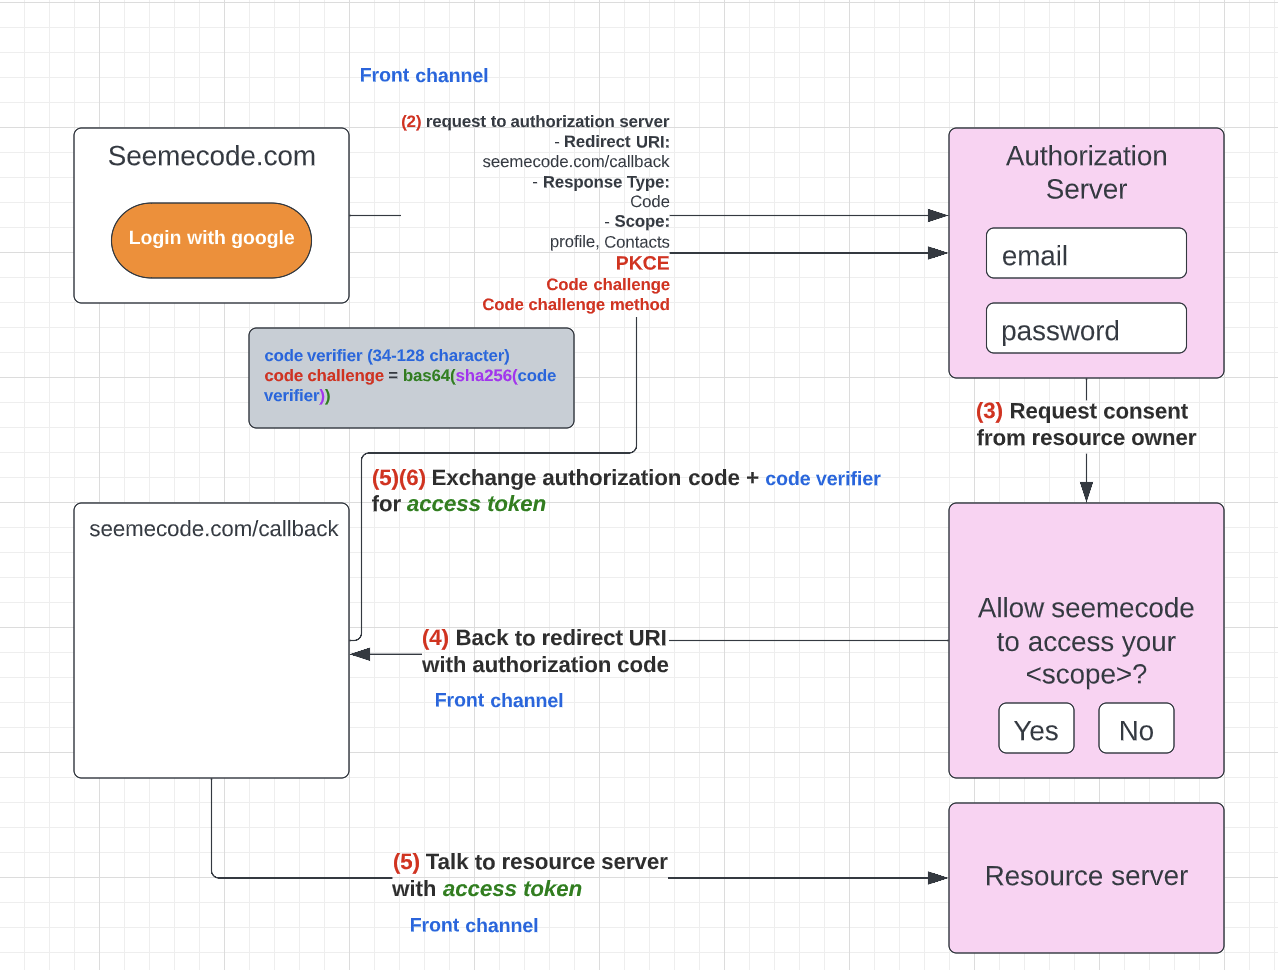
1. generate strings ที่มีความยาว 43-128 characters เรียกว่า **code_verifier**
2. hash **code_verifier** ด้วยการ hash ตามมาตราฐาน
3. ใน step ที่ 2 ให้ทำการส่ง code challenge และ code challenge method ไปที่ Authorization Server ด้วย โดย **code challenge คือค่าที่ได้จากการ hash และ code challenge method คือวิธีในการ hash เช่น sha256** กระบวนการนี้จะทำให้ Authorization Server รู้ว่า ค่าที่ได้จากการ hash คือค่าอะไร และใช้กระบวนการ hash แบบไหน
4. ใน step ที่ 5 ที่เราทำการส่ง authorization code ให้เราทำการส่ง **code_verifier** ไปที่ authorization server ด้วย ตัว authorization server จะทำการ hash ค่า **code_verifier** ด้วยวิธีการที่บอกก่อนหน้า (code challenge method) แล้ว check ค่าว่าได้ hash value ที่ตรงกันกับ code challenge หรือไม่


Top comments (0)