
In this blog, we will implement Single Sign-On (SSO) authentication with Keycloak. During this tutorial, we will take an example of SSO between Keycloak and Google Workspace accounts. You can also choose the cloud identity of your choice to get started. Before we start, make sure you have deployed Keycloak, we will be self-hosting it on Elestio.
What is Keycloak?
Keycloak is an open-source Identity and Access Management solution developed by Red Hat. It provides robust authentication, authorization, and single sign-on capabilities for web applications, mobile apps, and services. With Keycloak, organizations can centrally manage user identities, enforce security policies, and facilitate resource access across various platforms and environments.
Introduction to Single Sign-On (SSO)
Single Sign-On (SSO) is an authentication mechanism that enables users to log in once and gain access to multiple applications and services without having to re-enter their credentials for each one. With SSO, users authenticate themselves through a centralized identity provider (IdP), which then issues security tokens or session cookies that grant access to affiliated applications. This authentication experience improves user convenience, reduces the risk of password fatigue, and simplifies organisation identity management.
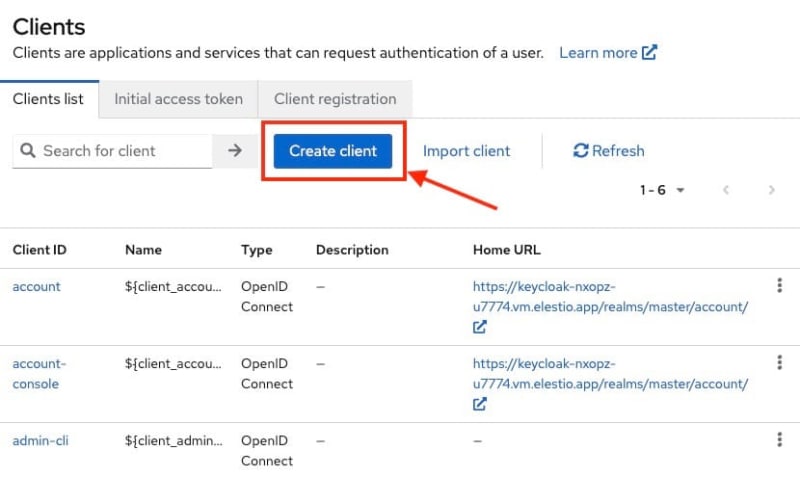
Creating a Client
Once logged in to Keycloak, create or switch to your preferred realm and head over to the Clients section from the left side panel and click on Create Client to create a new client.
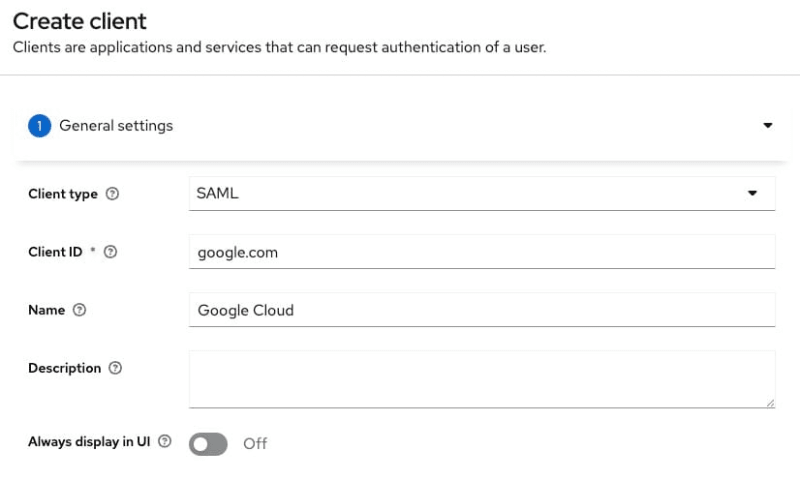
We will be using SAML federation for setup here so we will set client type as SAML , client id becomes google.com and name can be anything of your choice like I have given here as Google Cloud.
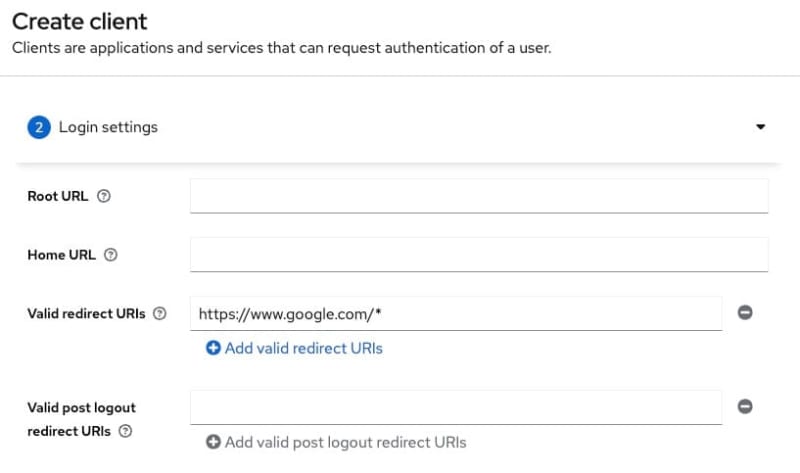
In the next step add https://www.google.com/\* as valid redirect URIs. You can add multiple URIs.
Now we will be configuring additional settings for google.com. Select email from the dropdown for Force Name ID format and toggle it on.

Next, under signature and encryption section toggle off the Sign documents option and toggle on Sign assertions.

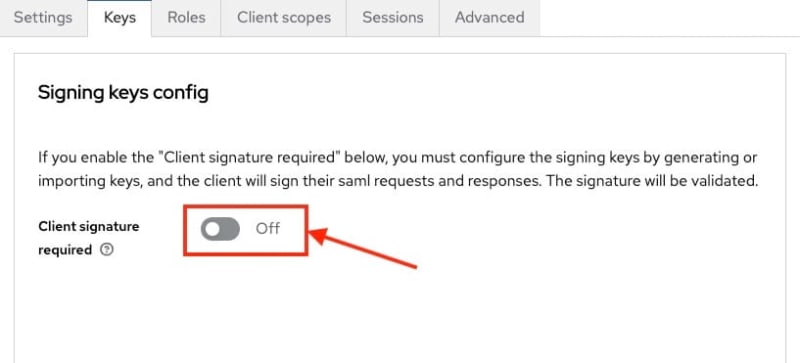
Now head over to the Keys section and turn off the Client Signature required settings. This step is optional and you can choose to validate the keys and move ahead. For the simplicity of this article we are going to keep it off.
Exporting Signing Certificate
Keycloak after authenticating a user passes SAML assertion to Cloud Identity and to enable it to verify the authenticity of that assertion, Keycloak signs the assertion with unique token-signing key that then provides the certificate that enables cloud identity to check the signature.
To view the certificate, head over to the Realm Settings and then go to the Keys tab. You will see a row Algorithm: RS256 and Use: SIG and select Certificate. A pop up will appear with your certificate content. Now copy this certificate content safely to a notepad or text editor.

Converting Signing Certificate
Open your notepad or text editor and paste the following at the begining of the certificate followed by new line
-----BEGIN CERTIFICATE-----
and in the end add the following line
-----END CERTIFICATE-----
It should look something like the following
-----BEGIN CERTIFICATE-----

MIICmzCCAYMCBgF7v8/V1TANBgkq...

-----END CERTIFICATE-----
Configuring Cloud Identity
⚠️
Make sure you replace and with appropriate values
- Open Admin Console and log in as a super-admin user.
- Head over to Security > Authentication > SSO with third-party IdP
- Now Add SSO Profile and Setup SSO with third party identiy provider to enabled.
- Configure the following settings
- Sign-in page URL : https:///realms//protocol/saml
- Sign-out page URL : https:///realms//protocol/openid-connect/logout
- Use a domain specific issuer: clear
- Change the password URL : https:///realms//account
- Under Verification certificate , click on Upload Certificate , and then select the certificate you downloaded previously
- Click Save to save the configurations
Thanks for reading ❤️
Thank you so much for reading and do check out the Elestio resources and Official Keycloak documentation to learn more about the Keycloak. You can click the button below to create your service on Elestio and implement this SSO authentication method. See you in the next one👋
![]()


Top comments (0)