
Hey everyone, in this blog we will be setting up the "Sign in with Google" option using Keycloak. We will be using a self-hosted Keycloak instance deployed on Elestio. So, to get started head over to Elestio Dashboard and deploy and login into the Keycloak instance to get started.
Creating New Realm
According to the Keycloak documentation
A realm manages a set of users, credentials, roles, and groups. A user belongs to and logs into a realm. Realms are isolated from one another and can only manage and authenticate the users that they control.
Once you are logged in, head over to the drop-down menu on the top left hand. It is important to notice that there is a realm " Keycloak master" already available. This realm has higher privileges hence it is recommended to create a new realm. Click on " Create realm".
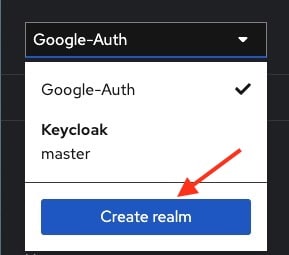
Now add the realm information such as Realm name. For eg: Here I have given it a name " Google-Auth". Click on " Create" to create new realm.

Next, head over to " Identity Providers" in the left panel and click on " Google" from other identity provider options.

The link that is provided in " Redirect URI" is important and will be required in the next steps. So make sure to keep this tab open. The link should be something like
https://YOUR_KEYCLOAK_DOMAIN/auth/realms/YOUR_REALM_NAME/broker/google/endpoint
Head over to next section to get the information to be filled out in this step.
Create Google Application
Head over to Google Console, login in to the console using Google account and you will see Google Developer Console.
Once logged in, head over the top left drop-down to create new project.

Click on " New Project" to proceed.

Enter the project name of your choice and select the Organisation if you have multiple organisations. Once done click on " Create"

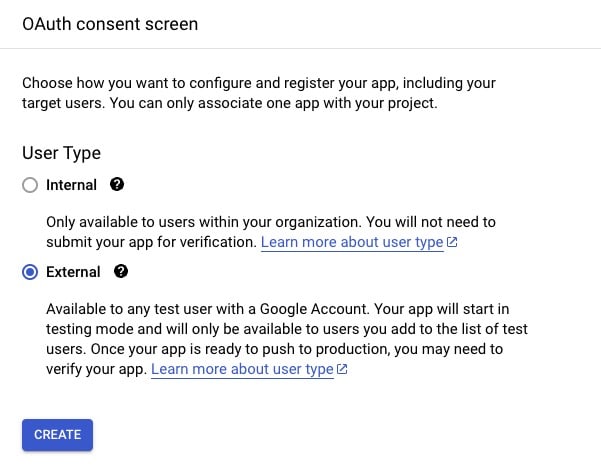
Once the project is created you will get a pop-up suggesting to configure the consent screen. If not then head over to the Dashboard and head over to " Explore and enable APIs" options. Then Click on "_ Credentials" > " Configure Consent Screen" _ and head over to the next step.

Click on " External" as we want to allow any Google account to be able to sign in to our application and hit " Create".
After this, we will be redirected to pages where we will have to configure different things
- Application type: Public
- Application name: Your application name
- Authorised domains: Your application top-level domain name
- Application Homepage link: Your application homepage
- Application Privacy Policy link: Your application privacy policy link
Now head over to the Create Credentials option in the navbar and click on "_ OAuth Client ID"._

Select Application type as a " Web application" and name the application according to your choice. Next, Add the link provided in the Keycloak tab under " Authorized Redirect URIs" and click " Create". The link should look something like this
https://YOUR_KEYCLOAK_DOMAIN/auth/realms/YOUR_REALM_NAME/broker/google/endpoint

As it is done, you will see a pop up with the information required in the next step. You will need to " Client ID" and " Client secret" in next step so make sure you make a safe copy of it.

Configuring Keycloak With Google Application Credentials
Add the copied credentials in the Keycloak Google provider section and click on the " Add" button.

And done! Now whenever you want to login with a Keycloak configured client you will find the option to login with Google Auth.

Thanks for reading ❤️
Thank you so much for reading and do check out the resources provided to learn more about the Keycloak. You can click the button below to create your service on Elestio and implement this authentication method. See you in the next one👋
![]()


Top comments (0)