Bing has recently announced the release of its new WordPress plugin by the name of Bing URL submission plugin. This new plugin allows WordPress site owners to have their site content indexed through Bing right after being published.
Let's jump into details about this new update so that you can take advantage of it ASAP!
How Does The Plugin Work?
The Bing URL submission plugin can help you index content right after you have published it. The plugin works by automating the submission of the URLs from the WordPress site directly to Bing's index. Once you have installed the plugin and configured it using the Bing Webmaster portal and have configured it using the key, the plugin will automatically begin to detect any new pages added or updated on the site. As soon as a new entry is made, the URL will be submitted to Bing. This plugin successfully ensures that all your site pages are updated to the latest versions.
What Else Does It Offer?
Other than indexing your site's pages, this plugin also supports the following features:
- The power to toggle the submission feature and turn it either on/off.
- The plugin also helps to submit the URL to Bing Index manually.
- You may also view a list of the URLs that have been recently submitted.
- The plugin also allows you to resubmit any of the failed submissions.
- You may also download the list of recent URL submissions.
How To Install The Plugin and Get Indexed?
Installing the new plugin is super easy! We have listed a bunch of steps that will help you install the plugin and get it running in no time. The installation process can be divided into two chunks: installing the plugin, and as mentioned above, you need to get hold of an API key. We have discussed the steps on the first plugin here:
Installing The "Bing URL Submissions Plugin"
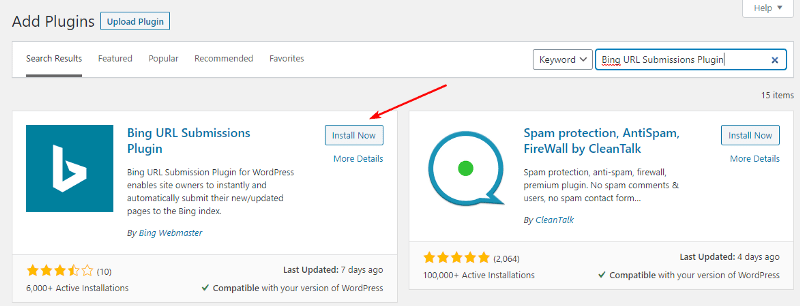
Installing the plugin is pretty simple; the first thing that you need to do is logging in your administration panel that belongs to your WordPress site. Then, go to Plugin > Add New, find Bing URL Submissions Plugin, click Install and then Activate.
Once you have installed the plugin, you will need to address the API key. We have discussed the steps you can use to access the API key below:
Accessing The API Key
Before you get a chance to enter the key and complete the configuration, you will need to access the API key. We have listed the steps to access the API key below:
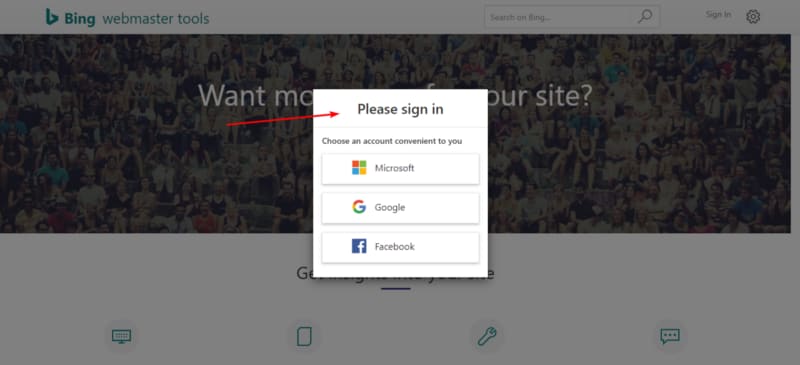
To get an API key, the first thing you need to do is logging in your account on Bing Webmaster Tools. As a WordPress site owner, you probably have an account on Bing Webmaster Tools. However, if you don't, you can easily sign in through your Gmail account or even your Facebook ID!
You will then need to add the site for which you need the API. These tools will verify the site and help generate API's.
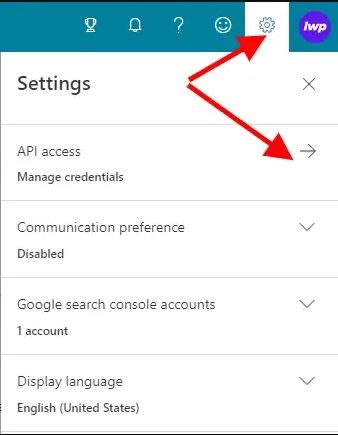
Once done, you will need to click on Settings and then to the API access category that is listed on the site.
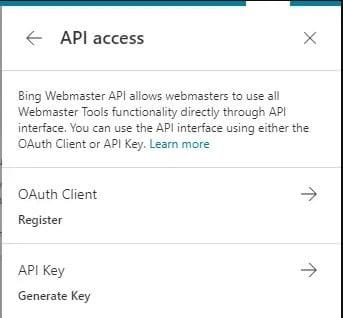
There will be some pre-listed terms and conditions displayed in the API access section. If you are accessing API's for the first time, you will need to read these terms and conditions before you accept them.
You are almost there now! Click on the Generate API key and you will be given an API key. Do keep in mind that one user will only get one API key. This API key is used for all sites on Bing Webmaster Tools.
Once you have completed these steps and obtained the API key, you can finally enter it and complete the configuration for the plugin. If you are facing trouble in generating an API key, you can get in touch with a reliable software development company like eLightUp and Dynamologic Solutions to help you figure it out. to help you figure it out.
Note: In some cases, an API key can get into the wrong hands and be used for illegal practices. If you feel that is the case, you can delete the previous API key and generate a new one for yourself through the same steps. You will have to go to the API page and delete the previous key before you generate a new one. You will have to update the new API key on all the applications as well.
Entering The API Key
Step 1: To complete this step, you will have to access the settings page of the Bing URL submissions plugin. You can access this page by clicking on Settings of this plugin in the Plugins section.
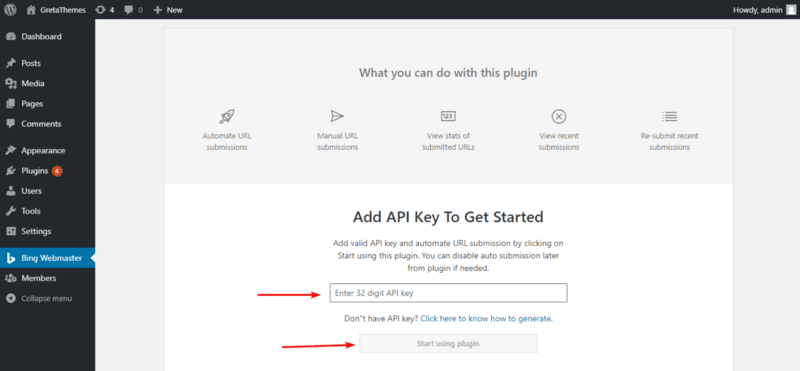
Step 2: Once step 1 is completed, your screen will receive a notification to enter the API key that you had obtained through the steps listed above. At this point, you should also make sure that your WordPress site is authenticated through Bing Webmaster. Finally, click Start using plugin.
Step 3: After that, your WordPress site will automatically submit any new or updated URLs to Bing's index.
You have now successfully configured your Bing WordPress Plugin! Your WordPress site will now automatically be able to send URLs of any new pages and updated ones to Bing's index. This makes the job for WordPress developers easier than ever. They don't have to manually submit the URL after every little update to Bing's index.
Final Thoughts
The popularity of WordPress as a content management system is increasing every day. At a time when millions of website owners are using WordPress, these plugins are a great way to improve efficiency and make the website smoother and operations hassle-free. Just like tons of other plugins out there, the Bing WordPress plugin is an attempt to simplify matters for website owners all over the world.
In addition to Bing, we also wrote about how to submit URLs to Google --- the most popular search engine, you can read it here.
--- --- ---
The publication at GretaThemes.







Top comments (0)