My newsletter Design Insight now features a Classifieds section. For a fee, people can buy an ad spot in my newsletter to promote their product or service.
To make this process easier to manage I set up a Gumroad listing and combined it with an Airtable base. With this setup, I've automated most of the process to the point where I only need to check in on things once a week.
This article describes how I set up this process including how I created the Airtable base, published a form for user submissions, added automations, and set up the Gumroad listing.
User Flow
Here's the user flow for buying an ad spot:
- A user navigates to the Gumroad listing.
- They read about the ad spot and see the available ad spots from the embedded Airtable view.
- They purchase an ad spot through Gumroad and are redirected to a form where they fill in detail related to the ad spot.
- They fill in the form and press submit.
- Airtable and I will handle the rest including adding it to the relevant newsletter edition.
- If the user chose to be notified when their ad is live, I'll send them an email letting them know.
Airtable Base + Tables Setup
I started by setting up a new Airtable account. I'm currently using the free account and haven't run into any limitations.
I then created a new base to manage the ad spot data. I called it Design Insight Classifieds.
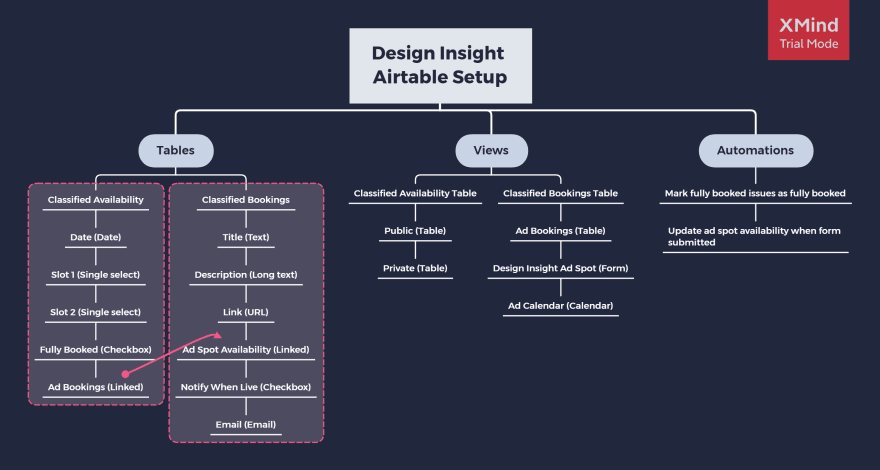
I knew I wanted 2 tables, one to manage the availability of ad spots and one to manage the booking details.
Table: Classified Availability
Fields:
- Date - the date of the newsletter edition (Date field)
- Slot 1 - I have space for 2 ad spots in each edition so each slot is accounted for here (Multiselect - Available + Booked)
- Slot 2 - Same as above.
- Fully Booked - This field denotes that a newsletter edition has both ad slots booked (Checkbox field)
- Ad Bookings - This is a linked field that's linked to the Classified Bookings table below. When a record in Classified Bookings matches the Date field in this table (Classified Availability), it will be included in this field. This shows me which ad bookings are scheduled for each week.
Table: Classified Bookings
Fields:
- Title - This is the title used for the ad in the newsletter (Text field)
- Description - This is the main copy used for the ad in the newsletter (Long text field)
- Link - This is the URL to the resource for the ad in the newsletter (URL field)
- Ad Spot Availability - I wanted to give people the option to select when they'd like the ad to be in the newsletter. This field is linked to the Date field in the other table (Classified Availability). This means any dates included in that table will appear in this table (Classified Bookings).
- Notify When Live - This denotes if the person submitting the ad spot wants to be emailed when the ad is live in the newsletter (Checkbox field)
- Email - If the person chose to be notified when their ad is live, their email address is tracked in this field (Email field)
Views:
- Public - I created a public view to be used in the Gumroad listing to show people what ad spots are available. It just shows the fields Date, Slot 1, and Slot 2. It is also filtered to only show records where Fully Booked is NOT checked. This means fully booked editions of the newsletter won't continue to show.
- Private - This is the private view that has all the fields and no filters.
These tables evolved over time as I set up other components like the submission form and various automations.
Airtable Form Setup
Once I set up the tables I needed, the next thing was to create a form to handle user submissions.
I was originally going to manage this on a Google form but found out Airtable has a forms feature.
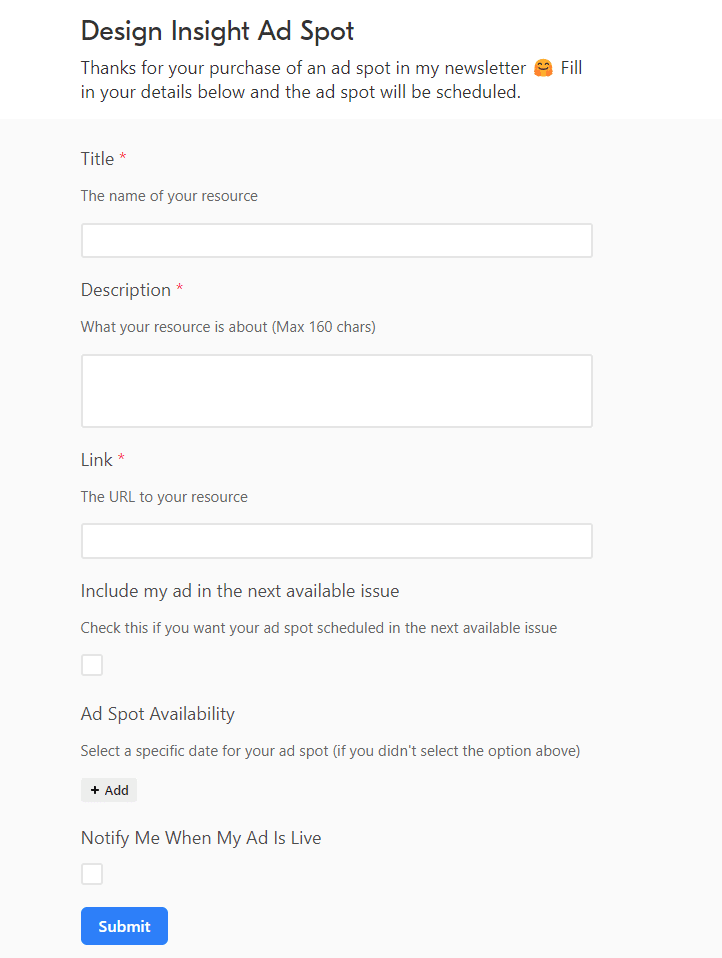
In Airtable, forms are managed as a type of view. In my case, I opened the Classified Bookings table and created a form view called Design Insight Ad Spot.
Form Fields:
- Title - corresponds to the Title field. Required
- Description - corresponds to the Description field. Required
- Link - corresponds to the Link field. Required
- Ad Spot Availability - corresponds to the Ad Spot Availability field. I turned on the option to "Limit record selection to a view" and chose the Public view. This means only records in the Public view will be shown. If you remember from above, the Public view only shows records where fully booked is NOT checked so users can only pick from available dates.
- Notify Me When My Ad Is Live - corresponds to Notify When Live field.
- Email - a conditional field that only shows if the field above is checked.
I've turned on the option to email me whenever the form is filled in so I can manually keep an eye on things for now.
As I'm on the free version of Airtable, there are limited customization options I can work with as regards the design but this works well for now.
The link to this form is presented to a user after they purchase an ad spot via Gumroad.
Before I marked this step as finished, I tested out submitting the form a few times to make sure everything worked as expected.
Airtable Calendar Setup
Similar to Forms, you can create Calendar views in Airtable.
This allows me to see which ad spots are scheduled for which newsletter edition. There's also the added convenience of linking this calendar to my Google calendar so I can view this from anywhere.
I created a Calendar view under the Classified Bookings table and called it Ad Calendar. I then selected the Ad Spot Availability field.
To link the calendar to my Google calendar, I selected Share view then selected Sync to an external calendar. This gave me a link which I then pasted into my calendar app.
Gumroad Listing Setup
OK, so by now I have the tables, form, and calendar set up so I have enough in place to put together the Gumroad listing.
I created a new product called Design Insight Ad Spot and started writing out the copy for the ad spot.
I included a background about the newsletter, various stats, and examples of newsletter ad spots.
At the bottom of the listing I pasted in the Public URL of the Classified Bookings table and it appeared perfectly.
I ensured the product URL was clear, created a cover image and thumbnail, and set the price.
The final step was to include the URL to the Design Insight Ad Spot form in the Content section of the product listing. To do this I put the URL into a text file and uploaded that to Gumroad. This allows me to add a short message after the purchase to thank the user for buying an ad spot.
I hit publish and then viewed the new listing to make sure everything looked good including the Airtable embed. You can see the live Gumroad listing here: Design Insight - Ad Spot.
Airtable Automations
Now that everything was set up and running, I wanted to experiment with some Airtable automations to make maintaining everything a bit easier.
This section could be a whole article in itself so I won't delve too deep into how it's all set up. I'll include screenshots where helpful to give an idea of how it's all working.
Some tips I found helpful for using Airtable automations:
- You'll need to create sample records that fit the criteria you're trying to test otherwise you won't be able to test the automation properly.
- Once you've created the automation, run the steps necessary to trigger the automation manually and make sure it works as expected.
- Name your automations clearly so you know what they are at a glance.
- If you're struggling to assemble the automation, write down what you want to happen on paper first. I got bogged down in the UI and found it quicker to write out the automation first.
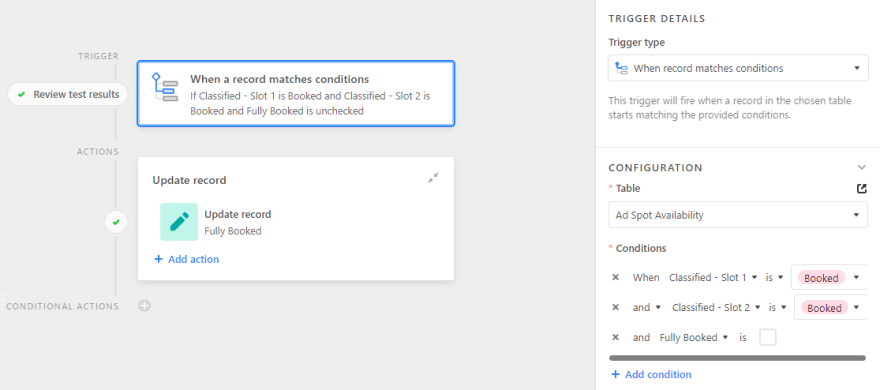
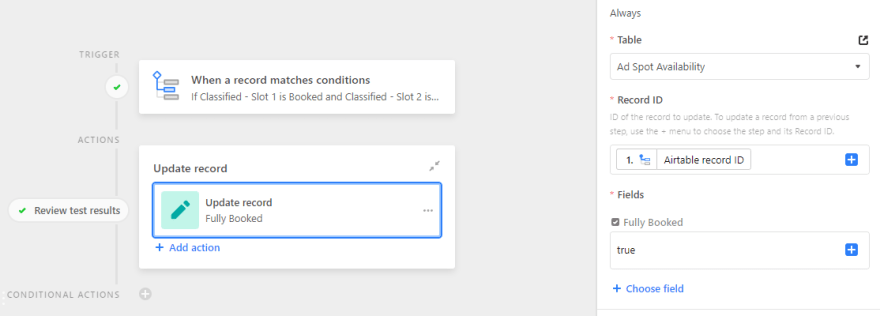
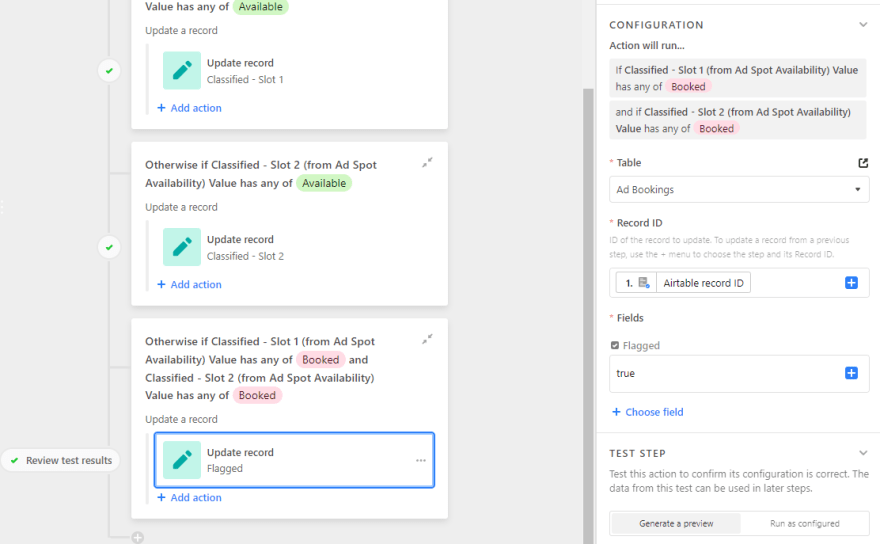
Automation 1 - Mark fully booked issues as fully booked
When an issue of the newsletter is fully booked, an automation runs to check the checkbox "Fully booked" in the Classified Availability table.
This removes it from the Public Classified Availability view which also removes it from being selectable on the Design Insight Ad Spot form.
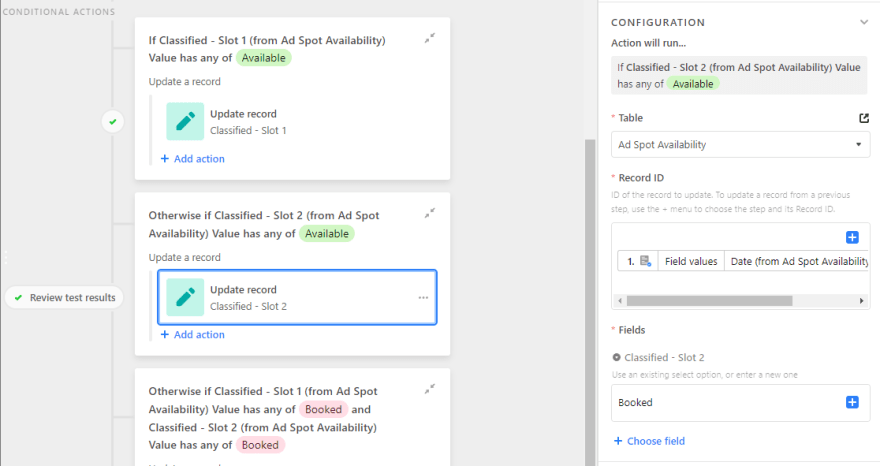
Automation 2 - Update Ad Spot Availability When Form Submitted
When the Design Insight Ad Spot form is submitted, mark the appropriate slot for that date as booked in the Classified Availability table.
This means I don't have to manually review every form submission and change the availability calendar for each slot to booked.
I've discussed a lot in this article I know. So if you have any questions for me on how any of this works, just let me know 🙂
If you enjoyed this, please consider sharing it with someone else who might find it useful 🤗






Top comments (0)