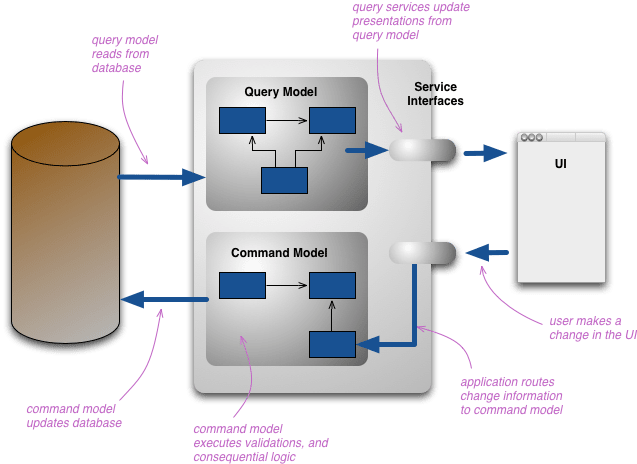
CQRS stands for Command and Query Responsibility Segregation, a pattern that separates read and update operations for a data store. Implementing CQRS in your application can maximize its performance, scalability, and security. The flexibility created by migrating to CQRS allows a system to better evolve over time and prevents update commands from causing merge conflicts at the domain level.
In a scalable environment, having several services consuming a single database that serves as a read and write can cause many locks on the data and with that cause several performance problems, as well as the whole process of the business rule that will get the data from display takes extra processing time. In the end, we still have to consider that the displayed data may already be out of date.
This is the starting point of CQRS. Since the displayed information is not necessarily the current information, so obtaining this data for the display does not need to have its performance affected due to recording, possible locks or bank availability.
The division of responsibility for recording and writing conceptually and physically. This means that in addition to having separate ways to record and retrieve data, the databases are also different. Queries are done synchronously on a separate denormalized basis and writes asynchronously on a normalized database.
Expoloring CQRS
Beginning the explanations, the first moment you need to separate the application responsibility:
- Command: Every operation requires change of data in the application.
- Query: Every operation requires information about the data application.
Query Operation
Within the concept, Query has the main function of retrieving application data. Often its characteristic is to be synchronous and connected with NoSQL databases. The use of these databases allows faster queries, as we do not have Joins that can burden our performance. With this solution for the data, we assume that we will work with duplicate records.
Command Operation
Following an asynchronous operation, the command has as an operation everything that writes and changes records. A good way is to work with the concept of events, where messages are sent and we have the return of success or failure in the processing of the message.
Synchronization:
Data synchronization can happen in several ways:
- Automatic update – Every change in the state of a data in the writing database triggers a synchronous process to update in the read database.
- Eventual update – Every change in the state of a data in the writing database triggers an asynchronous process to update in the read database, offering an eventual consistency of the data.
- Controlled Update – A periodic, scheduled process is triggered to synchronize the databases.
Update on demand – Each query checks the consistency of the read versus the write base and forces an update if it is out of date.
In our implementation we use the eventual update.
Advantages
- Faster reading of data in Event-driven Microservices.**
- High availability of the data.
- Read and write systems can scale independently.
Disadvantages
- Read data store is weakly consistent (eventual consistency)
- The overall complexity of the system increases. Cargo culting CQRS can significantly jeopardize the complete project.
When to use CQRS
- In highly scalable Microservice Architecture where event sourcing is used.
- In a complex domain model where reading data needs query into multiple Data Store.
- In systems where read and write operations have a different load.
When not to use CQRS
- In Microservice Architecture, where the volume of events is insignificant, taking the Event Store snapshot to compute the Entity state is a better choice.
- In systems where read and write operations have a similar load.
Implementing Solution
Here is the complete code of the project
The following technologies were used to carry out the project and it is necessary to install some items:
- Docker
- Java 17
- Maven
- SpringBoot
- Amazon SQS
- Amazon DynamoDB
- Localstack
- Swagger
Localstack
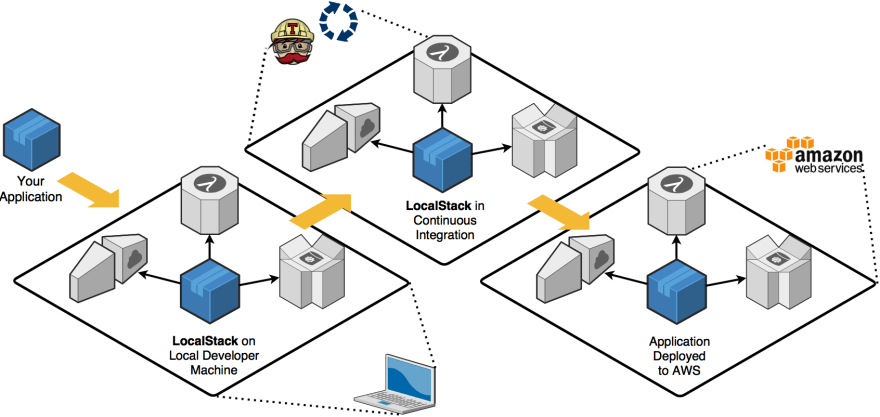
LocalStack is a project open-sourced by Atlassian that provides an easy way to develop AWS cloud applications directly from your localhost. It spins up a testing environment on your local machine that provides almost the same parity functionality and APIs as the real AWS cloud environment, minus the scaling and robustness and a whole lot of magic.
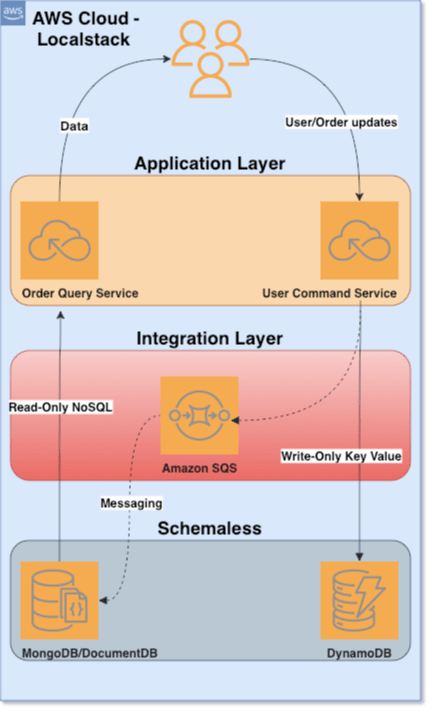
For this solution I made the choice to bring an implementation, Amazon SQS will be used for our event and data synchronization, Amazon DynamoDB to be just our recording database and MongoDB as our NoSQL database (Could also be DocumentDB, but not the same was used, Localstack does not support that database in their services).
Confuguring Localstack environment
To run our stack we will upload our services, in the project there is the MongoDb directory, in it there is a file docker-compose.yaml, this file will upload our Read-only Database.
version: "3.8"
services:
  mongo:
    image: mongo:5.0
    container_name: mongo
    environment:
      ME_CONFIG_BASICAUTH_USERNAME: admin
      ME_CONFIG_BASICAUTH_PASSWORD: admin
      ME_CONFIG_MONGODB_PORT: 27017
      ME_CONFIG_MONGODB_ADMINUSERNAME: admin
      ME_CONFIG_MONGODB_ADMINPASSWORD: admin
    restart: unless-stopped
    ports:
      - "27017:27017"
    volumes:
      - ./database/db:/data/db
      - ./database/dev.archive:/Databases/dev.archive
      - ./database/production:/Databases/production
  mongo-express:
    image: mongo-express
    container_name: mexpress
    environment:
      - ME_CONFIG_MONGODB_ADMINUSERNAME=root
      - ME_CONFIG_MONGODB_ADMINPASSWORD=password
      - ME_CONFIG_MONGODB_URL=mongodb://root:password@mongo:27017/?authSource=admin
      - ME_CONFIG_BASICAUTH_USERNAME=mexpress
      - ME_CONFIG_BASICAUTH_PASSWORD=mexpress
    links:
      - mongo
    restart: unless-stopped
    ports:
      - "8081:8081"
Run the following command:
docker-compose up -d
Now with MongoDB running, we are going to raise our AWS stack, for that we will go to the localstack directory, in the directory we have the docker-compose.yaml file, which has a similar structure to the previous file.
With this docker-compose we will upload our Message Broker, Amazon SQS and our Write-Only database, DynamoDB.
version: '3.9'

services:
  localstack:
    container_name: "${LOCALSTACK_DOCKER_NAME-localstack_main}"
    image: localstack/localstack
    ports:
      - "4566-4599:4566-4599"
      - "${PORT_WEB_UI-8080}:${PORT_WEB_UI-8080}"
    environment:
      - SERVICES=sqs,dynamodb
      - DEBUG=1
      - DATA_DIR=/tmp/localstack/data
      - DOCKER_HOST=unix:///var/run/docker.sock
    volumes:
      - /var/run/docker.sock:/var/run/docker.sock
      - localstack_data:/tmp/localstack/data
    networks:
      - localstack
    command: >
          "
            # Needed so all localstack components will startup correctly (i'm sure there's a better way to do this)
            sleep 10;

            aws sqs create-queue --endpoint-url=http://localstack:4566 --queue-name user-service-event;

            # you can go on and put initial items in tables...
          "

volumes:
  localstack_data:
networks:
  localstack: {}
Within the framework of the environment, in docker-compose, we specify which services we want to make available. To do this, we run the following command:
docker-compose up -d
Now that we have our infrastructure available, we will show our technical drawing for our application.
Configuring AWS, SQS and DynamoDB environment
After we have our services all available. We will configure our local AWS stack. For this, you will need to enter the terminal of your localstack container, for this, execute the following command:
docker exec localstack bash
Once you access the localstack container terminal, you will need to configure: accessKey, secretKey, region and the output format. Our configuration looked like this:
$ aws configure
AWS Access Key ID [None]: anything
AWS Secret Access Key [None]: anything
Default region name [None]: us-east-1
Default output format [None]: json
after configuration, we will create our queue inside SQS and our table in Dynamo DB:
SQS Create Queue
aws sqs create-queue --endpoint-url=http://localstack:4566 --queue-name user-service-event;
DynamoDB Create Table
aws dynamodb --endpoint-url=http://localhost:4566 create-table \
    --table-name user \
    --attribute-definitions \
        AttributeName=id,AttributeType=S \
        AttributeName=email,AttributeType=S \
    --key-schema \
        AttributeName=id,KeyType=HASH \
        AttributeName=email,KeyType=RANGE \
--provisioned-throughput \
        ReadCapacityUnits=10,WriteCapacityUnits=5
After configuration, we can run our application and check our CQRS implementation with Aws localstack.


Top comments (0)