Hi everyone, as an enthusiast developer, I wanted to learn about databases. There are lots of them on the internet but the one that caught my attention is MongoDB. Recently I heard about the unique database called MongoDB. It's a NoSQL document database where data is stored in documents instead of rows and columns as in SQL databases.
After researching more about MongoDB, its features and applications, I started learning about it and also completed my first Basic course at MongoDB University. Thanks to GitHub's Student Developer Pack and MongoDB to provide free access to MongoDB University courses.
With basic knowledge of the MongoDB database, I decided to use it with one of my projects and here is what I have built.
Quotes gen project: https://quotes-gen-project.herokuapp.com
In this project, I have created a model to store quotes and authors in a MongoDB database and View to display a random quote from a collection of more than 2 lacs of quotes.
So, I am writing this article to share with you the steps I followed to connect the MongoDB database with my Django project.
There are currently 3 ways to connect the MongoDB database to Django, using
- PyMongo
- MongoEngine
- Djongo [Dj ango + M ongo]
I personally loved how Djongo manages to connect MongoDB to Django with minimum changes. I will suggest using Djongo for beginners as it does not change the original Django ORM and everything is kept minimal and simple. And in this article, we are going to use it to connect Django with MongoDB.
Pre-requisites
Before proceeding further make sure you have basic knowledge of how things work in Django and MongoDB. I have mentioned few resources to get started with them.
- Writing first Django app, part 1
- Your First Steps With Django: Set Up a Django Project
- MongoDB Basics
- Create a Database in MongoDB
Let's get started,
Step 1: Virtual environment setup
Make sure you have created a virtual environment and activates it using the following commands,
# Install virtualenv package
python -m pip install --user virtualenv

# Create a virtual environment with the name 'env'
python -m venv env

# Activate the virtual environment
env\Scripts\activate
Step 2: Install packages
Install the required packages like Django and Djongo using the following command,
pip install Django Djongo pymongo[srv]
Step 3: Start the Django project
Now as our virtual env is activated, let's create our Django project and the app.
# Start the Django project
django-admin startproject <project-name>

# Open the project folder
cd <project-name>

# Create an app
python manage.py startapp <app-name>

# Start the server to see the project running
python manage.py runserver
Don't forget to add the newly created app to INSTALLED_APPS in the settings.py file.
Step 4: MongoDB cluster creation
Now our app is ready, let's head to MongoDB to create our Atlas cluster.
- Go to https://cloud.mongodb.com and sign in
- Create an Organisation and a Project
- Create Cluster
- Click on Create a Cluster
- Select the Shared Database deployment for this tutorial
- Change the Cluster name
- Click on Create button (Takes few minutes to complete the process)
- Click on Connect and Create a Database User with Username and Password. If it asks to add an IP address then Click on Add IP address without adding anything. This allows access to your cluster from any IP address and is not recommended when creating a real-life project.
- Then select the connection type Connect your application and copy the provided link. We will need it later.
For more information, visit the MongoDB Documentation, Get started with Atlas.
Step 5: Database information in Django
Everything is ready to be served. In settings.py file add the following information in DATABASE and replace the credentials like username, password, and atlas cluster with yours. You can add the database name of your choice, then Django will create that database on migration. Add admin instead of <myFirstDatabase>.Remember the link we copied earlier, you can also use it in place of the given link.
DATABASES = {
        'default': {
            'ENGINE': 'djongo',
            'NAME': 'your-db-name',
            'ENFORCE_SCHEMA': False,
            'CLIENT': {
                'host': 'mongodb+srv://<username>:<password>@<atlas cluster>/<myFirstDatabase>?retryWrites=true&w=majority'
            }
        }
}
I may have skipped some Django parts to focus this article on MongoDB connection. Please make sure you have followed all steps required to run a Django project.
Step 6: Where the magic happens...
It's time to actually connect our Django project to a MongoDB cluster. Run the following commands to make migrations and migrate the database.
# Make migrations
python manage.py makemigrations

# Migrate
python manage.py migrate
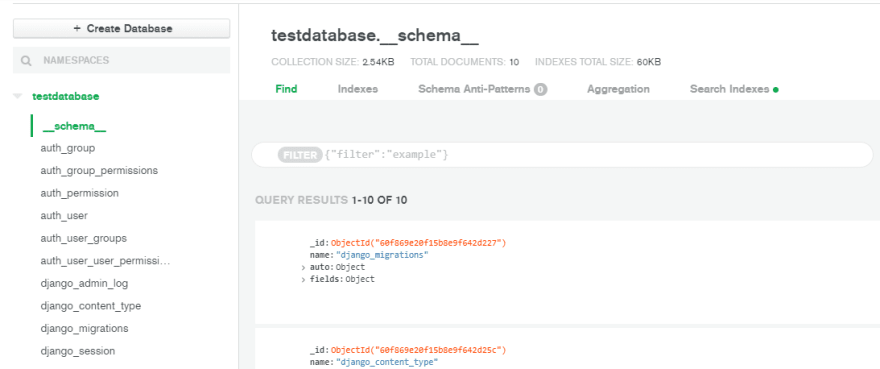
And that's it. You can see in your MongoDB cluster that the new database is created with the name provided by you and few collections inside that Database like the following,
If you get an error
djongo.database.DatabaseErrorwhile migrating the database, run the following commandpip install sqlparse==0.2.4to fix the issues.
Step 7: Creating Models
To know how Django models are connected to the MongoDB database, let's create a model in our project. For example, in the following code, the model People is created with Name, Age fields.
class People(models.Model):
    Name = models.CharField(max_length=100, default=None)
    Age = models.IntegerField(default=None)
Don't forget to register the model by adding the following lines in the admin.py file.
from . models import People
admin.site.register(People)
Again run python manage.py makemigrations and python manage.py migrate to migrate the database.
In the MongoDB cluster, you can see that the new collection testapp_people is created. In Django, the models are connected to the MongoDB collections with the name <app-name>_<model-name> where app-name is the name of Django app and model-name is the name of the model inside that app.
Step 8: Adding data
Last but not the least, let's create a superuser using the following command and add some data using Django admin.
python manage.py createsuperuser

# To start the server
python manage.py runserver
After adding some data from the admin panel, you can see that the collection is crowded with some data which are called Documents. MongoDB stores the data in the form of documents.
This is all you need to know while starting a Django project with MongoDB. Now go ahead and create some interesting projects. Check out GitHub repository for the project I mentioned in the start to help you in the process.
If you face any issues in the process, don't hesitate to mention them in a comment. I am always peeping at my inbox for new comments and will get back to you immediately.
If you have any suggestions or feedback related to my articles, please let me know.
Thank you for reading this article. I hope this was helpful to you.🌻


Top comments (0)