WebViews in React Native are the only way to let the user visit external links within an iOS or Android application. WebView can be used for embedding or running a web application inside our React Native app that’s good especially if you have a web app and you want to connect that app with your React Native app.
What we’re going to build
- A WebView and custom navigation to handle navigation in WebView.
- How to Pass data to React Native from WebView.
- How to Pass data to WebView from React Native.
Prerequisites
- Node.js version <= 10.x.x installed
- Have access to one package manager such as npm or yarn
- Use React Native version 0.60.x or above
Let start by creating a new React Native project for the example application I'm using react-native-cli
react-native init RNWebViewExample
This will bootstrap the project and all the necessary files to start working with React native. 🎉
To run react-native app
# for ios
react-native run-ios
# for android
react-native run-android
Installing the dependencies
We’re relying on the following packages to implement the functionalities needed by the app:
-
react-native-webview- the package allow us to use WebView within a React Native app. -
@react-navigation/native- the package allow us to use the navigation in React Native app. -
@react-navigation/stack- the package allows us to create stack navigator in react-navigation. -
react-native-gesture-handler- the package provides native-driven gesture management.
We are using react-native v.62 so there’s no additional linking needed for the above packages. I hope you’ve successfully installed it. If you’re stuck somewhere, please refer to the official installation guide for above packages. We’re going to use an iOS simulator for this tutorial. If you’re on Windows or Linux based operating systems, you can use Android Studio.
Adding Screens and Navigation
The App Component is going to be responsible for initializing screens and create Stack Navigator. Add the import statements that are going to help construct a stack navigator. We are using the createStackNavigator function to create a stack-based navigation flow. This function takes a route configuration object and an options object and returns a React component. Right now, it has only one screen that will be displaying some buttons to navigate to a specific WebView.
Stack Navigation provides a way to transit between screens. This mechanism works quite similar to how a web application works in a web browser. A web app either pushes (next page) or pops (go back) when navigating between different web pages in the browser. Similarly, different screens can be used to either push or pop between in a React Native application.
import React from "react";
import { StatusBar } from "react-native";
import { NavigationContainer } from "@react-navigation/native";
import { createStackNavigator } from "@react-navigation/stack";
import Home from "./src/screens/RootScreen";
import WebToNative from "./src/screens/WebToNative";
import NativeToWeb from "./src/screens/NativeToWeb";
import WebViewUI from "./src/screens/WebView";

const Stack = createStackNavigator();

function App() {
  return (
    <>
      <StatusBar barStyle="dark-content" />
      <NavigationContainer>
        <Stack.Navigator initialRouteName="Home">
          <Stack.Screen
            name="Home"
            component={Home}
            options={{
              headerTintColor: "green",
              title: "Home",
            }}
          />

          <Stack.Screen
            name="WebViewUI"
            component={WebViewUI}
            options={{
              headerTintColor: "green",
              title: "WebViewUI",
            }}
          />
          <Stack.Screen
            name="WebToNative"
            component={WebToNative}
            options={{
              headerTintColor: "green",
              title: "WebToNative",
            }}
          />
          <Stack.Screen
            name="NativeToWeb"
            component={NativeToWeb}
            options={{
              headerTintColor: "green",
              title: "NativeToWeb",
            }}
          />
        </Stack.Navigator>
      </NavigationContainer>
    </>
  );
}
export default App;
If you’re new to the React Navigation library, be sure to check their getting started guide react-navigation.
WebView and custom navigation to handle navigation in WebView
The WebView component requires two props to make it work. First, the startInLoadingState prop must be set to true, as shown in the below snippet. Then, the renderLoading prop is responsible for triggering the loading indicator, in our case, the function: LoadingIndicatorView(). We are going to use the webpage by its URL. But if you want to load HTML directly, you can use the HTML property in WebView’s source property, HTML as a source I'm going to explain later
<WebView
  source={{ uri: "https://dev.to/" }}
  renderLoading={LoadingIndicatorView}
  startInLoadingState={true}
  ref={webviewRef}
/>
Handing navigation using WebView
Inside the WebViewUI component, let’s create three event handler for navigation
webViewgoback: to go the previous web page inside the WebViewwebViewNext: to go to the next web page in the WebView.props.navigation.navigate("Home"): to go home component in react-native.
import React from "react";
import {
  View,
  Text,
  ActivityIndicator,
  TouchableOpacity,
  SafeAreaView,
  StyleSheet,
} from "react-native";
import { WebView } from "react-native-webview";

function WebViewUI(props) {
  const webviewRef = React.useRef(null);

  function webViewgoback() {
    if (webviewRef.current) webviewRef.current.goBack();
  }

  function webViewNext() {
    if (webviewRef.current) webviewRef.current.goForward();
  }

  function LoadingIndicatorView() {
    return (
      <ActivityIndicator
        color="#009b88"
        size="large"
        style={styles.ActivityIndicatorStyle}
      />
    );
  }
  return (
    <>
      <SafeAreaView style={styles.flexContainer}>
        <WebView
          source={{ uri: "https://dev.to/" }}
          renderLoading={LoadingIndicatorView}
          startInLoadingState={true}
          ref={webviewRef}
        />
        <View style={styles.tabBarContainer}>
          <TouchableOpacity onPress={webViewgoback}>
            <Text style={{ color: "green" }}>Back</Text>
          </TouchableOpacity>
          <TouchableOpacity onPress={() => props.navigation.navigate("Home")}>
            <Text style={{ color: "green" }}>Exit</Text>
          </TouchableOpacity>
          <TouchableOpacity onPress={webViewNext}>
            <Text style={{ color: "green" }}>Next</Text>
          </TouchableOpacity>
        </View>
      </SafeAreaView>
    </>
  );
}

const styles = StyleSheet.create({
  ActivityIndicatorStyle: {
    flex: 1,
    justifyContent: "center",
  },
  flexContainer: {
    flex: 1,
  },
  tabBarContainer: {
    backgroundColor: "#d3d3d3",
    height: 56,
    alignItems: "center",
    flexDirection: "row",
    paddingHorizontal: 16,
    justifyContent: "space-between",
  },
  button: {
    fontSize: 24,
  },
  arrow: {
    color: "#ef4771",
  },
  icon: {
    width: 20,
    height: 20,
  },
});
export default WebViewUI;
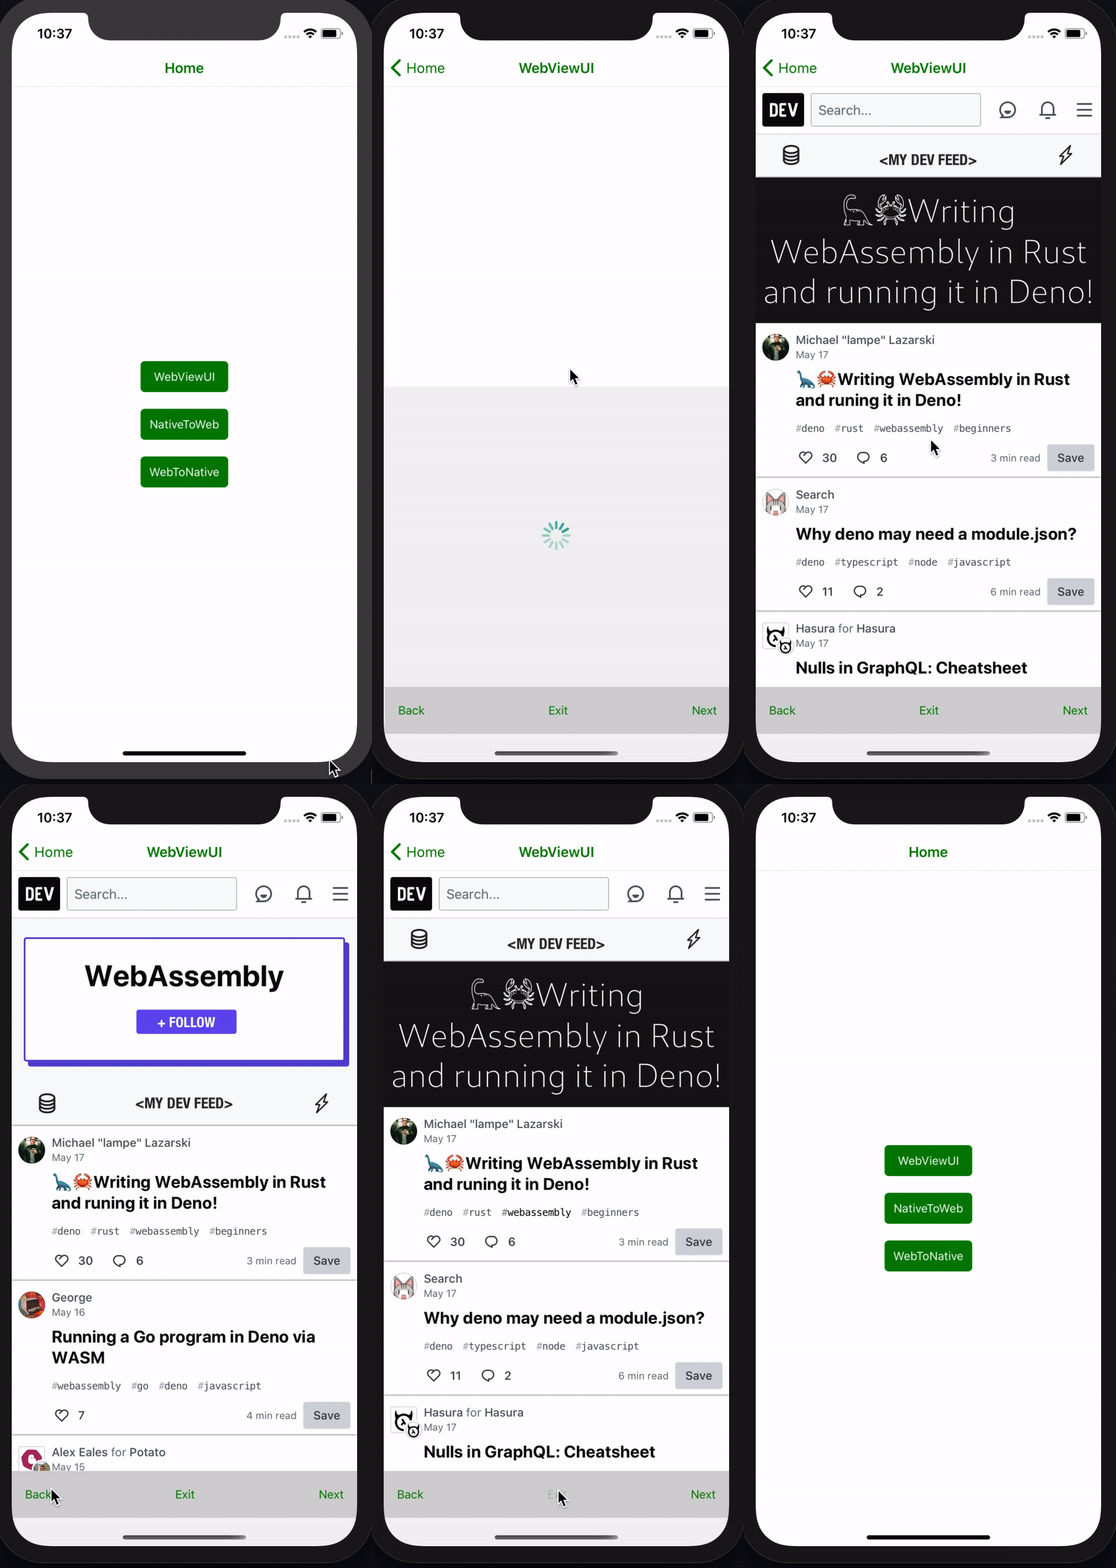
Here’s the complete demo in action with the Back, Next and Exit buttons working.
How to Pass data to React Native from WebView
Above section, we saw how to load a webpage by its URL. But if you want to load HTML directly, you can use the HTML property in WebView’s source property, as shown below. If the webpage wants to send/communicate something back to your React Native code? That is where we can use window.ReactNativeWebView.postMessage and the onMessage prop as listener in react-native.
window.ReactNativeWebView.postMessage(JSON.stringify(data)) sends data to react native
NOTE: window.ReactNativeWebView.postMessage only accepts one argument, which must be a string.
import React from "react";
import { ActivityIndicator, SafeAreaView, StyleSheet } from "react-native";
import { WebView } from "react-native-webview";

function WebToNative(props) {
  const webviewRef = React.useRef(null);
  function onMessage(data) {
    alert(data.nativeEvent.data);
    console.log(data.nativeEvent.data);
    props.navigation.navigate("Home");
  }

  function LoadingIndicatorView() {
    return (
      <ActivityIndicator
        color="#009b88"
        size="large"
        style={styles.ActivityIndicatorStyle}
      />
    );
  }
  return (
    <>
      <SafeAreaView style={styles.flexContainer}>
        <WebView
          source={{
            html: `<body style="display:flex; justify-content:center;flex-direction:column;align-items:center">
                     <h2>React native webview</h2>
                     <h2>React native webview data transfer between webview to native</h2>
                     <button style="color:green; height:100;width:300;font-size:30px"
                      onclick="myFunction()">Send data to Native</button>
                     <p id="demo"></p>
                     <script>
                       const data = [
                           'Javascript',
                           'React',
                           'React Native',
                           'graphql',
                           'Typescript',
                           'Webpack',
                           'Node js',
                        ];
                      function myFunction() {
                        window.ReactNativeWebView.postMessage(JSON.stringify(data))
                      }
                      var i, len, text;
                      for (i = 0, len = data.length, text = ""; i < len; i++) {
                      text += data[i] + "<br>";
                      }
                     document.getElementById("demo").innerHTML = text;
                    </script>
                 </body>`,
          }}
          renderLoading={LoadingIndicatorView}
          startInLoadingState={true}
          ref={webviewRef}
          onMessage={onMessage}
        />
      </SafeAreaView>
    </>
  );
}

const styles = StyleSheet.create({
  ActivityIndicatorStyle: {
    flex: 1,
    justifyContent: "center",
  },
  flexContainer: {
    flex: 1,
  },
});
export default WebToNative;
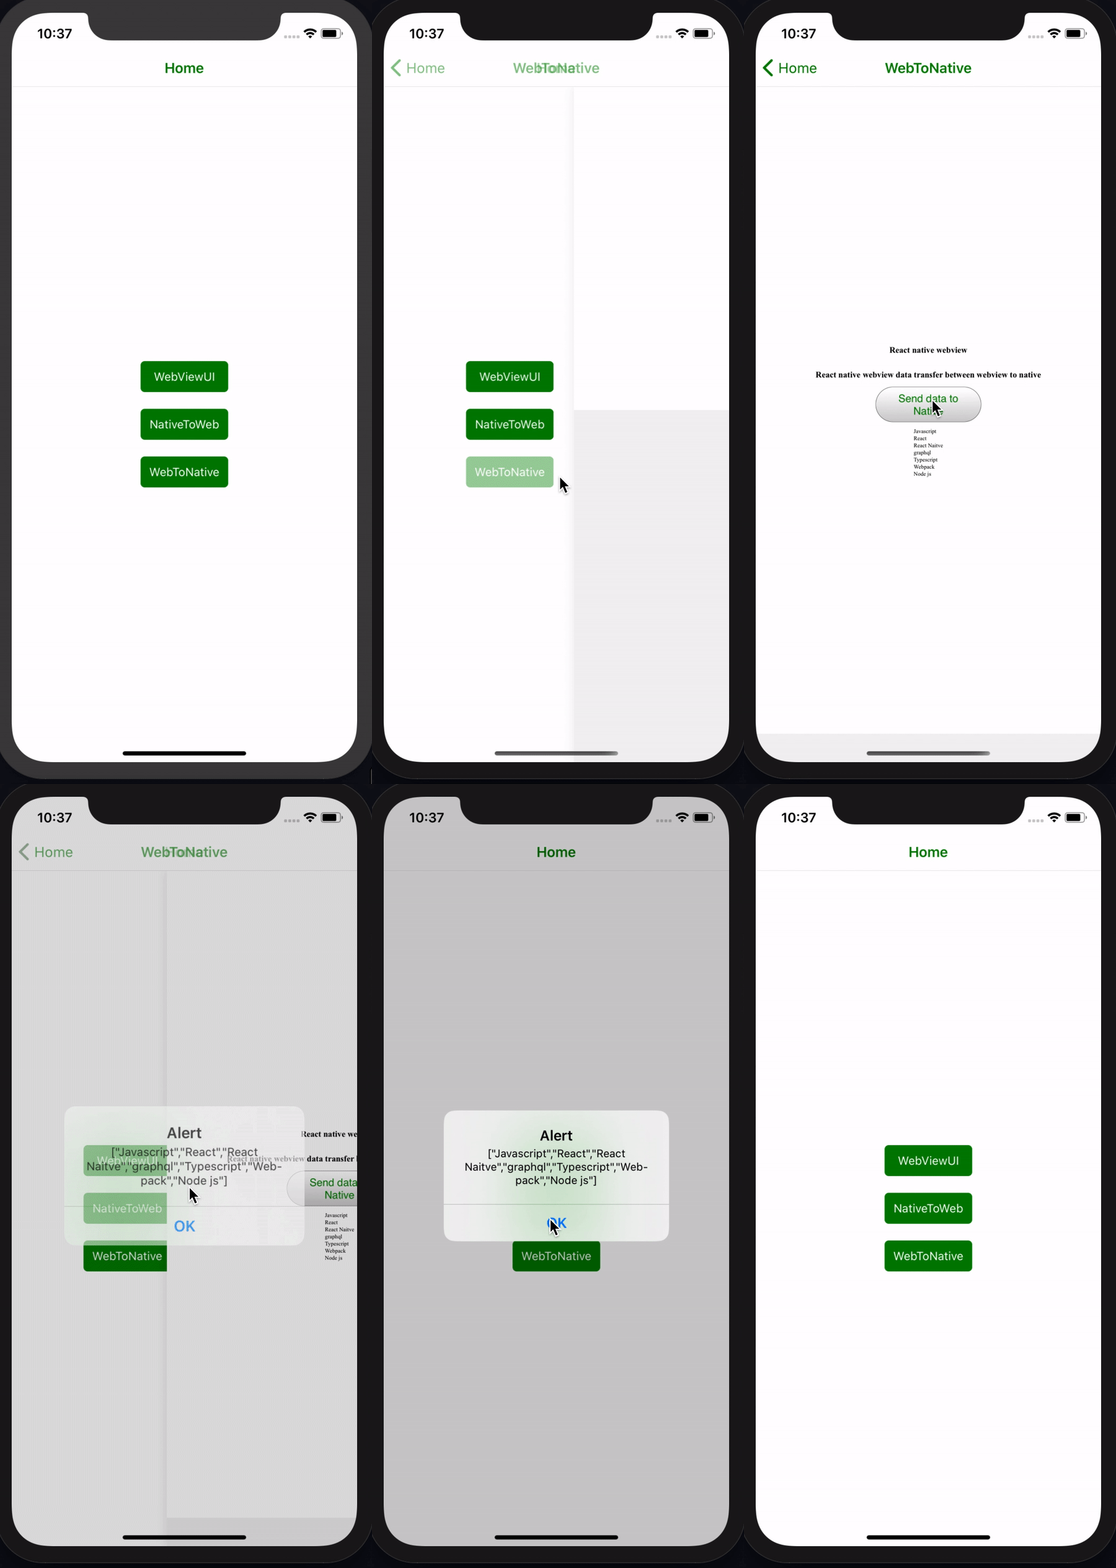
You will get the following result in the simulator running the application.
How to Pass data to WebView from React Native
In the above section, we leaned in details how to Pass data to WebView from React Native. Now we are going to learn how to pass data to WebView from React Native. To pass data to WebView we are going to use injectedJavaScript method in the WebView component.
document.addEventListener("message", function(event) {
 alert(event.data)
}
Using the above message EventListener we can get the data from react-native to WebView.
import React from "react";
import { ActivityIndicator, SafeAreaView, StyleSheet } from "react-native";
import { WebView } from "react-native-webview";

function NativeToWeb(props) {
  const webviewRef = React.useRef(null);
  const data = [
    "Javascript",
    "React",
    "React Native",
    "graphql",
    "Typescript",
    "Webpack",
    "Node js",
  ];
  const runFirst = `
      document.body.style.backgroundColor = 'green';
      setTimeout(function() { window.alert(JSON.stringify([
             'Javascript',
             'React',
             'React Naitve',
             'graphql',
             'Typescript',
             'Webpack',
             'Node js',
          ])) }, 1000);
      true; // note: this is required, or you'll sometimes get silent failures
    `;

  function onMessage(data) {
    props.navigation.navigate("Home");
  }

  function LoadingIndicatorView() {
    return (
      <ActivityIndicator
        color="#009b88"
        size="large"
        style={styles.ActivityIndicatorStyle}
      />
    );
  }
  return (
    <>
      <SafeAreaView style={styles.flexContainer}>
        <WebView
          source={{
            html: `<body style="display:flex;justify-content:center;flex-direction:column;align-items:center">
                      <h2>React native webview</h2>
                      <h2>React native webview data transfer between Native to web</h2>
                      <button style="color:green; height:100;width:300;font-size:30px"
                        onclick="myFunction()">Close webview</button>
                      <p id="demo"></p>
                      <script>
                       var newData = [];
                       document.addEventListener("message", function(data) {
                       newData.push(data.data)
                       alert(data.data)
                       var i, len, text;
                       for (i = 0, len = newData.length, text = ""; i < len; i++) {
                       text += newData[i] + "<br>";
                       }
                       document.getElementById("demo").innerHTML = text;
                      });
                      function myFunction() {
                      window.ReactNativeWebView.postMessage('Hello')
                      }
                    </script>
           </body>`,
          }}
          renderLoading={LoadingIndicatorView}
          startInLoadingState={true}
          ref={webviewRef}
          onMessage={onMessage}
          injectedJavaScript={runFirst}
        />
      </SafeAreaView>
    </>
  );
}

const styles = StyleSheet.create({
  ActivityIndicatorStyle: {
    flex: 1,
    justifyContent: "center",
  },
  flexContainer: {
    flex: 1,
  },
});
export default NativeToWeb;
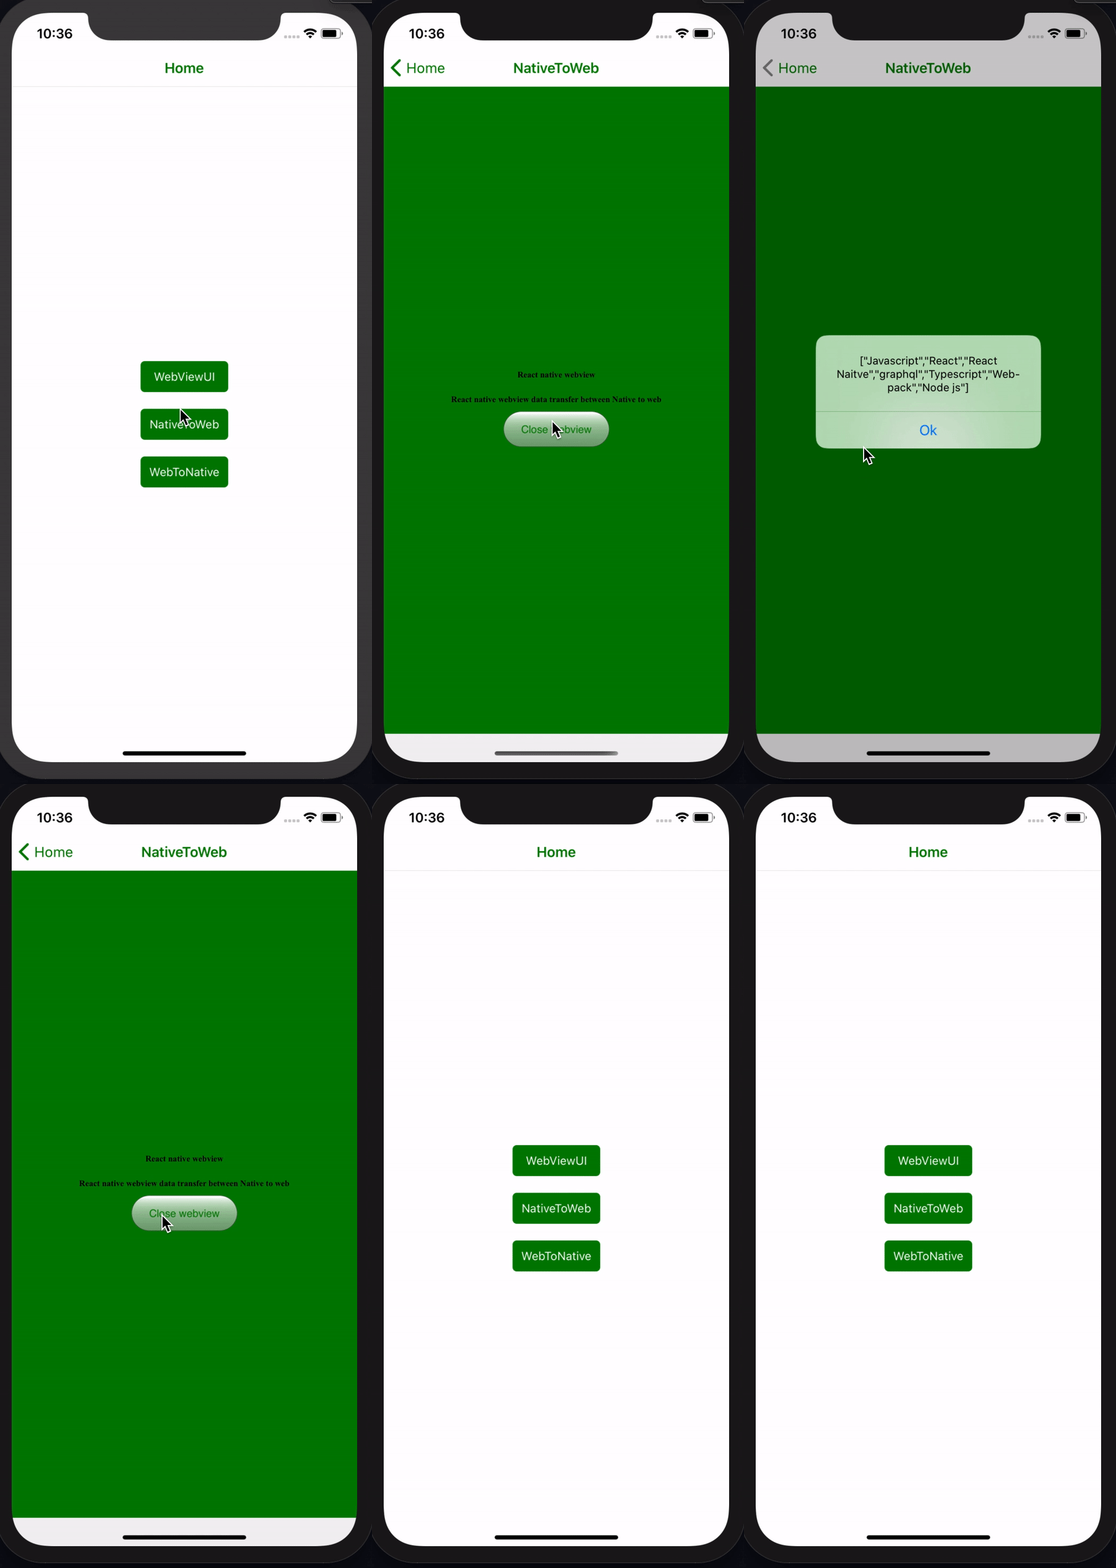
You will get the following result in the simulator running the application.
Conclusion
This article concludes how to get started, setting up, and using a WebView component in a React Native application. the important part of this article how to handle the navigation inside the WebView and pass the data from react-native to webview and webview to react-native
You can find the complete code for this article at here
 mukeshmandiwal
/
RNWebViewExample
React-native-webview
WebView — Navigation and Data flow with WebViews in a React Native app
 git clone https://github.com/mukeshmandiwal/RNWebViewExample.git

 cd RNWebViewExample

 yarn install or npm install

# for ios
cd ios && pod install

react-native run-ios

# for android
react-native run-android


Top comments (12)
Hey man, great article. Ive tried to get data from RN to my WebApp but am not winning.
Where did you add the eventListener exactly?
Heres my gist
gist.github.com/digitlninja/fd4dea...
Hi @mukesh,
How do I pass dynamic values from react native to web view.
Static values I am able to pass but struggling to pass dynamic token
Regards,
Prajyot
JSON.stringifyyour dynmaic token and add toinjectedJavaScript = {json.stringfy(yourtoekn)}Thank you for this awesome tutorial. UI layouts can be improved but overall a great tutorial to get an in-depth concept of React Native Webview along with React Native Navigation. Anyone going through this article can grasp the concept of utilization of webviews in React Native app.
What would you think about using this method to achieve a Hybrid-Native Sweet Spot: Native navigation with web content?
signalvnoise.com/posts/3743-hybrid...
It would allow you to make your webapp in whatever web framework you’d like, and swap it out whenever something better (like SolidJS) comes along. Clients would also get updates to the main webapp instantly. As opposed to users having to update their native app frequently, after the developer had to wait 14 days for App Store approval each time.
You could also completely avoid having an API client, merely serving HTML over the wire. See Hotwire.dev, where HOTwire Strada is similar to the JSON bridge you used to communicate between React Native and the WKWebView.
Doing that would allow you to SSR content even for the Native app. Giving more control to the server as to what is rendered, instead of using something like Server-Driven Rendering (like AirBnB etc.) which controls native components by using JSON commands from the server.
Not sure how good web animations would be, but allegedly they can run in 60fps inside the WKWebView.
This would also be superior to using CapacitorJS as a bridge between a webapp and native, since Capacitor requires you bundle and distribute everything (including updates) in the App Store.
Gave exactly what i was looking for!!!
thanks it's a great tutorial
can you add how to get location if URL included 'add address' or something like that
You can use in this way
Hey man, i use source uri is a web build by react js. So can you tutorial me get data from react native app to react js web through ?
Thank you!
been looking for this its very wonderful,
How can we use different event type name in add event listener instead of message.because it capturing other message events also.
document.addEventListener("message"