Introduction
Hello everybody. My name is Nikolay Angelov (http://nikolaytech.com) and I have put together this Workshop in which we will be creating a very simple but powerful Decentralized Application using a few tools.
The general idea for the App will be to store Certificates (Images) in a decentralized way using IPFS and saving the hash of the image inside an Ethereum Smart-Contract. That way we are certain that no one has altered the Certificate and that it hasn’t been changed.
To create our app we will need to install a few tools and I will explain how in this document.
Tool List:
- Ganache (https://truffleframework.com/ganache)
- InterPlanetary File System - IPFS (https://ipfs.io/)
- MetaMask (https://metamask.io/)
- JavaScript + js
Installing Ganache
Ganache is a fast and customizable blockchain emulator. It allows you to make calls to the blockchain without the overheads of running an actual Ethereum node.
- Transactions are "mined" instantly.
- No transaction cost.
- Accounts can be recycled, reset and instantiated with a fixed amount of Ether (no need for faucets or mining).
- Gas price and mining speed can be modified.
- A convenient GUI gives you an overview of your test chain events.
Now it’s time to install Ganache.
- Open https://github.com/trufflesuite/ganache/releases/tag/v1.2.2 and select the appropriate version based on the operation system you are using.
- For Windows Download the .exe

Now depending on your Windows settings, Windows Defender SmartScreen can warn you that this installation is not safe. Just ignore it and follow the steps to install Ganache:
After clicking on “More Info”, a new screen will appear showing you the installation button.
Then you just need to click next and follow the normal installation instructions and Ganache should be running on your computer.
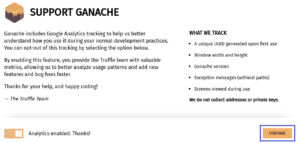
- Now you can allow or forbid Ganache to analyze your data. Make a choice and click continue.
Congratulations! You successfully installed Ganache!
- Run your Ganache and you should get a screen with all of your accounts, their coins and some other information.
Let’s leave Ganache for now and install the rest of the things we need.
Using Infura Provider for IPFS
IPFS is a peer-to-peer distributed file system that seeks to connect all computing devices with the same system of files. In some ways, IPFS is similar to the World Wide Web, but IPFS could be seen as a single BitTorrent swarm, exchanging objects within one Git repository. In other words, IPFS provides a high-throughput, content-addressed block storage model, with content-addressed hyperlinks. (Source: Wikipedia)
- Installing IPFS might be a hard process for beginners, so I have decided to use the API provided by https://infura.io Note: If you are interested in installing this yourself just talk to me and I will help you.
Installing MetaMask Plugin
MetaMask is a bridge that allows you to visit the distributed web of tomorrow in your browser today. It allows you to run Ethereum dApps right in your browser without running a full Ethereum node.
MetaMask includes a secure identity vault, providing a user interface to manage your identities on different sites and sign blockchain transactions.
- Open https://metamask.io/ and get the Plugin for your browser.


- Now MetaMask should appear in your browser Extensions. (Upper right Corner)
You might get a screen that tells you to try the new version.
Please go with the old version and select “No thanks, maybe later” as the new version is pain right now.
Now you need to click “Accept to the next few screens until you are prompted to create a password. This is because MetaMask is actually a wallet that has to be secured

Now you have a Wallet, On the next screen will appear your 12 keywords called Mnemonics. You need to store those in a secure place since they will later allow you to access your wallet in case of a breach or stolen/forgotten password. In our case, we don’t really care as we are going to run our own network.

Now we just need to connect MetaMask to our early started Ganache.
It’s an easy task - go on the top left corner of MetaMask and you will see “Main Network” and an Arrow. Click the Arrow.
- On the drop-down select “Localhost 8545” which is our Ganache local address.

- Now we are connected to our Network and we just need to import a Wallet that has coins. For that, we need to Go to our running Ganache and select the Key Icon (“Show Keys”) right of the first address that we have on the list.

- After that just copy the Private Key.

- Then we go back to MetaMask to import this Key to our Wallet.
The Import is located on the same row as the Network we selected by on the right side.
Click this and then Select “Import Account”
- Paste the Private Key that we copied from Ganache in the box and *Import*

- Now we have Money and we can go and start Coding Stuff.

Creating the Smart Contract
To create our Smart Contract we are going to use an online editor called Remix.
On a more advanced level, Remix actually supports running and deploying on contracts but we don’t really need all of its functions for the basics.
- Go and open https://remix.ethereum.org and you will see a Text Editor.
- On the top left corner there is a “plus” icon with which we can start our first Contract.
Click it and then we need to type the name of our new Contract. Let’s called it CertificatesRegistry
- Now it is time to start Coding Here are our first lines of code that basically define the Version of Solidity that we are using and the actual Contract.

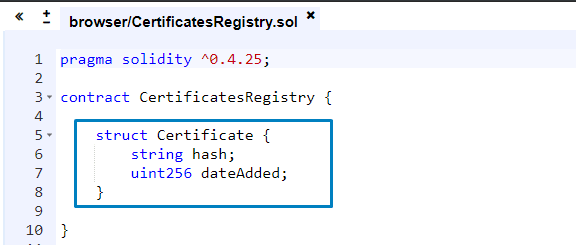
- We want to store Certificates and keep some Data for them.
First thing is that we are storing the Image for the Certificate on IPFS for that reason we need to keep the Hash of it.
I would suggest keeping the information of when the Certificate was added as well.
Let’s see how this thing look in Solidity Code and add it to our code.
- Now we have a structure where we can store the data we need but we want to keep multiple Certificates on our web page, so we should have an Array of Certificates.

- So we can store all the Data in the world, but we don’t have a way to Add new Certificates. Maybe it is time for us to create one function that will do that for us.

- The last thing we need in our Contract is a way to get all the Certificates that we have. In Solidity you cannot return Arrays, so we need a Function that will give us the Count of Certificates that we have and then we need another one that will be giving the Information for the specific Certificate.

- And this is the very basic Contract that we are going to be using.
- To use it we need to deploy it in our Ganache local network. How can we do that? Well, that is the reason we use Remix… as Remix does that for us with only a few clicks.
- On the right side of the Editor, we can see some more information. There we have a few Buttons. Which are “Compile” “Run” “Analysis” “Testing” “Debugger” and some Settings. We care only for “Run” right now, so just go ahead and select “Run”
- After that, we have a few more things. “Environment”, “Account”, “Gas Limit” and so on. Currently, our eyes are on Environment. There we have few options in a drop-down menu which are basically options for us to tell Remix where were went to play and deploy our Contract. We want to use our Ganache so we should select the Third Option “Web3 Provider”

Then we get a screen asking us if we are sure that we want to connect to Ethereum Node. Please select “Ok” and then on the next screen Click “Ok” again without changing anything in the box.
This way we connect Remix to our Ganache and when we do that Remix automatically fills the Accounts with the ones from Ganache, so we actually have money. (Not like MetaMask)
After that in the Deployed Contract Section, we will see information about our Contract.
The most important thing from there is the Address where our Contract is Located, but for now, leave it as it is we will return back in few minutes. (Please DO NOT CLOSE the Remix)
 Creating our JavaScript Front-End
Well, we have our Contract and everything set up. Now we need a way to interact with it and upload Certificates. For that reason, we will be creating JavaScript Page.
I have prepared some Code Skeleton as Resource which holds the CSS, HTML and some initial helper functions we might need and there is no need to code them.
- Download the Code Skeleton from Certificate-Registry-Skeleton
- Un-zip the Zip Archive and there you will find all the Files we need. We even have the Contract if you had a hard time writing it
The main that we are going to Edit is certificates.js
- Open the Folder or the js file in Editor of your choice.
- Now we need only one last Installation before we get into JavaScript and finish this Workshop and that is our HTTP-server
- To install HTTP-server you need to open your terminal (Command Prompt) and type the following in there:
npm install –g HTTP-server
- After that go to the project directory and run in your terminal (Command Prompt)
HTTP-server
Let’s get back into the JavaScript editor and our certificates.js File. There you can see a few things prepared and there Two Functions that have “TODO” which we actually need to Code.
Because the actual Skeleton is already prepared and we have our HTTP-server running we can open and see the Page first look. (Not everything will Work but we can see what we have)
- Let’s go and Check it out. Open http://localhost:8080

Here is our Initial Version. Of course, the Buttons don’t work right now and it is time to make them do stuff. Let’s start with “Submit Certificate”
- Before Starting with our “TODO” items we need to set up our Connection to the Contract. That will be happening with Web3 which is provided by the MetaMask, so the first thing we need to do is check if the user has MetaMask installed and if they don’t we need to tell them to install it.

- After that, we need to Connect to the Contract. That is the reason we have an Empty Variable on top which is ContractAddress. We need to write our Contract Address and we get that information from our Remix. (Hopefully, you didn’t close it. I did warn you J) Go back to the Remix and in the Deployed Contracts just click the small icon and it will copy the Address of the Contract and then past it to this variable.
Note: The Contract Address will be different for everybody, so don’t copy this from my screen and just do the Steps.
- Now the real Connection. For that, we need something called ABI, but I have already prepared it for you in our Config Folder, so we will use it from the Skeleton and this Address that we just wrote. It looks like this.
Basically saying… Hey, Web3 here is this Contract and it is located on that Address.
This way our JavaScript knows how to communicate with the Contract and where to find it.
- The first “TODO” that we are going to code is from the first function “uploadCertificate” which is the one interacting and uploading files the IPFS and then adding the information to our Contract.
In the Skeleton, I have already prepared the IPFS and connected it to the Infura Provider.
You can see that from the first two lines.
Now we have left to code the actual upload.
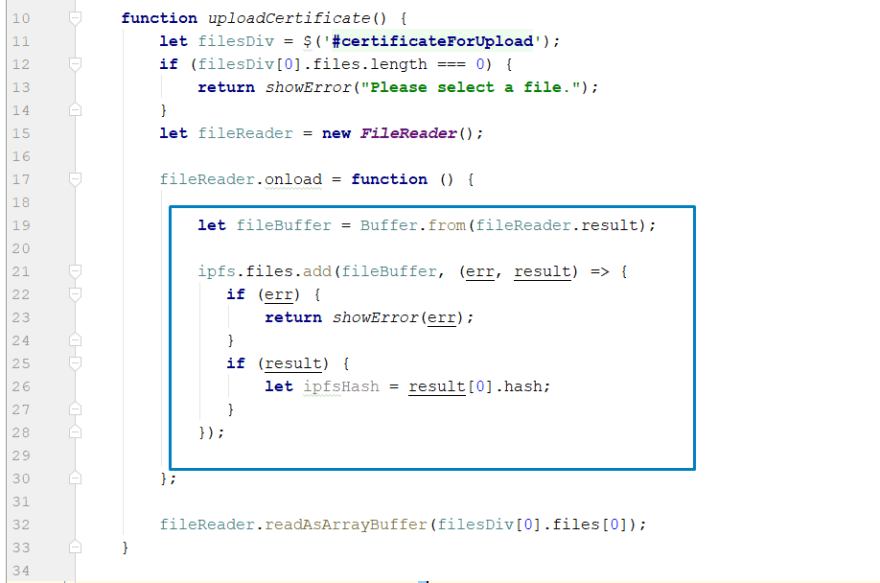
- First, we pick the Div element where our File Form is located and we want to check if the User has selected any file before doing If he didn’t select a file we display an Error using the Helper function “showError”.

- Now if the User has selected a file it is time for us to upload it to IPFS and get its hash.
- We have the Hash of the Certificate and now we can add it to our Smart Contract. This is done with our variable “contract” with which we made a connection to our *Smart Contract.*

- With this, we have our Uploading of Certificates functionality ready and we can go on our Page and check it out. Just go again on http://localhost:8080 and try to submit a certificate.
Now when you click Submit, MetaMask will Pop-up and ask you if you want to make a Transaction. This is because we are trying to Record the Information in the Blockchain and MetaMask asks for permission to do that. Just Click “Submit” in MetaMask and the magic will happen.
If you did everything correct you will get this nice Success Message.
- All Good. We can upload certificate images to IPFS and can store the information in the Blockchain, but we cannot still view it. Maybe it is time to start Coding our Second “TODO” (Function).
- Ok let’s jump and Code our viewGetCertificates
- Here we first need to get the number of how many Certificates we have stored. That is because we want to iterate over them on our JavaScript and not inside the Solidity as for loops in Solidity are quite expensive.
- Now we have the number of Certificates and we want to get their information one by one and append them to our HTML using jQuery.
With this, we now should have View of Certificates working as well.
- Let’s open our page again at http://localhost:8080 and click “View Certificates” to see if our Certificate that we previously uploaded is there.
Now we have a fully working Decentralized App with IPFS which is Decentralized Storage.
You can hit me with any questions or follow me on:
http://nikolaytech.com
https://linkedin.com/in/thedi
Email: nikolay@nikolaytech.com


Top comments (0)