
Do you want to know how to build an AI image analyzer? Then read this article till the end! I'm going to show you how to build AI analyzer tools really simply, so you almost don't have to have any prior knowledge. I will take you step by step, and we will use Project IDX and the Gemini API. This means you don't have to set up anything; everything we will do is on the cloud. If you're ready, then let's get started!
Getting Started with Project IDX
The first step is pretty simple. We need to open the website idx.google.com. If you haven't registered yet, you have to register first, and then you can see the screen below.

Choose a Template: I will choose the Gemini API template.
Name Your Project: I will call it "test 2024".
Select Environment: I will choose "Vite", which is a JavaScript web application environment.
Create the Project: Press the create button.

After a few minutes, IDX will create everything for us, and we will see our template files, which we can modify as we like.
Modifying the Template
This is our index.html file. We can modify it the way we like, but let's first look at it. The initial template contains almost everything that we need. This template uses the Gemini 1.5 - flash model, so it's more than enough for us.

Getting an API Key
As you can see, the application doesn't work initially because we need to get an API key first. Go the website https://aistudio.google.com/app/apikey and obtain your key there. If you want detailed instructions on how to get an API key, please watch another video about Project IDX. Once you get your key, copy it and then go to the main.js file and replace the placeholder with your API key.

Testing the Application
Let's check if our application is working. Press "Go" and see what Gemini returns to us.

As you can see, Gemini understands what's inside the picture and suggests some recipes to bake this kind of bakery. Since this application is already on the server, you will be able to share the link or open this application in your browser.

The URL is not beautiful yet; however, you will be able to see that everything is working, and you can share this link with your partners or co-workers.
Adding Image Upload Functionality
To complete our AI image analyzer, we need to be able to add our own image. Let's make some adjustments to the template, first is index.html file:
Change the Application Name: I will call it "AI Image Analyzer".
Delete the HTML: Delete the predefined images. Lines from 14 until 27.
<div class="image-picker">
 <label class="image-choice">
   <input type="radio" checked name="chosen-image" value="/baked_goods_1.jpg">
   <img src="/baked_goods_1.jpg">
 </label>
 <label class="image-choice">
   <input type="radio" name="chosen-image" value="/baked_goods_2.jpg">
   <img src="/baked_goods_2.jpg">
 </label>
 <label class="image-choice">
   <input type="radio" name="chosen-image" value="/baked_goods_3.jpg">
   <img src="/baked_goods_3.jpg">
 </label>
</div>
- Add an input field for uploading images. Line 15 ```
4. Change the input name prompt value to "Ask anything you want about this image".
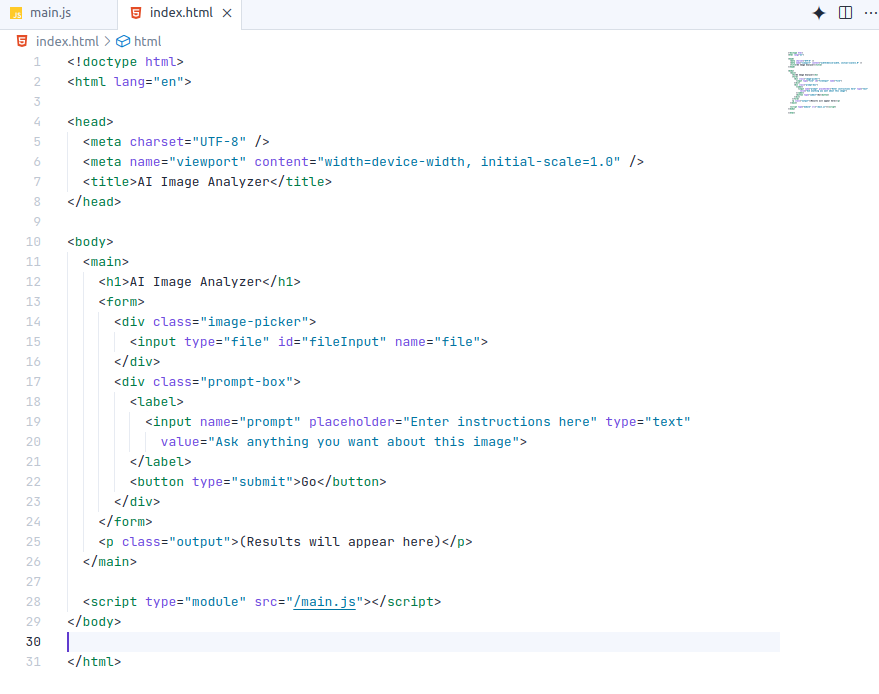
The resulting HTML should look like the picture below.
## Updating the JavaScript
We need to define JavaScript code to read our file. Open the main.js file and make the following changes:
Remove the code from line 22 until 26.
// Load the image as a base64 string
let imageUrl = form.elements.namedItem('chosen-image').value;
let imageBase64 = await fetch(imageUrl)
.then(r => r.arrayBuffer())
.then(a => Base64.fromByteArray(new Uint8Array(a)));
Add a new code starting from line 22.
// Load the image as a base64 string
const fileInput = document.getElementById('fileInput');
const file = fileInput.files[0];
const imageBase64 = await new Promise((resolve, reject) => {
const reader = new FileReader();
reader.readAsDataURL(file);
reader.onload = () => {
const base64String = reader.result.split(',')[1]; // Extract base64 part
resolve(base64String);
};
reader.onerror = reject;
});
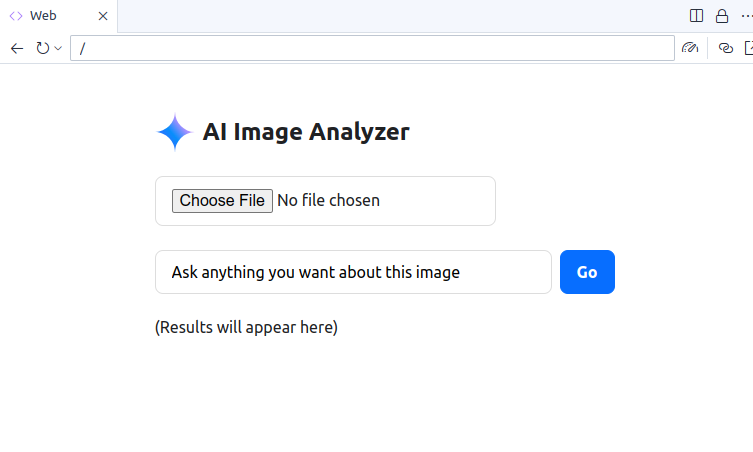
Your application will look like this in the screenshot below.
## Final Testing
Let's check the result. Upload an image, ask what is on the image, and press "Go".
My image example
The result:
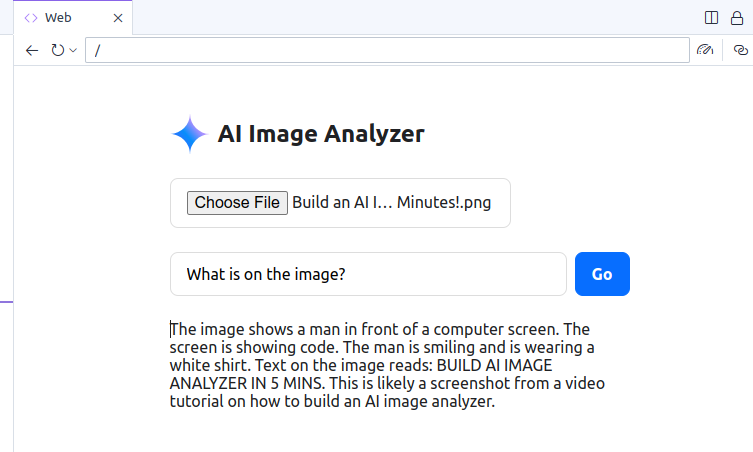
As you can see, the Gemini API explains everything about the image. Our AI image analyzer is working!
## Video Tutorial - How To Build AI Image Analyzer
Conclusion
That's it! As you can see, it's really simple to build an AI image analyzer using Project IDX and the Gemini API. You can make a bunch of different apps. This is just one example. I hope you find this article helpful and informative. Please don’t forget to share your feedback in the comments below.
Thank you, and see you in my next articles! :)


Top comments (0)