Getting to grips with the basics of how users interact with your web apps using a screen reader is hugely beneficial in developing accessible content. While accessibility guidelines (i.e. the WCAG) and principles can be understood without becoming a screen-reading expert, a grasp of the basics will help you:
- Better understand the reasons behind the "rules" to follow for developing accessible web apps
- Get an idea for some of the frustrations screen reader users come up against time and again due to inaccessible sites
- Conduct basic screen reader accessibility checks of your own work as you develop
Popular free screen reader + browser combinations (according to the latest WebAIM screen reader user survey) include:
- NVDA with Firefox for Windows users
- VoiceOver with Safari for Mac OS users
As a Mac user, this post is focused purely on VoiceOver.
A little initial setup
Before you get started, you will need to enable keyboard accessibility on your Mac, as this comes disabled by default. In your System Preferences, go to:
Keyboard > Shortcuts
And in the "Full Keyboard Access" section at the bottom, select "All controls", as per the image below.
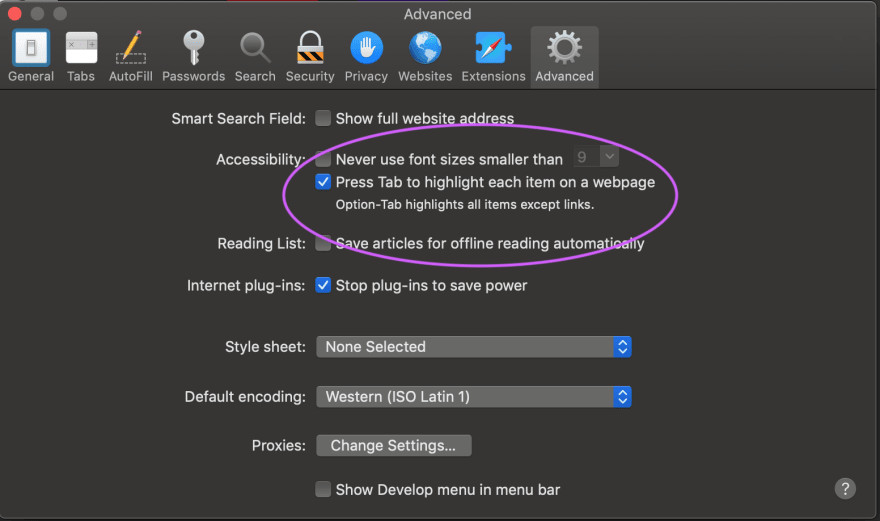
In Safari Preferences, go to:
Advanced > Accessibility > Press tab to highlight each item on a webpage, as per the image below
You're now ready to get started!
Switching on and off
Switching VoiceOver on and off can be done with a keyboard shortcut:
Cmd + F5
It is the same key combination to switch on and off, so don't worry, if you've managed to switch it on, you definitely will be able to switch it off again!
The "VoiceOver" keys
Nearly all commands you will use with VoiceOver begin with a combination commonly referred to as "VoiceOver keys" or "VO". This key combination is:
Ctrl + Option
I'll refer to this key combination as "VO" from now on, as a useful shorthand.
Task 1: Try triggering a whole page to be read aloud
The command to simply 'start reading' is:
VO + A
Why not switch on VoiceOver now and give it a go? When you want to stop the flow of reading, you can do so by pressing:
Ctrl
Task 2: Try reading items one by one
To read content in sections, the command is:
VO + Right arrow (for next item), or
VO + Left arrow (for the previous item)
Give it a try! You'll notice that this time instead of reading the entire page, VoiceOver will only read one piece of content at a time. This can be very useful if you are checking a specific section of your work.
Task 3: Interact with some items
You can move through the interactive items on the current page by using the Tab key:
Tab (to go to the next interactive item)
Shift + Tab (to go to the previous interactive item)
If you're not familiar with standard keyboard navigation, you might like to check out my previous post on this topic too for a bit more background:

How Should Keyboard Navigation Work in Web Applications?
Suzanne Aitchison ・ Nov 10 '19 ・ 3 min read
You will notice that when you are focused on an interactive item such as a button or a link, VoiceOver will give you a hint about how to interact with the item. The hint will be both verbal and visual, e.g. as shown in screenshot below:
To 'click' the item, use the key combination:
VO + Space Bar
Try switching on VoiceOver and giving this a go - once you've achieved this, you're now able to read and step through most content, interact with dropdowns/buttons/etc, and navigate by links - great!
Bonus Task: Navigate by headings
In the latest WebAIM Screen Reader User Survey, respondents were asked:
- When trying to find information on a lengthy web page, which of the following are you most likely to do first?
A huge 68.8% of responses said "Navigate through the heading levels on the page".
Therefore, I would recommend that in addition to the three previous steps that will allow you to browse and interact with most content, you also become familiar with navigating by heading level.
The command to navigate headings in order is:
VO + Cmd + H (to go to next heading)
VO + Shift + Cmd + H (to go to previous heading)
This is a way for screen reader users to scan web content for the section they need - very similar to how sighted users would scan the page! Given the high instance of users preferring to navigate this way, it is definitely worth giving this one a try. It will also help highlight how important good use of heading levels is to making sure your content is surfaced to your users.
For a bit more on heading levels, check out my previous post on the topic:

Getting Heading Levels Right - Including Here on DEV
Suzanne Aitchison ・ Oct 22 '19 ・ 4 min read
Keen to learn more?
If you'd like to sharpen your VoiceOver skills even further, I'd recommend heading over to the Apple VoiceOver docs or this handy reference guide from Deque University
Did you find this post useful? Please consider buying me a coffee so I can keep making content 🙂


Top comments (0)