Introduction
Hello everyone 👋
My name is Vedant, and I love building apps using Swift and Android SDK. In the previous article, we discussed how we can use the swift-android repository to use the Android Swift classes to calculate the SafeArea constants. We will continue exploring other possibilities and will try to build an AlertDialog for both Android & iOS platforms.
In this article (exclusively for SCADE enthusiasts), we will learn how to use Android widgets using the swift-android repository. This approach will give you a basic understanding of how to use the equivalent Swift classes for Java classes.
I am sure it will be fun! So let’s start 😎.
Prerequisite
If you haven’t installed the SCADE IDE, download the SCADE IDE and install it on your macOS system. The only prerequisite for SCADE is the Swift language (at least basics). Also, please make sure the Android emulator or physical device is running if you want to run SCADE apps on an android device.
Source Code
You can directly see the sample example on scade-platform repository.
https://github.com/scadedoc/UgExamples/tree/master/UgModalDialogDemo
Getting Started
This will be similar to creating a new SCADE project, click on File -> New -> New Project. Then select the SCADE option, enter the name of the project and click Create.
It is easy to build the AlertDialog for the iOS platform, we just need to use the same native iOS code to create an alert. For Android, we will integrate the swift-android repository via SPM to Package.swift.
Code for iOS
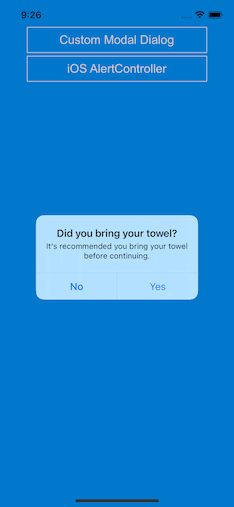
To calculate for iOS devices, we can use the exact same native swift codebase for creating an AlertDialog with a title and description along with two buttons.
This code will be explicitly written for iOS so we will place the OS checks first. This is required otherwise it will throw an error when run for Android.
import ScadeKit

#if os(iOS)
 import UIKit
#endif
We use the UIAlertController widget to create an AlertDialog and pass the title, and message to it.
let alert = UIAlertController(
       title: "Did you bring your towel?",
       message: "It's recommended you bring your towel before continuing.",
       preferredStyle: .alert)
The preferredStyle parameter is set to .alert so that it will display the Alert format with the title and message.
Then, let’s add a few buttons by using the addAction() method.
alert.addAction(UIAlertAction(title: "Yes", style: .default, handler: { _ in print("yes") }))
alert.addAction(UIAlertAction(title: "No", style: .cancel, handler: { _ in print("no") }))

SCDApplication.rootViewController?.present(alert, animated: true)
It will add two buttons with the default style and handler. Finally, to display the dialog use the present() method of the SCDApplication.rootViewController.
Then, set the target to an iOS emulator and check if the AlertDialog is working fine.
Great! The native iOS code works fine with the SCADE editor. Let’s continue integrating the AlertDialog for Android.
Integrate swift-android via SPM
We can’t use directly Java classes in SCADE editor rather we will need the equivalent Swift classes. We will add the swift-android library via SPM into the Package.swift.
// swift-tools-version:5.3
import PackageDescription
import Foundation

let SCADE_SDK = ProcessInfo.processInfo.environment["SCADE_SDK"] ?? ""

let package = Package(
   name: "UgModalDialogDemo",
   platforms: [
       .macOS(.v10_14)
   ],
   products: [
       .library(
           name: "UgModalDialogDemo",
           type: .static,
           targets: [
               "UgModalDialogDemo"
           ]
       )
   ],
   dependencies: [
     .package(name: "Android", url: "https://github.com/scade-platform/swift-android.git", .branch("android/24"))
   ],
   targets: [
       .target(
           name: "UgModalDialogDemo",
           dependencies: [
               .product(name: "Android", package: "Android", condition: .when(platforms: [.android])),
               .product(name: "AndroidOS", package: "Android", condition: .when(platforms: [.android])),
               .product(name: "AndroidApp", package: "Android", condition: .when(platforms: [.android])),
               .product(name: "AndroidContent", package: "Android", condition: .when(platforms: [.android])),
           ],
           exclude: ["main.page"],
           swiftSettings: [
               .unsafeFlags(["-F", SCADE_SDK], .when(platforms: [.macOS, .iOS])),
               .unsafeFlags(["-I", "\(SCADE_SDK)/include"], .when(platforms: [.android])),
           ]
       )
   ]
)
We require AndroidApp module of the swift-android repository. It will require important classes such android.app.AlertDialog.
The code below is the native implementation of the Android code. We use the AlertDialog.Builder class to create a Dialog with a title and message.
new AlertDialog.Builder(context)
   .setTitle("Title")
   .setMessage("Message")

   // Specifying a listener allows you to take an action before dismissing the dialog.
   // The dialog is automatically dismissed when a dialog button is clicked.
   .setPositiveButton(android.R.string.yes, new DialogInterface.OnClickListener() {
       public void onClick(DialogInterface dialog, int which) {}
    })

   // A null listener allows the button to dismiss the dialog and take no further action.
   .setNegativeButton(android.R.string.no, null)
   .setIcon(android.R.drawable.ic_dialog_alert)
   .show();
We now need to convert the above Java code into Swift using the equivalent classes of the swift-android repository.
Swift compiler for Android code
The swift-android repository contains the swift classes which are generated from the Android SDK. We will inject the required classes into our SCADE app and achieve similar functionality accordingly. It uses SPM a lot to inject the necessary dependencies into the SCADE app.
We require the applicationContext and AndroidApp classes to call the necessary methods for the Android code snippet above.
As the next step, we will import these packages for Android in the main.page.swift file.
import ScadeKit

#if os(Android)
  import Android
  import AndroidApp
  import AndroidContent
#endif
We are now ready to call the respective swift methods for the given above java methods.
#if os(Android)
     let builder: AlertDialogBuilder = AlertDialogBuilder(context: Application.currentActivity!)
     builder.setTitle(title: "Did you bring your towel?")
     builder.setMessage(message: "It's recommended you bring your towel before continuing.")

     // setting buttons
     builder.setPositiveButton(text: "Yes", listener: nil)
     builder.setNegativeButton(text: "No", listener: nil)

     let dialog: AlertDialog = builder.create()!
     dialog.show()
     print("Dialog shown")
#endif
Let us understand the above code snippet and what it does basically. In order to access the Activity context, we use the currentActivity instance which returns the context. Using this context, we call AlertDialogBuilder to access the resource globally.
The builder method of the AlertDialogBuilder class allows the creation of the dialog user interface including title, description, and buttons. We can also customize the dialog interface accordingly. As of now, let’s build a dialog with basic functionality.
You can see, that we have just converted the above Java code to Swift code using the swift-android classes. Finally, we just display the dialog using the show() method of the AlertDialog class.
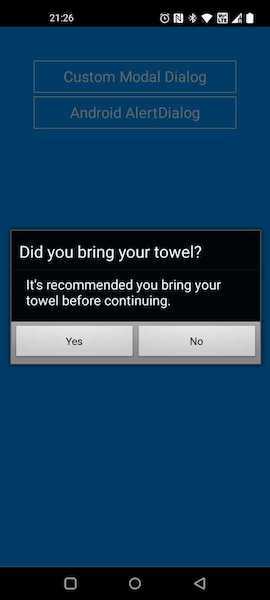
Now we are good to test the code on Android devices. Set the target to any Android device you like and test if it is working as expected.
Voila🎊! We have successfully developed the AlertDialog interface for our SCADE app. Integrating any Android-specific feature is very easy into the SCADE app using the swift-android library. You should definitely try the swift-android to build some of the useful components to build cross-platform apps.
This is another example of using the swift-android repository. Please give it a try to convert the Android Java classes to the respective Swift class. Thank you for reading and see you in the next article!
Happy Coding 😊


Top comments (0)