Sitecore has been pretty clear that the only supported option for deploying items to XM Cloud was using Sitecore Content Serialization (SCS) format. But people love using Unicorn and there were enough clues lying around that Unicorn might work? But I couldn't be sure. To make my life as a DevRel professional at Sitecore easier, I was sort of hoping this Proof of Concept with Items as Resources (IAR) wasn't going to work.
But it did.
So I'm writing this article so you can see how it works and also highlight some risks with trying to deploy Unicorn serialization to XM Cloud!
⚠ IMPORTANT⚠
Sitecore does not officially support Unicorn deployment to XM Cloud.
The approach in this article was done to prove something is POSSIBLE, but also explain why you probably still shouldn't do it.
Please?Jason, a concerned Sitecorian
Why write this article, then?
If this is something you shouldn't be doing, why document how to do it? Well, the fact of the matter is, I didn't know if it could be done or not. And when I talked to other people much more fluent in Unicorn than I, they also didn't know for sure. In fact, I couldn't find a single resource or example from Sitecore or others that showed why Unicorn could NOT be pushed to XM Cloud. There were plenty of statements saying that only the Sitecore CLI and Sitecore Content Serialization (SCS) format were supported. Nobody had figured out why, though.
So I'm going to show you how to make it work, and then explain the risks.
What's the TL;DR?
The challenge: Take an existing Unicorn serialization file and have the item get created in XM Cloud.
The pieces that make it work:
- Deploy pipeline in GitHub actions (or your favorite DevOps tool) that invokes the Sitecore CLI
- The Sitecore CLI itemres --unicorn command to create an IAR .dat file from Unicorn serialization
- A placeholder .dat file in App_Data that is part of the solution being deployed.
The result: It works. (With some things that are not 'clean') Definitely not supported by Sitecore, and could stop working at any time. Be aware of the risks.
Follow along with the GitHub repo
So you can see exactly how this all came together, you can find my fork of the XM Cloud foundation head in my GitHub: https://github.com/jst-cyr/xmcloud-unicorn-deployment
The key files to reference are:
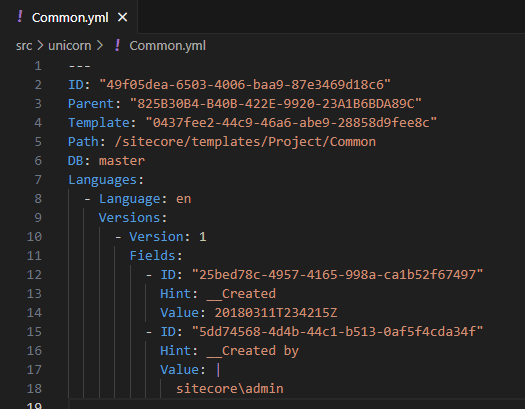
- src/unicorn/Common.yml
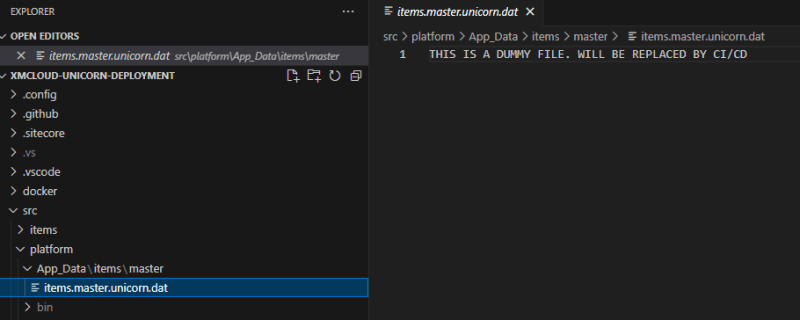
- src/platform/App_Data/items/master/items.master.unicorn.dat
- .github/workflows/deploy_xmCloud.yml
PART 1: Adding the Unicorn serialization files
In my example, I have a single Unicorn serialization file that is used to test out the concept.
Here are the steps I took:
I forked the xmcloud-foundation-head that is used by XM Cloud. This provided me a base solution that is ready to deploy to XM Cloud.
I found a simple serialized file from a 5-year old project that my colleague Dylan Young had in his GitHup repo. This file was a template folder so had limited references to other items and did not have a complex subitems tree I needed to worry about. The purpose was to have an example, but in a real scenario you would have many files across many projects/features that you might have to locate and add to your XM Cloud solution.
-
I added the serialized file into a folder that I named 'unicorn'. This was for testing purposes and made the later IAR generation step much easier, but you likely would have a more complex setup in a real situation.
NOTE: I did not need to reference it in the project, I only needed to add it to source control.
-
I updated the Parent ID value and the Path to match with the folder in XM Cloud. In the repository I took the file from, it was also referencing a 'project' folder, but it didn't match with the default one shipped with XM Cloud.
To make my life easier, and avoid needing to ship a new parent folder, I updated it to match with the /sitecore/templates/Project folder that ships with XM Cloud. This actually didn't occur to me originally until my deployment failed and the item didn't get created, so I'm telling you now so you don't make my mistake!
Important note: My use case was purposefully simple. No parent children to deploy, no child items, using an existing Project folder, and only pushing a single item. Your solution will not necessarily be that simple and you may have many files that you have to analyze for conflicting folder paths and invalid ID values.
That being said, whether you want to use Unicorn or convert to SCS, you'll likely need to figure out those updates.
PART 2: Adding a placeholder item resources DAT file
I'll be honest, I didn't do this as my second step when I was first putting this together. This was actually my last step because I had no idea I needed to do this until things didn't work for me.
The goal: This file is going to be replaced in the DevOps pipeline with a real IAR DAT file and will tell XM Cloud to deploy it.
The XM Cloud deployment will only look at the files you have referenced in your project. If you have a file in the right place, but it's not referenced by the project build, it isn't going to be pushed over to XM Cloud.
I chose to do a text file that had the right file name (items.master.unicorn.dat). This is an invalid DAT file and I did this so that if XM Cloud deploy throws an error I would know that the file got there, but my actual IAR file had not. (Basically my equivalent of a "Here!" write to the console log).
PART 3: Adding GitHub Action for triggering deployments on push to the branch
I stole this idea from our XM Cloud Introduction example repo. My colleague Rob Earlam had built out a multisite DevOps pipeline with GitHub actions and it was easy enough to trim it down to just what I needed to push a project to XM Cloud. This was a good starting point.
From what is in that repo, I created .github/workflow/CI-CI_XM_Cloud.yml
name: CI-CD - XM Cloud
on:
  workflow_dispatch:
  push:
    branches: [main]
  pull_request:
    branches: [main]
jobs:
  deploy:
    uses: ./.github/workflows/deploy_xmCloud.yml
    if: github.repository_owner == 'jst-cyr' && ((github.event.pull_request.head.repo.full_name == github.repository) || (github.event_name == 'push'))
    with:
      environmentName: Unicorn
    secrets:
      XM_CLOUD_CLIENT_ID: ${{ secrets.XM_CLOUD_CLIENT_ID }}
      XM_CLOUD_CLIENT_SECRET: ${{ secrets.XM_CLOUD_CLIENT_SECRET }}
      XM_CLOUD_ENVIRONMENT_ID: ${{ secrets.XM_CLOUD_ENVIRONMENT_ID }}
This file will trigger on PRs and pushes to the repository and run the deploy_xmCloud.yml GitHub action (more on that later). Important pieces:
github.repository_owner == 'jstcyr'
This ensures if somebody forks the repo and does a PR that it doesn't trigger a deployment to my environment.
environmentName: Unicorn
This can be any value, but I use it in deploy_xmCloud.yml to add it to the action name. This is useful in multi-site scenarios where we might deploy multiple sites and we want to see in the GitHub Actions dashboard which site is being pushed.
XM_CLOUD_CLIENTID
The value here is used to authenticate with the Sitecore CLI. Essentially my username. You can get your Client ID from the XM Cloud Deploy App.
XM_CLOUD_CLIENT_SECRET
The value here is used to authenticate with the Sitecore CLI. The password, if you will. You can your client secret when you get your client ID.
XM_CLOUD_ENVIRONMENT_ID
This specifies which environment the deployment should connect to. If you use the console to create your environment, you can easily get the environment ID there. If you already have an environment, you can get it from the environment details page.
I've used GitHub secrets here for sensitive environment/auth information so that I don't have to commit the values to the repository. I strongly suggest you do this for your XM Cloud deploy actions!
PART 4: Building the Deployment GitHub action
With deployments being triggered, we now need the Sitecore CLI actions to actually push our solution to the environment. I again stole this from our XM Cloud Introduction repo and have a very simple job:
name: Deploy the solution and items to an XM Cloud instance

on:
  workflow_call:
    inputs:
      environmentName:
        required: true
        type: string
    secrets:
      XM_CLOUD_CLIENT_ID:
        required: true
      XM_CLOUD_CLIENT_SECRET:
        required: true
      XM_CLOUD_ENVIRONMENT_ID:
        required: true

jobs:
  deploy:
    name: Deploy the XM Cloud ${{ inputs.environmentName }} Site
    runs-on: ubuntu-latest
    steps:
      - uses: actions/checkout@v3
      - uses: actions/setup-dotnet@v2
        with:
          dotnet-version: "6.0.x"
      - run: dotnet tool restore
      - run: dotnet sitecore --help
      - name: Authenticate CLI with XM Cloud
        run: dotnet sitecore cloud login --client-credentials --client-id ${{ secrets.XM_CLOUD_CLIENT_ID }} --client-secret ${{ secrets.XM_CLOUD_CLIENT_SECRET }} --allow-write
      - name: Deploy the CM assets to XM Cloud
        run: dotnet sitecore cloud deployment create --environment-id ${{ secrets.XM_CLOUD_ENVIRONMENT_ID }} --upload
In this deploy job, it does the following steps:
- Ensure the Sitecore CLI is installed and ready
- Authenticate against XM Cloud using the client ID and client secret that were passed in
- Trigger a new deployment to the specified environment
At this point, when I commit code, it detects the change and pushes my project to XM Cloud.
PART 5: Generating the Unicorn IAR file
One small line of code can be added to that deployment job to make the magic happen now:
run: dotnet sitecore itemres unicorn --output src/platform/App_Data/items/master/unicorn --path "src/unicorn" --overwrite
By running this command before we trigger the deployment, we can replace the placeholder DAT file with our generated one. The commands and parameters work as follows:
- itemres: This command generates an Item as Resources (IAR) package
- unicorn: This subcommand tells it to expect Unicorn serialization format
- --output: This specifies the path where we want the IAR file to be placed after it is created. We want this to match to the source path of where we put our placeholder DAT file. You might notice I don't specify the file name as it automatically uses the folder path in App_Data to create the file name. (items/master/unicorn becomes items.master.unicorn.dat)
- --path: This tells the command where in the file system to find the files to process into the DAT file.
PART 6: Validating the deployment
Now we need to check that everything went over. First we check to see that the file showed up in our deployment logs on XM Cloud.
From the 'Build' section of the deployment we see:
This tells me that a DAT file with the right name got there, but it doesn't tell me if it was processed.
From the 'CM instance logs' Log file:
Since there was no error here, that means the file is not the invalid text file that was in my project, and is a valid IAR file that contains 1 item. However, that does NOT mean it successfully was imported (I learned that the hard way).
For instance, if the IAR is a valid format, this part will show correctly. However, I originally had a parent that didn't exist in the database. So no errors occurred, but the item wasn't pushed. So I need to check in Content Editor.
From the Content Editor UI:
 \
\
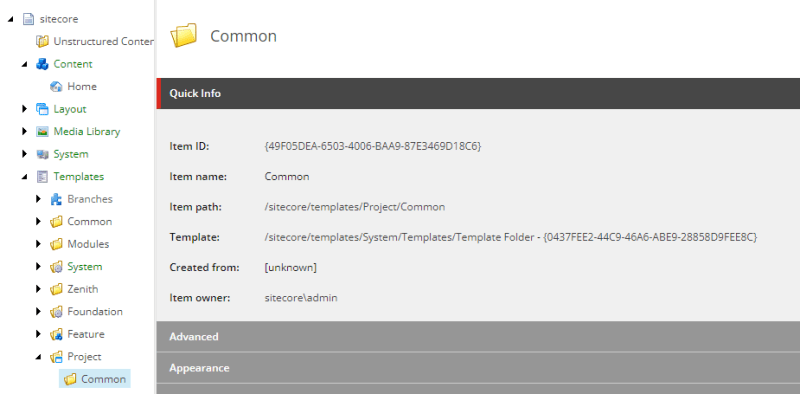
I can see here that there is a Common folder in the Project templates folder, and that the Item ID matches the item I wanted to create that was in my Unicorn serialization.
SUCCESS!
Wait... it worked?
What I had hoped to learn, when doing this investigation, was that the Unicorn-based IAR files could not be uploaded to XM Cloud and there was no way to get Unicorn serialization format to work. That would make my life a lot easier with the statement that Sitecore does not support Unicorn serialization with XM Cloud because it's a lot easier to say something isn't supported when it also just plain doesn't work. So life for me will be a little more complicated and nuanced!
In doing this proof of concept, I did identify some risks with this solution.
⚠ Risk #1: No support
It works, but the way to get this to work is not supported by Sitecore. That means there is no way to get help from Sitecore about using this type of a flow if something goes wrong and no obligation from Sitecore to ensure it keeps working.
⚠ Risk #2: Brittle dependency
My approach relies on a mechanism of forcing files into a specific folder structure on the environment using the project file. That happens to work with XM Cloud's deploy app at the time of writing, but because this is SaaS the entire backend of how deployments work could shift on me and this could get broken. Also, because it's not supported, there would likely be no notifications sent out that it would no longer be working. You can always fix things later, when it breaks, I suppose? It's one of those "buyer beware" risks that some folks are willing to take on.
⚠ Risk #3: Unknown serialization conversion complexity
My sample scenario used a single template folder with a simple parent relationship. I used out of the box parent folders and templates with no dependencies. Even then, I needed to edit a few things manually on the file to get it to work with XM Cloud's default items. I can imagine a large project of serialized items could become cost-prohibitive to manually get working.
This is not really an issue with using Sitecore CLI, Unicorn, or the IAR approach, but more to point out what I got working here didn't really analyze the effort needed to migrate the serialization files to work with XM Cloud. You should factor that into your plans as an unknown risk factor to your timeline.
⚠ Risk #4: The steps provided might take more effort for a real project
The itemres command I used in the Sitecore CLI was pointed at a single folder of Unicorn serialized files. A real solution would have a Helix structure with many different locations that the files could be contained in for each feature. I did not check for how much work it would be to get that more complex structure pulled together. It's still technically possible to get it to work, but you should assume there will be more effort than shown here to get all of your serialized projects configured, working, and deployed through your DevOps pipeline.
⚠ Risk #5: Unclean project structure
In order to tell XM Cloud to grab that IAR file, I needed to add placeholder files to my .NET solution. The whole approach feels wrong, adding a bunch of invalid DAT files into the project (and source control) just to make deployments work. I suppose you could manage a different project file just for the placeholder DATs, just to make it cleaner for devs who are working locally, but it screams of bad practice. This risk doesn't affect your effort levels or whether the solution would work, but it does impact your developer experience.
Conclusion? Maybe not a good idea?
If you are going to work with XM Cloud, and you love Unicorn, you might be tempted to try to figure out a way to make it work. I did this experiment so that you can see what the challenges are, what steps you can take, and make an informed decision. I feel that converting your Unicorn serialization over to SCS is a much easier approach and there are tools for that already. I would definitely recommend taking that migration to SCS approach if you are building against XM Cloud, but if you really love Unicorn and are okay with the risks involved at least there is a way to make it work!


Top comments (0)