We’re continuing our series describing how to send emails with various frameworks and libraries. This time, we’re going to touch on a really popular library for mobile development known as React Native. Along with native iOS and Android development, it’s become a very common way of shipping fast robust mobile apps. For a detailed comparison of the differences between both types of development, check out the article on the Railsware blog.
In this article, we’re going to talk about setting up an email client to enable email sending from within your mobile app. We’ll cover various approaches and will suggest the best one to pursue in our opinion. Let’s start!
What are the use cases of email sending in React Native?
There can be plenty. Typically mobile apps send various transactional emails – for registration, account confirmation, password reset. This will be especially the case if you build solely a mobile app, without a web backend to support it.
Emails can also be sent when users reach certain milestones or encounter specific errors. Finally, verification emails can also be triggered from within a mobile app before users are granted certain levels of access. This might be useful, for example, in car or scooter sharing apps as well as various fintech applications.
Often you also want users to communicate with you via an app. This can be useful, for example, if you want to make it easy for them to contact your support or report bugs or feature requests. Instead of adding your email or redirecting them to your contact pages, you could give them a chance to send (and even to receive) such messages within an app. If you wish to give users a chance to share something with their peers via email, it can also be easily done.
Let’s now explore how to add mailing capabilities to React Native apps.
Sending emails via Linking API
One approach to the problem is with React’s Linking API. This API is not meant only for email sending. Instead, it lets you interact with both incoming and outgoing app links. So, for example, you could have Google Maps app launch when users tap on a location in your app. Or let users tap on links in their emails and immediately open your app on e.g. checkout screen.
With Linking API, we can also open user’s default email app and pre-fill an email that will be then sent from their account. This will be perfect for reporting a bug or requesting a feature. It might also be handy if you want users to share some content with their peers via email.
To build our email, we’ll use the openURL() method from Linking API. As the name says, it’s used for opening links via a dedicated app. We don’t need to open a browser, instead, we’ll use the good-old mailto known from the most basic HTML classes.
Before being redirected to an email client, the method will return a ‘Promise’ object, asking them to confirm the intent.
Let’s say we’re building an app showing some most wonderful stars and galaxies of our universe. We know of at least one guy who might be interested.
Here’s the proposed URL you could add to your app.
mailto:<elon@spacex.com>
?subject=<’Can we get there?’>&
body=<’Elon, here’s one destination you guys should consider [link]’>&
cc=<elon@tesla.com; elon@solarcity.com; elon@stanford.edu >
Note that Linking API doesn’t allow sending attachments so a link will have to do.
And now the full code to insert in the app’s code:
// send-email.js
// We can use react-native Linking to send email
import qs from 'qs';
import { Linking } from 'react-native';
export async function sendEmail(to, subject, body, options = {}) {
    const { cc, bcc } = options;
    let url = `mailto:${to}`;
    // Create email link query
    const query = qs.stringify({
        subject: subject,
        body: body,
        cc: cc,
        bcc: bcc
    });
    if (query.length) {
        url += `?${query}`;
    }
    // check if we can use this link
    const canOpen = await Linking.canOpenURL(url);
    if (!canOpen) {
        throw new Error('Provided URL can not be handled');
    }
    return Linking.openURL(url);
}
// example.js
import { sendEmail } from './send-email';
sendEmail(
    'elon@spacex.com',
       'Can we get there?',
    'Elon, here’s one destination you guys should consider [link]',
 { cc: 'elon@tesla.com; elon@solarcity.com; elon@stanford.edu' }
).then(() => {
    console.log('Your message was successfully sent!');
});
We could also pass cc (and bcc if necessary) as arrays of emails instead of strings to ‘sendEmail’ function and it would probably be a better approach as the format of the data is specific to the nature of Linking API. In general, it’s better to encapsulate strings within ‘sendEmail’ and use an array while calling them. If users were to pick addresses from a list, they would come as arrays that would then have to be concatenated. For the sake of brevity, however, we used a string above.
Sending emails via serverless 3rd parties
Another, more robust approach to sending emails in React Native will be with external third-party services. Instead of launching a user’s email app to send an email, we’ll start sending emails to users in the background. These can be registration emails, password resets or anything else that makes sense to be sent once triggered.
To perform such operations, we’ll need to set up triggers (e.g. when a user taps on a ‘register’ button) and a way to send emails based on them. There are several approaches here:
Using Firebase triggers + Zapier + SendGrid
In this approach, we’ll try to integrate three different tools together to enable email sending.
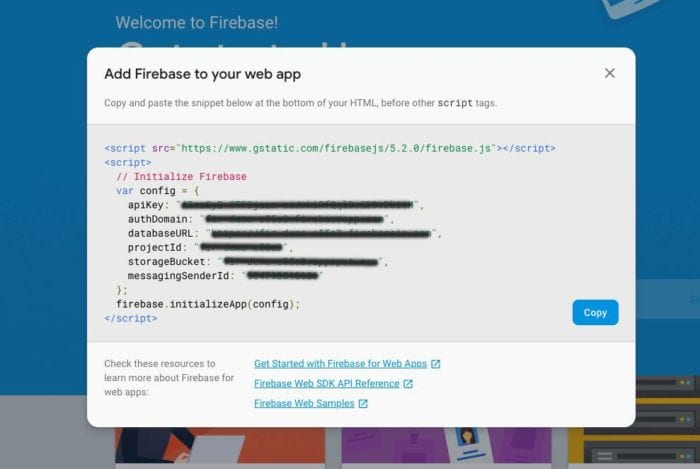
First of all, set up your Firebase account either with the help of the official docs or with the dedicated 3rd party layer for Firebase for React Native. Like Firebase with your React Native project by adding your individual code as shown on the screenshot below.

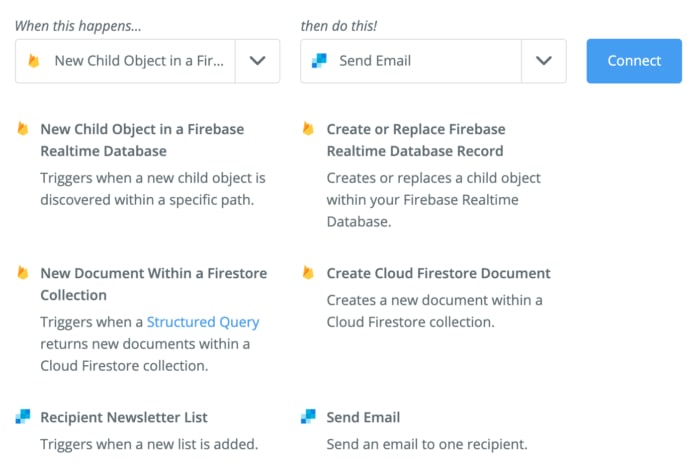
Now, the idea will be to send emails only when a new child record is added to Firebase Realtime Database. You won’t be able to send emails directly when that happens but this is when Zapier comes in handy. It lets you trigger an email sending from e.g. SendGrid the moment a child object is added with one of its ‘zaps’.

Now, just set up a customized email template to be sent when a Zap is triggered and you’re done! For more details on setting things up, check out SendGrid’s tutorial.
Using Firebase Cloud Functions + e.g. Gmail + Nodemailer
As you can see above, Firebase can be used to trigger events based on actions users take in your React Native app. Since 2017, there’s also a way to send transactional emails without the poor experience of redirecting them to their email app. You can do it through the 3rd-parties such as Zapier.
Firebase Cloud SDK allows for sending these emails with a node library called nodemailer. For it to work, you also need to add an email account to handle the sending. The most straightforward approach is with another Google product – Gmail but you can also use tools for mass mailings such as SendGrid or Mailjet.
This quickstart demonstrates how to set up an Auth-triggered Cloud Function using the Firebase SDK for Cloud Functions.
Setting up your own server
Finally, if you don’t want to rely on 3rd parties, you could set up your own backend to handle email sending. This is certainly more difficult and time-consuming but if you make it work, it could save you money and provide independence from other providers.
One approach to doing this could be with Nodemailer, which we already utilized in the previous example. Integrating it with React Native raises problems as you can’t use server-side modules in React Native as RN is solely client-side. React Native comes with a WebKit JS engine bundled and the latter one misses several features vital for sending emails, for example, support for sockets. If you were to use nodemailer, you would need to add your SMTP credentials to the device which is possible but, this time, raises security concerns.
The best way to go about it would be probably by setting up a proxy server to handle email sending away from the device. This would, however, require a lot more additional development without a guarantee of success.
As you can see, this approach is far from perfect. Try it out, though, if the previous methods don’t appeal to you and let us know in the comments if you managed to build something reliable. We’re curious to know!
Summary – which method is best for sending emails in React Native?
As you can see, there’s no one obvious approach to the problem. The choice of tools and methods will heavily depend on your needs, budget and time available. In short, we would recommend the following:
If you only need to give users the ability to send emails and don’t mind launching their email app for that purpose, use Linking API. It’s the simplest, fastest and most cost-effective method.
If you need to send transactional emails in the background, the mix of Firebase + Zapier + SendGrid or other similar tools should be the obvious choice. You’ll need to account for three different subscriptions and will be reliant on external tools (which has pros and cons), but it will provide the reliability you need.
If you have lots of time and a limited budget (for example, you’re in an early stage prototyping), think about setting up your own proxy server and using tools like Nodemailer. Think twice, about whether above isn’t worth a try. Chances are, you can build it on a fairly low budget and with very brief development time.
We hope this article helped you choose the right approach. If you’ve tried some other approach and it worked, please let us know in the comments below and we’ll be happy to update the article.
Thank you for reading our Sending Emails in React Native tutorial that was originally published on Mailtrap Blog.


Top comments (0)