
Relationship-Based Access Control (ReBAC) and Attribute-Based Access Control (ABAC) are advanced authorization models beyond traditional role-based approaches. While Strapi's built-in system is great for basic role-based permissions, today's applications tend to need more sophisticated control that allows users to have access based on the relationships existing between users and resources, as well as dynamic attributes.
In this tutorial, you'll learn how to:
- Set up permissions that depend on user relationships and the resources they access in Strapi
- Create attribute-based rules considering contexts like time, location, and resource state
- Combine ReBAC and ABAC to build a more thorough access control system
- Implement these controls in both the Strapi backend and Next.js frontend
We'll demonstrate this concept by building a Blog platform, where access to posts is determined by relationships (like author, editor, or viewer) and factors such as post status, user subscription level, and content restrictions.
ReBAC and ABAC Demo
Below is a demo of how the ReBAC and ABAC roles we'll be enforcing throughout this tutorial will work in our blog application.
GitHub Project Repo
The code for this tutorial is available in my GitHub repository. The complete frontend code is in the complete-frontend branch, and the full backend code is in the master branch. Feel free to clone and follow along.
Prerequisites
You will need the following to get started:
- Node.js v18 or later
- A code editor on your computer
- Python
- Docker installed on your computer
What are ReBAC and ABAC?
Before we move further, let's understand what ReBAC and ABAC policies are:
Relationship-Based Access Control (ReBAC)
Relationship-Based Access Control (ReBAC) is a way to manage access by focusing on the connections between people and resources. Rather than just looking at someone's role or identity, ReBAC determines what users can access based on their relationships with others in the system. Think of it like a web, where each person or resource is linked, and those links determine what you can do or view.
For example, on LinkedIn, you can see certain posts or updates because you're connected to someone, whether directly or through shared groups. ReBAC works the same way, deciding access based on these types of connections.
Attribute-Based Access Control (ABAC)
Attribute-Based Access Control (ABAC) is an authorization model that evaluates multiple characteristics (attributes) of users, resources, actions, and environmental conditions to determine access permissions.
For example, in a blog platform, if someone wants to read a premium article, ABAC doesn't just check if they have a "subscriber" badge. Instead, it evaluates multiple factors, such as whether their subscription is still active. Are they allowed to access content in this region? Have they exceeded their monthly article limit as a free user? For instance, a free user might be allowed to read 5 articles per month, while a basic subscriber can read unlimited articles but can't access premium content, and a premium subscriber gets full access to everything including exclusive content and commenting privileges.
Setting Up the E-Learning Platform
To get started with our implementation, let's create a new Strapi project and clone our Next.js frontend starter project:
# Create Strapi project
npx create-strapi-app@latest backend

git clone https://github.com/icode247/blog-frontend

# Install Permit.io in the Strapi project
cd elearning-backend
npm install permitio
Setting up local Permit.io Policy-Decision-Point (PDP) container
A Policy-Decision-Point (PDP) is a network node responsible for answering authorization queries using policies and contextual data.
To get started, let's set up a new Permit.io project and get our API key.
Permit.io is an authorization-as-a-service tool that allows you to easily implement scalable relationship-based access control (RBAC) and attribute-based access control (ABAC) permissions in your Strapi and Next.js project without needing to modify your code when your authorization requirements change.
Create a Permit.io PDP Environment
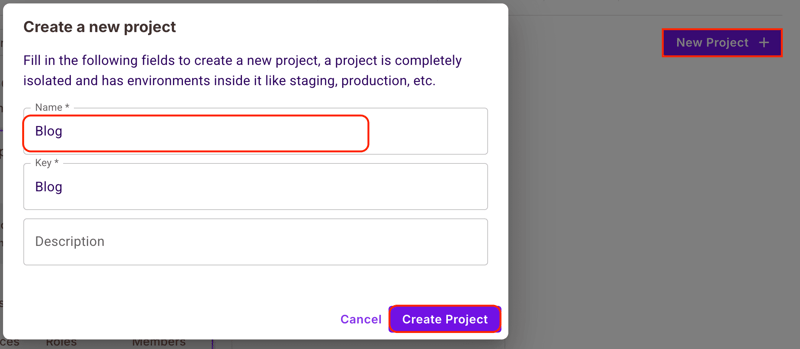
To setup a PDP container, create a Permit.io account and set up a new project named Blog in the dashboard.
Get Permit.io API Key
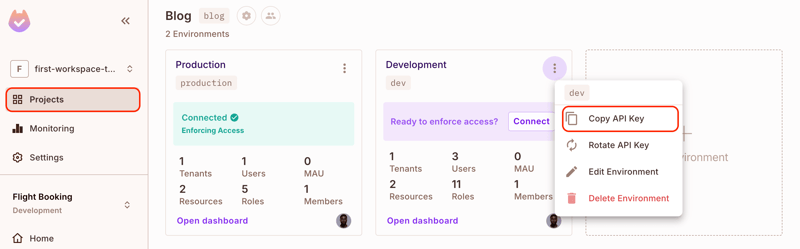
Permit.io automatically provides Production and Development environments for each project. Choose your desired environment or create a new one, then copy the API key.
Pull Permit using Docker
Next, to run the Permit's ReBAC and ABAC policies, you need to set up your own local PDP container. Do that by running the command below:
docker pull permitio/pdp-v2:latest
docker run -it -p 7766:7000 \
    --env PDP_DEBUG=True \
    --env PDP_API_KEY=<YOUR_API_KEY> \
    permitio/pdp-v2:latest
If you do not have Docker installed yet, click here to install Docker. Because you need it for the above command.
Replace <YOUR_API_KEY> with your Permit.io API Key you copied earlier and press Enter key to run the command.
Initialize Permit Client
Next, set up Permit.io in your Strapi project by creating a permit folder inside the backend/src directory. Inside this folder, add a new file called backend/src/permit/client.ts and initialize the Permit.io client with the code snippets below:
import { Permit } from "permitio";

export const permit = new Permit({
  pdp: process.env.PERMIT_PDP_URL || "http://localhost:7766",
  token: process.env.PERMIT_SDK_KEY || "",
});
The above code starts the Permit.io SDK to enable fine-grained authorization systems through policy evaluation done by a Policy Decision Point (PDP) server that references defined policies.
Then, add the following helper functions to the backend/src/permit/client.ts file to check user permissions, sync your users within Permit.io, and sync resource relationships.
export interface PermissionContext {
  user: {
    key: string;
    attributes: {
      subscription_tier: string;
      is_premium: boolean;
      articles_read: number;
      location?: string;
    };
  };
  resource: {
    type: string;
    instance: string;
    attributes?: Record<string, unknown>;
  };
}

export async function syncUser(user: {
  id: string;
  email: string;
  firstName?: string;
  lastName?: string;
}): Promise<void> {
  try {
    const synced = await permit.api.syncUser({
      key: user.id,
      email: user.email,
      first_name: user.firstName,
      last_name: user.lastName,
    });

    console.log("User synced:", synced);
  } catch (error) {
    console.error("User sync failed:", error);
    throw error;
  }
}

export async function assignResourceRole(
  userId: string,
  role: string,
  resourceType: string,
  resourceId: string
): Promise<void> {
  try {
    await permit.api.assignRole({
      user: userId,
      role: role,
      resource_instance: `${resourceType}:${resourceId}`,
      tenant: "default",
    });
  } catch (error) {
    console.error("Role assignment failed:", error);
    throw error;
  }
}
In the above code snippet, we have created two helper functions that will be reused throughout our application:
-
assignResourceRoleto assign resource roles to given resources using thepermit.api.assignRolemethod, which takes theuserIdor any unique identifier,resource_instance, androleandtenantas arguments. -
syncUserto have a copy of your user data required for enforcing the permissions on Permit.io
Setting up Strapi Content Types
Before implementing the permission system, we need to set up our content types in Strapi to match our authorization model.
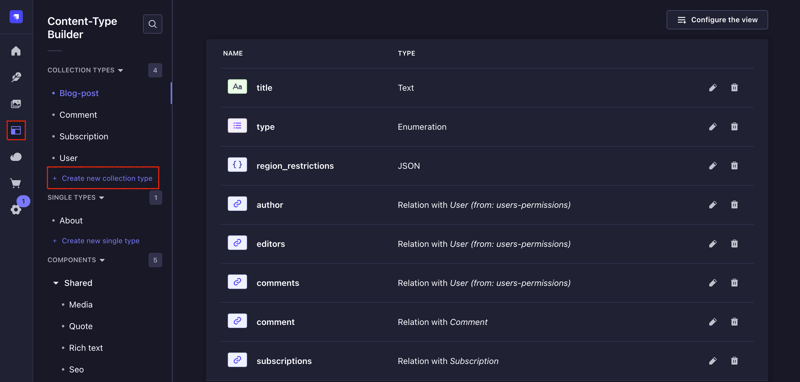
From your Strapi admin dashboard, navigate to the Content-Type Builder page and create a new Blog-post collection type with the following fields:
| Attribute | Type | Required | Default | Additional Info |
|---|---|---|---|---|
title |
string | Yes | - | - |
content |
richtext | Yes | - | - |
type |
enumeration | Yes | free | Options: free, premium, members-only
|
status |
enumeration | Yes | draft | Options: draft, published, archived
|
region_restrictions |
json | No | - | - |
author |
relation | No | - | Relation: manyToOne → plugin::users-permissions.user (inversed by blog_posts) |
editors |
relation | No | - | Relation: manyToMany → plugin::users-permissions.user (inversed by edited_posts) |
comments |
relation | No | - | Relation: oneToMany → api::comment.comment (mapped by blog_post) |
Create another collection type for Comment with the following fields:
| Attribute | Type | Required | Default | Additional Info |
|---|---|---|---|---|
content |
text | Yes | - | - |
author |
relation | No | - | Relation: manyToOne → plugin::users-permissions.user (inversed by comments) |
blog_post |
relation | No | - | Relation: manyToOne → api::blog-post.blog-post (inversed by comments) |
status |
enumeration | No | pending | Options: pending, approved, rejected
|

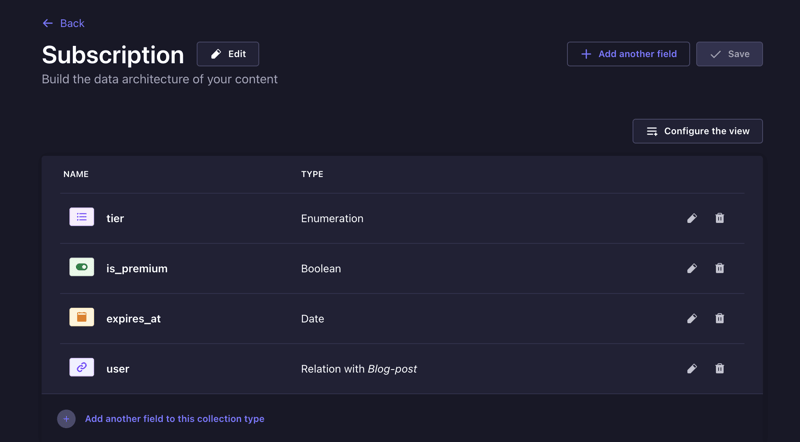
Lastly, create another one for Subscription Content Type and add the following fields:
| Attribute | Type | Required | Default | Additional Info |
|---|---|---|---|---|
tier |
enumeration | Yes | free | Options: free, basic, premium
|
is_premium |
boolean | Yes | false | - |
expires_at |
datetime | No | - | - |
user |
relation | No | - | Relation: oneToOne → plugin::users-permissions.user (inversed by subscription) |
Configuring Users & Permissions
Let's use Strapi's built-in RBAC (Role-Based Access Control) policy to configure user access for each of the collections we've created.
Strapi provides two default roles for managing access:
- Public – for resources that are publicly accessible.
- Authenticated – for protected resources that require user authentication.
To configure permissions, navigate to: Settings → Users & Permissions plugin → Roles
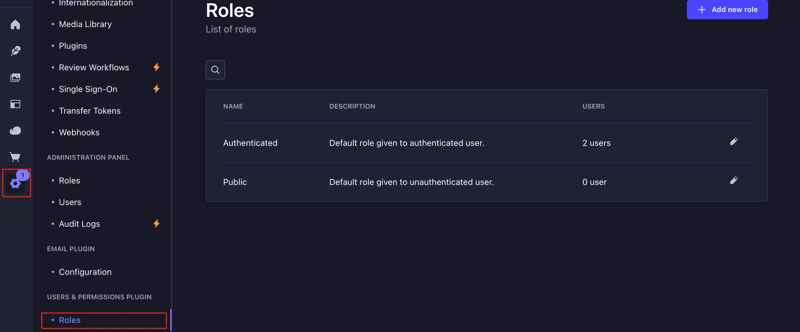
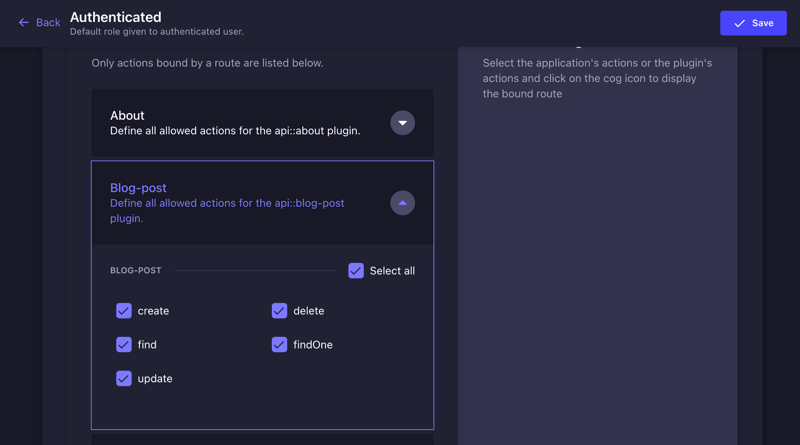
Click on each role and grant users access to the collections as needed. For this demonstration, we’ll be working with the Authenticated role.
Grant the Authenticated role full access to the following collections:
- Blog Posts – Allow users to create, read, update, and delete their posts.
- Comments – Permit users to add comments and view others' comments but restrict them from modifying or deleting comments they don’t own.
- Subscriptions – Allow users to view and manage their subscription details.
These permissions will ensure that authenticated users can interact with the platform effectively while maintaining security and control.
Later, we’ll implement ReBAC (Relationship-Based Access Control) and ABAC (Attribute-Based Access Control) to introduce more advanced, dynamic permission rules based on user roles, relationships, and attributes.
Configuring Permit.io for ReBAC and ABAC
With the initial role-based permissions in place,let's proceed to implementing a we have a more dynamic and fine-grained authorization.
Before writing any application code, let's configure our authorization model in Permit.io to support ReBAC and ABAC.
Configuring ReBAC in Permit.io
Let's set up our authorization model in Permit.io. We'll start by configuring ReBAC for our blog platform.
Step 1: Modeling our System
First, let's map out the resources and relationships we need to manage access to:
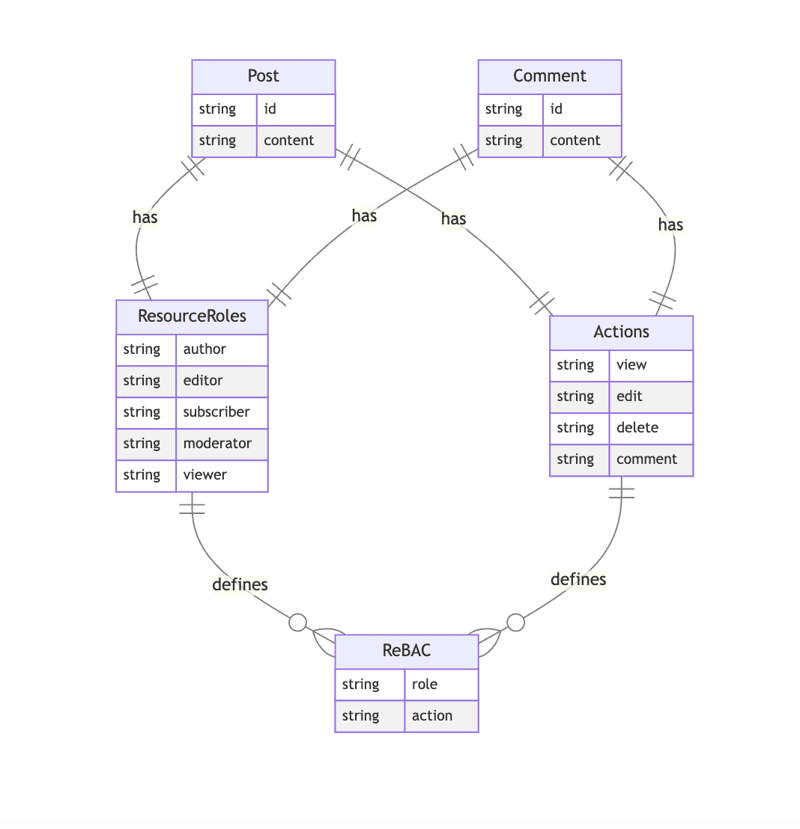
Our platform revolves around two key resources: Posts and Comments. A Post is the main content, and a Comment is a response tied to a post.
To manage access, users have different roles:
- Authors create posts.
- Editors review and update content.
- Subscribers access premium posts.
- Moderators manage comments.
- Viewers can only read content.
Each role has specific actions like viewing, editing, deleting, or commenting, that determine what they can do. Since posts and comments are connected, permissions follow relationships. Using ReBAC (Relationship-Based Access Control), we define who gets access based on their role and connection to the content.
Step 2: Setting Up Resources and Actions
- Navigate to Policy → Resources from your Permit.io dashboard.
- Click on Add Resource and create these resources in order:
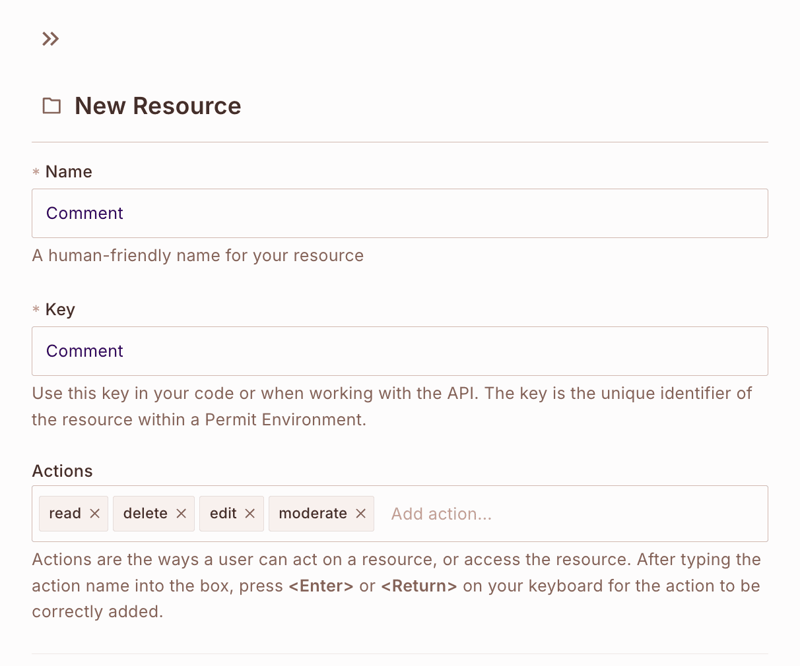
Create a **BlogPost resource with the following actions**:
-
read- View blog post content -
edit- Edit blog post content -
delete- Delete blog post -
comment- Add comments to a blog post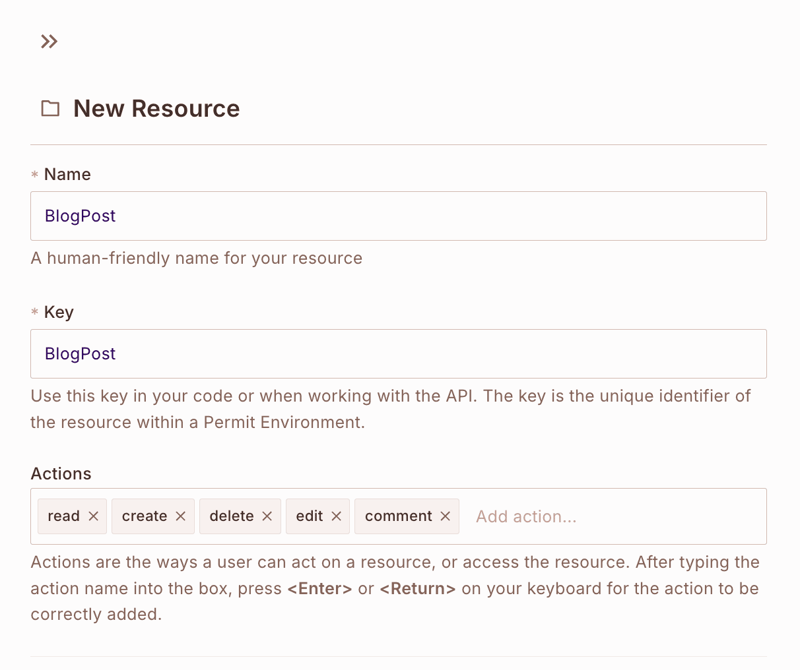
Create a **Comment resource with these actions**:
-
read- View comments -
edit- Edit comment content -
delete- Delete comment -
moderate- Approve or reject comments
Step 3: Mapping Resource Roles
For each resource, set up resource roles under "ReBAC Options":
- For BlogPost resource, add:
-
author- Full control over their posts -
editor- Can edit and moderate posts -
subscriber- Can view and comment on posts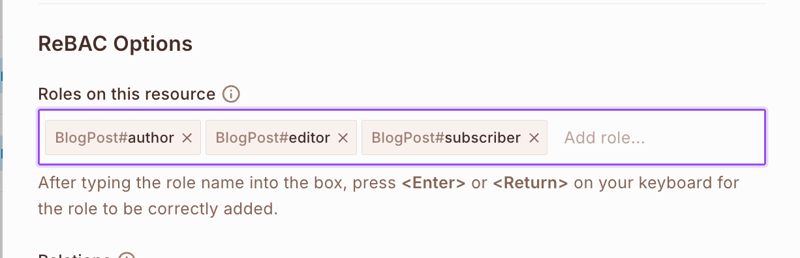
- For Comment resource, add:
-
author- Can edit and delete their comments -
moderator- Can approve, reject, and delete comments -
viewer- Can only view comments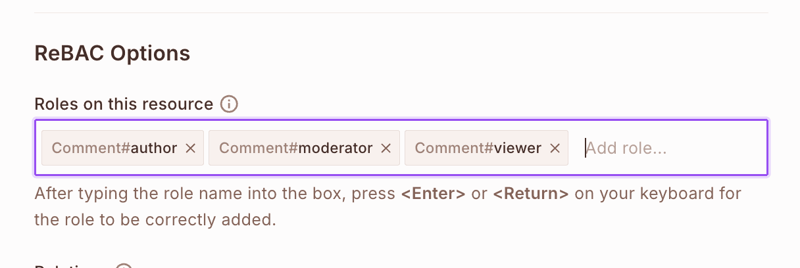
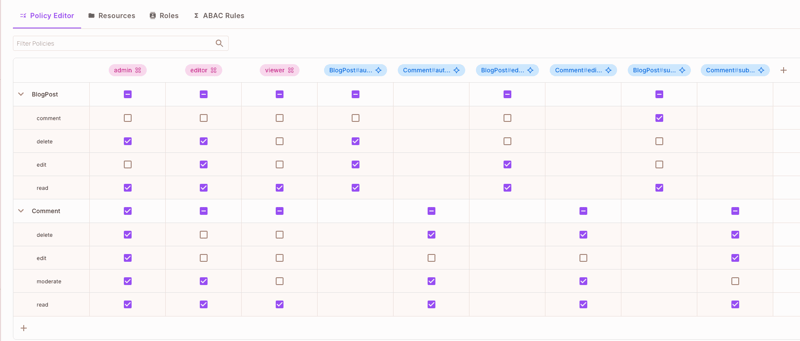
- Configure permissions for each role in the Policy Editor:
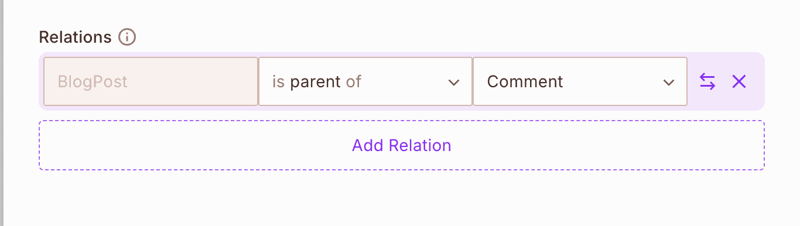
Step 4: Setting Up Resource Relationships
Now define the relationships between BlogPost and Comment resources:
- Open the BlogPost resource to edit
- Under Relations, set up:
Step 5: Setting Up Role Derivations
Configure how roles are derived based on relationships:
- Navigate to the Roles tab
- Under ReBAC Options, set up derivations:
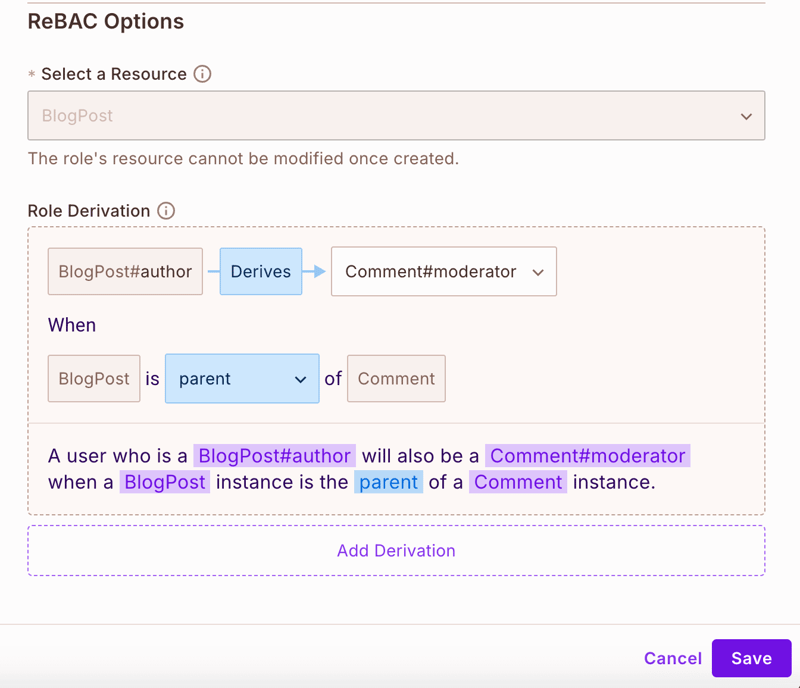
For BlogPost Author derivation:
- When a user is a
BlogPost#author, they automatically becomeComment#moderatorfor all comments on their posts
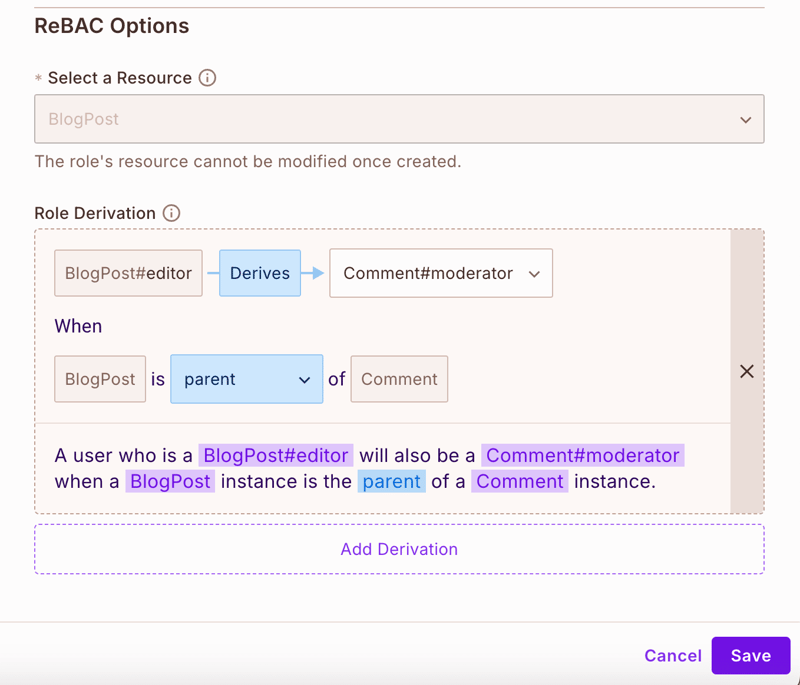
For Editor derivation:
- When a user is a
blogpost#editor, they automatically becomecomment#moderatorfor all comments on posts they can edit.
This setup follows a relationship-based pattern where permissions flow between resources based on user roles. Here's what happens:
- When a user is assigned as the author of a BlogPost:
- They get full control over their post (edit, delete, view)
- Through derivation, they automatically become a moderator of all comments on their post
- This means they can approve, reject, or delete comments without needing separate permissions
- Similarly for editors:
- When assigned as editor of a BlogPost
- They automatically get moderator permissions for comments
- This allows them to manage the discussion on posts they edit
- However, they can't delete the post itself (reserved for authors)
Adding ReBAC Policies to Strapi
With the permissions configured, let's proceed with integrating it with our Strapi application. First, create a lifecycle hook to sync users who are creating blog posts with Permit. Create a lifecycles.ts file in the backend/src/api/blog-post/content-types/blog-post folder and add the code snippets below:
import { syncUser, assignResourceRole } from "../../../../permit/client";

interface BlogPost {
  id: string;
  title: string;
  author: {
    id: string;
    email: string;
    firstName?: string;
    lastName?: string;
  };
  editors?: Array<{
    id: string;
    email: string;
    firstName?: string;
    lastName?: string;
  }>;
}

async function populateBlogPost(result: BlogPost) {
  return await strapi.documents("api::blog-post.blog-post").findOne({
    documentId: (result as any).documentId,
    populate: ["author", "editors", "subscribers"],
  });
}

async function syncUserAndAssignRole(
  user: { documentId: string; email: string; username?: string },
  role: string,
  resource: string,
  resourceId: string
) {
  if (!user) return;

  await syncUser({
    id: user.documentId,
    email: user.email,
    firstName: user.username,
  });

  await assignResourceRole(user.documentId, role, resource, resourceId);
}

export default {
  async afterCreate(event: { result: BlogPost }) {
    try {
      const blogPost = await populateBlogPost(event.result);

      await syncUserAndAssignRole(
        blogPost.author as any,
        "author",
        "BlogPost",
        blogPost.documentId
      );

      // if an editors were asigned to the blog post
      if (blogPost.editors) {
        for (const editor of blogPost.editors) {
          await syncUserAndAssignRole(
            editor as any,
            "editor",
            "BlogPost",
            blogPost.documentId
          );
        }
      }
    } catch (error) {
      console.error("Failed to sync with Permit.io:", error);
    }
  },

  async afterUpdate(event: { result: BlogPost }) {
    try {
      const blogPost = await populateBlogPost(event.result);

      if (blogPost.editors) {
        for (const editor of blogPost.editors) {
          await syncUserAndAssignRole(
            editor as any,
            "editor",
            "BlogPost",
            blogPost.documentId
          );
        }
      }
    } catch (error) {
      console.error("Failed to sync with Permit.io:", error);
    }
  },
};
The above code snippet will listen to the Strapi's afterCreate and afterUpdate events in the Blog-post collection type to sync the users that created the post with a permit and assign the appropriate roles to them in Permit.io.
Then, create a lifecycle method for the subscription collection to sync the subscribers with Permit.io to grant them access after they've subscribed. Create a lifecycles.ts file in the backend/src/api/blog-post/content-types/subscription folder and add the code snippets below:
import { syncUser, assignResourceRole } from "../../../../permit/client";

interface BlogPost {
  id: string;
  title: string;
  author: {
    id: string;
    email: string;
    firstName?: string;
    lastName?: string;
  };
  editors?: Array<{
    id: string;
    email: string;
    firstName?: string;
    lastName?: string;
  }>;
}

async function populateBlogPost(result: BlogPost) {
  return await strapi.documents("api::blog-post.blog-post").findOne({
    documentId: (result as any).documentId,
    populate: ["author", "editors", "subscribers"],
  });
}

async function syncUserAndAssignRole(
  user: { documentId: string; email: string; username?: string },
  role: string,
  resource: string,
  resourceId: string
) {
  if (!user) return;

  await syncUser({
    id: user.documentId,
    email: user.email,
    firstName: user.username,
  });

  await assignResourceRole(user.documentId, role, resource, resourceId);
}

export default {
  async afterCreate(event: { result: BlogPost }) {
    try {
      const blogPost = await populateBlogPost(event.result);

      await syncUserAndAssignRole(
        blogPost.author as any,
        "author",
        "BlogPost",
        blogPost.documentId
      );

      // if an editors were asigned to the blog post
      if (blogPost.editors) {
        for (const editor of blogPost.editors) {
          await syncUserAndAssignRole(
            editor as any,
            "editor",
            "BlogPost",
            blogPost.documentId
          );
        }
      }
    } catch (error) {
      console.error("Failed to sync with Permit.io:", error);
    }
  },

  async afterUpdate(event: { result: BlogPost }) {
    try {
      const blogPost = await populateBlogPost(event.result);

      if (blogPost.editors) {
        for (const editor of blogPost.editors) {
          await syncUserAndAssignRole(
            editor as any,
            "editor",
            "BlogPost",
            blogPost.documentId
          );
        }
      }
    } catch (error) {
      console.error("Failed to sync with Permit.io:", error);
    }
  },
};
Now, create an application-level middleware to enforce the ReBAC policies in your Blog-Post and Subscription routes. Create the backend/src/middlewares/rebac-check.ts file in the src folder and add code snippets below:
import { Context, Next } from "koa";
import { permit } from "../permit/client";
import type { Core } from "@strapi/strapi";

export const ACTIONS = {
  get: "read",
  put: "edit",
  delete: "delete",
};

export const RESOURCE = {
  "/comments": "Comment",
  "/blog-posts": "BlogPost",
};

export default (_config: any, { strapi }: { strapi: Core.Strapi }) => {
  return async (ctx: Context, next: Next) => {
    const { user } = ctx.state;

    if (!user) {
      return ctx.unauthorized("Authentication required");
    }
    const postId = ctx.params.id;
    const action = ctx.request.method.toLowerCase();
    const resourcePath = "/" + ctx.request.url.split("/").filter(Boolean)[1];
    try {
      const permitted = await permit.check(
        user.documentId.toString(),
        ACTIONS[action],
        {
          type: RESOURCE[resourcePath],
          key: `${RESOURCE[resourcePath]}:${postId}`,
        }
      );

      if (!permitted) {
        return ctx.forbidden("Access denied by permission policy");
      }

      await next();
    } catch (error) {
      strapi.log.error("Permission check failed:", error);
      return ctx.internalServerError("Permission check failed");
    }
  };
};
These code snippets will handle the ReBAC permission enforcement on the Comments and Blog-post collection using the permit.check function, which accepts the unique identifier we used when syncing the user, the action the user tends to perform, the resource type and resource instance.
Testing the ReBAC Implementation
Now that we have set up our ReBAC policies and implemented them in Strapi let's test them to see how they work. We'll create some test data and verify our permission rules. Navigate to your Strapi dashboard and create the following users in the User collection type:
{
    "username": "author1",
    "email": "author@example.com",
    "password": "testpass123",
    "confirmed": true,
    "blocked": false
},
{
    "username": "editor1",
    "email": "editor@example.com",
    "password": "testpass123",
    "confirmed": true,
    "blocked": false
},
{
    "username": "subscriber1",
    "email": "subscriber@example.com",
    "password": "testpass123",
    "confirmed": true,
    "blocked": false
}
Then create the new blog posts below, assign the author1 as the author, editor1 as the editor.
 {
    "title":"Test Blog Post",
    "content": "This is a test blog post content",
    "type": "premium",
    "status": "published",
    "author": author1,
    "editors": [editor1],
    "region_restrictions": ['US', 'UK']
 }
Then, create a new subscription. Select subscribe1 as the user selects the blog post we created as the blog and premium as the plan:
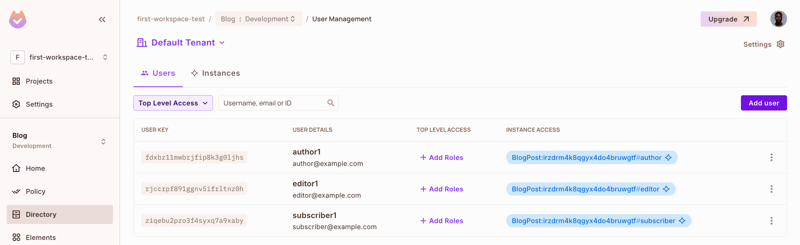
After creating the above records, navigate to the Directory page in your Permit account; you'll find the users and the instance roles assigned to them:
When an editor tries to delete a comment, they will get a permission error.
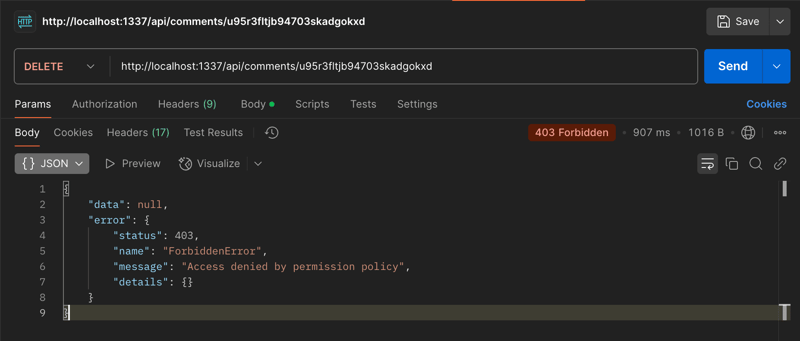
The responses will show how ReBAC enforces permissions based on relationships:
- Authors have full control over their posts and comments
- Editors can edit posts but can't delete them
- Subscribers can only view and comment
You can verify these permissions in your Strapi admin panel under the Audit Logs section or by checking the Permit.io dashboard's activity logs.
Configuring ABAC Rules
Next, we'll build upon this foundation by adding ABAC rules to consider attributes like subscription status and regional restrictions...
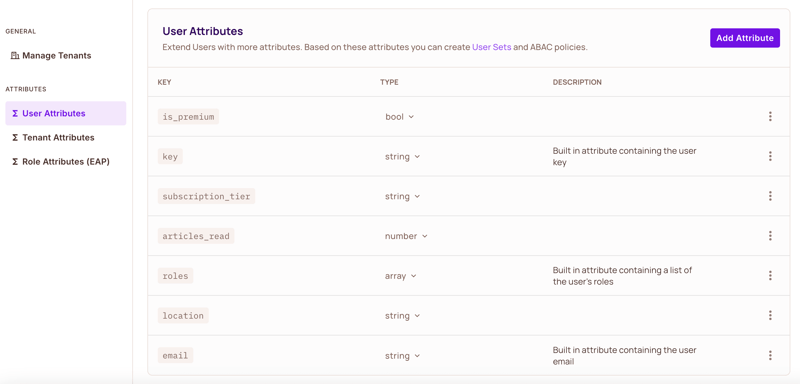
Step 1: Define User Attributes
Navigate to Directory → Users → Settings → User Attributes and add:
{
    "subscription_tier": {
        "type": "string",
    },
    "is_premium": {
        "type": "boolean"
    },
    "articles_read": {
        "type": "number"
    },
    "location": {
        "type": "string"
    }
}
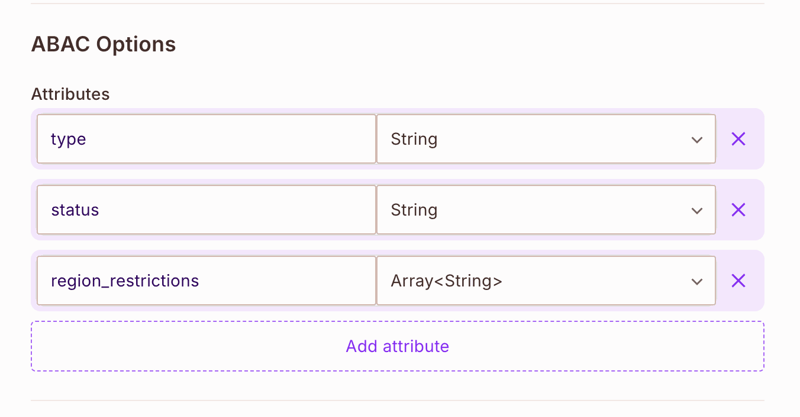
Step 2: Define Resource Attributes
For the BlogPost resource, add these attributes:
{
    "type": {
        "type": "string",
        "enum": ["free", "premium", "members-only"]
    },
    "status": {
        "type": "string",
        "enum": ["draft", "published", "archived"]
    },
    "region_restrictions": {
        "type": "array",
        "items": {
            "type": "string"
        }
    }
}
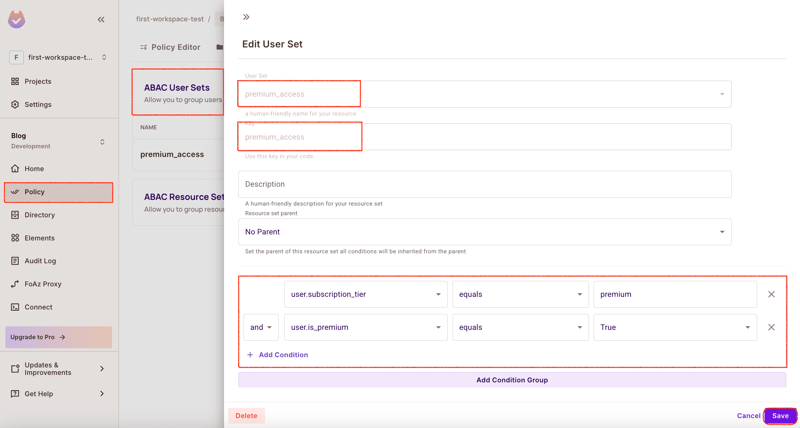
Step 3: Creating Condition Sets
Navigate to Policy → ABAC Rules and create the following condition sets:
Premium Content Access
{
    "name": "premium_access",
    "conditions": [
        {
            "user.subscription_tier": {
                 "operator": "equals",
                 "value": "premium",
            },
            "user.is_premium": {
                "operator": "equals",
                "value": true
            }
        }
    ]
}
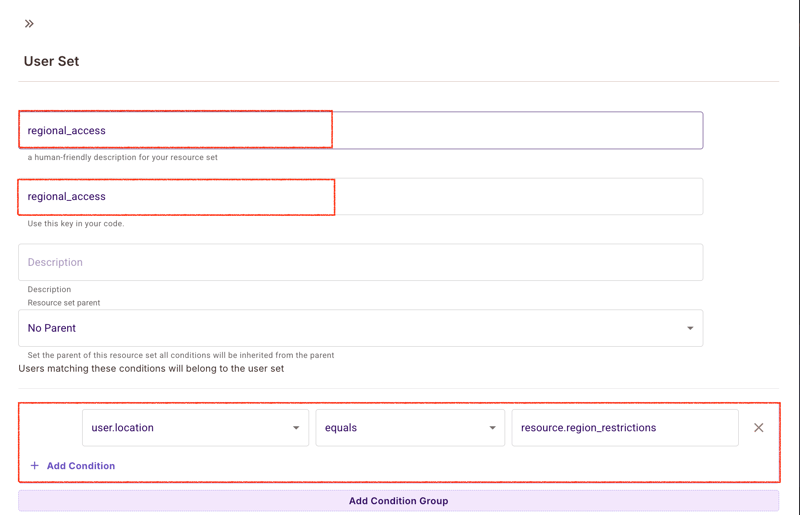
Regional Access Control
{
    "name": "regional_access",
    "conditions": [
        {
            "user.location": {
                "operator": "equals",
                "value": "resource.region_restrictions"
            }

        }
    ]
}
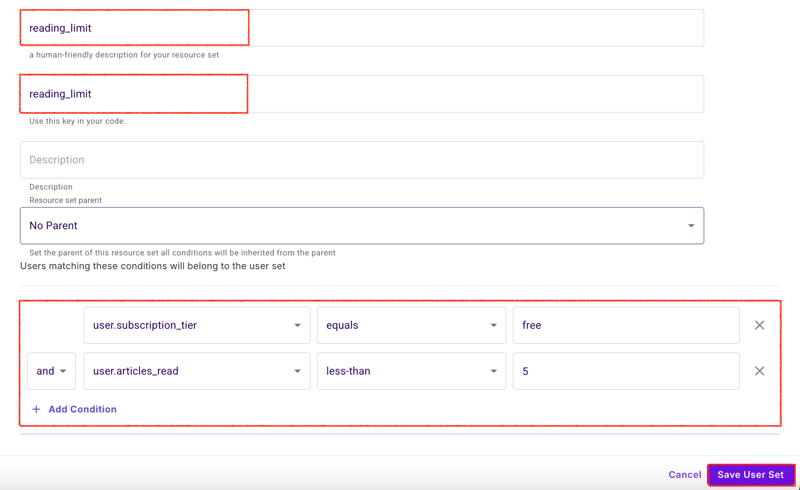
Article Reading Limit
{
    "name": "reading_limit",
    "conditions": [
        {
            "user.subscription_tier": {
                "operator": "equals",
                "value": "free"
            },
            "user.articles_read": {
                "operator": "less-than",
                "value": 5
            }
        }
    ]
}
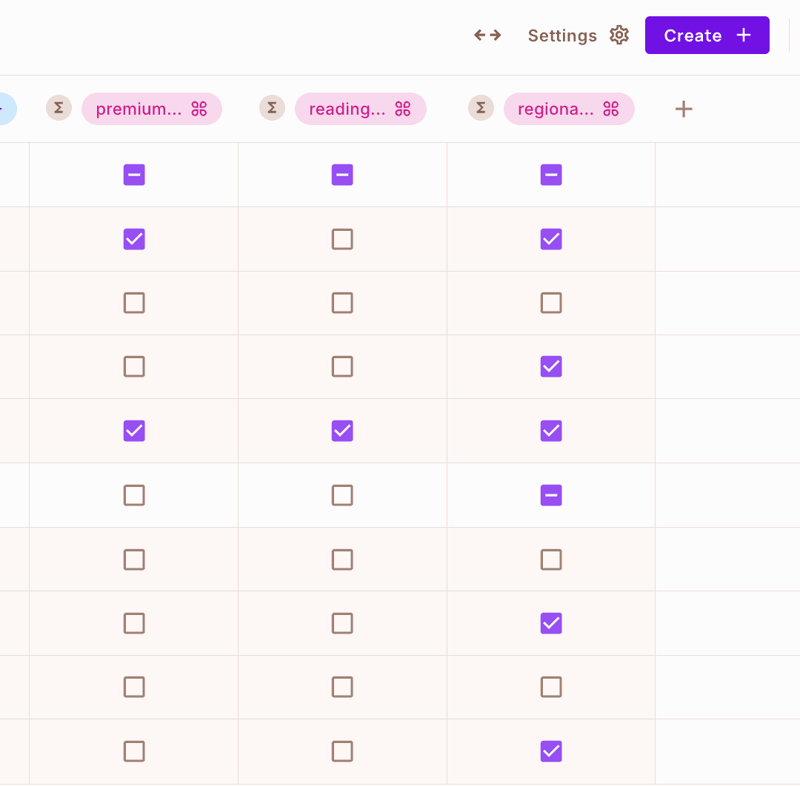
Step 4: Apply ABAC Rules
In the Policy Editor, apply these rules to actions:
For BlogPost resource:
-
read: Checkregional_accessAND (premium_accessORreading_limit) -
comment: Checkregional_accessANDpremium_access -
edit: Requiresauthororeditorrole +regional_access -
delete: Requiresauthorrole only
For Comment resource:
-
read: Checkregional_access -
edit: Requiresauthorrole ANDregional_access -
delete: Requiresauthorormoderatorrole -
moderate: Requiresmoderatorrole
This configuration creates a sophisticated permission system that controls access based on user relationships (author, editor, subscriber), enforces regional content restrictions, manages premium content access, implements reading limits for free users, and provides proper comment moderation controls.
Adding ABAC to Our Middleware
Next, enforce the ABAC rules we configured for your Strapi application. First, let's update your backend/src/middleware to include ABAC checks:
import { Context, Next } from "koa";
import { permit } from "../permit/client";
import type { Core } from "@strapi/strapi";

export const ACTIONS = {
  get: "read",
  put: "edit",
  delete: "delete",
  post: "create",
};

export const RESOURCES = {
  "/comments": "Comment",
  "/blog-posts": "BlogPost",
};

export default (_config: any, { strapi }: { strapi: Core.Strapi }) => {
  return async (ctx: Context, next: Next) => {
    const { user } = ctx.state;

    if (!user) {
      return ctx.unauthorized("Authentication required");
    }

    const postId = ctx.params.id;
    const action = ctx.request.method.toLowerCase();
    const resourcePath = "/" + ctx.request.url.split("/").filter(Boolean)[1];

    try {
      const subscription = await strapi.db
        .query("api::subscription.subscription")
        .findOne({
          where: { user: user.id },
          select: ["tier", "is_premium"],
        });

      const articlesRead = await strapi.db
        .query("plugin::users-permissions.user")
        .findOne({
          where: { id: user.id }
        });

      let resourceAttributes = {};
      if (RESOURCES[resourcePath] === "BlogPost" && postId) {
        const post = await strapi.db.query("api::blog-post.blog-post").findOne({
          where: { id: postId },
          select: ["type", "status", "region_restrictions"],
        });

        resourceAttributes = {
          type: post.type,
          status: post.status,
          region_restrictions: post.region_restrictions,
        };
      }

      const permitted = await permit.check(
        user.id.toString(),
        ACTIONS[action],
        {
          type: RESOURCES[resourcePath],
          key: `${RESOURCES[resourcePath]}:${postId}`,
          attributes: resourceAttributes,
        },
        {
          user: {
            attributes: {
              subscription_tier: subscription?.tier || "free",
              is_premium: subscription?.is_premium || false,
              articles_read: articlesRead?.articles_read || 0,
              location: ctx.request.headers["x-user-location"],
            },
          },
        }
      );

      if (!permitted) {
        return ctx.forbidden("Access denied by permission policy");
      }

      await next();
    } catch (error) {
      strapi.log.error("Permission check failed:", error);
      return ctx.internalServerError("Permission check failed");
    }
  };
};
First of all, this middleware checks whether the user is authenticated and, if so, enforces Attribute Based Access Control (ABAC) in a Strapi app. It decides what action to take (read, create, edit, delete) depending on the HTTP method and what resource is being accessed (BlogPost, Comment). It then gets user details, including subscription tier and articles read, as well as resource attributes like post type and region restrictions. It uses permit.check to check if the user has permission based on these attributes. It allows the request to proceed if access is granted and returns an error if denied.
Adding ReBAC and ABAC to Next.js
Now, let's implement the frontend components that enforce these permission rules. Create the following files: an api/api.ts file in the blog-frontend/lib directory in your frontend and add the code snippets:
export async function getBlogPost(id: string) {
  const res = await fetch(`/api/blog-posts/${id}`, {
    headers: {
      'x-user-location': localStorage.getItem('userLocation') || '', // For ABAC location check
    }
  });

  if (!res.ok) {
    if (res.status === 403) {
      throw new Error('Access denied to this content);
    }
    throw new Error('Failed to fetch blog post');
  }

  return res.json();
}

export async function updateBlogPost(id: string, data: any) {
  const res = await fetch(`/api/blog-posts/${id}`, {
    method: 'PUT',
    headers: {
      'Content-Type': 'application/json',
      'x-user-location': localStorage.getItem('userLocation') || '',
    },
    body: JSON.stringify(data),
  });

  if (!res.ok) {
    throw new Error('Failed to update blog post');
  }

  return res.json();
}
The above code will handle all our API calls to the Strapi backend to fetch blogs.
Then, create and update the BlogPost in the blog-blog-frontend/components folder to display the blogs and respect the permission rules we have defined:
import { useState, useEffect } from "react";
import CommentSection from "./CommentSection";
import { api } from "@/lib/api";

interface BlogPostProps {
  id: string;
  userSubscription: {
    tier: string;
    is_premium: boolean;
  };
}

export default function BlogPost({ id, userSubscription }: BlogPostProps) {
  const [post, setPost] = useState<any>(null);
  const [error, setError] = useState<string>("");
  const [isEditing, setIsEditing] = useState(false);

  useEffect(() => {
    async function loadPost() {
      try {
        const data = await api.getBlogPost(id);
        setPost(data);
      } catch (err: any) {
        setError(err.message);
      }
    }
    loadPost();
  }, [id]);

  if (error) {
    return (
      <div className="p-4 bg-red-100 text-red-700 rounded">
        {error === "Access denied to this content" ? (
          <>
            <h3 className="font-bold">Premium Content</h3>
            <p>This content requires a premium subscription to access.</p>
          </>
        ) : (
          error
        )}
      </div>
    );
  }

  if (!post) return <div>Loading...</div>;

  return (
    <div className="max-w-2xl mx-auto p-4">
      <h1 className="text-3xl font-bold mb-4">{post.title}</h1>

      {/* Premium content badge */}
      {post.type === "premium" && !userSubscription.is_premium && (
        <div className="bg-yellow-100 p-2 mb-4 rounded">⭐ Premium Content</div>
      )}

      {/* Content */}
      <div className="prose max-w-none">
        {isEditing ? (
          <textarea
            value={post.content}
            onChange={(e) => setPost({ ...post, content: e.target.value })}
            className="w-full p-2 border rounded"
          />
        ) : (
          <div>{post.content}</div>
        )}
      </div>

      <div className="mt-4 space-x-2">
        {post.canEdit && (
          <button
            onClick={() => setIsEditing(!isEditing)}
            className="bg-blue-500 text-white px-4 py-2 rounded"
          >
            {isEditing ? "Save" : "Edit"}
          </button>
        )}

        {post.canDelete && (
          <button
            onClick={() => {

            }}
            className="bg-red-500 text-white px-4 py-2 rounded"
          >
            Delete
          </button>
        )}
      </div>

      {/* Comments section */}
      <CommentSection postId={id} userSubscription={userSubscription} />
    </div>
  );
}
Next, update the CommentSection in the blo to render the comments and enforce the comment moderation rules:
import { useState } from "react";

interface CommentSectionProps {
    postId: string;
    userSubscription: {
      tier: string;
      is_premium: boolean;
    };
  }

  export default function CommentSection({ postId, userSubscription }: CommentSectionProps) {
    const [comments, setComments] = useState<any[]>([]);

    // Only premium users can comment
    const canComment = userSubscription.is_premium;

    return (
      <div className="mt-8">
        <h2 className="text-2xl font-bold mb-4">Comments</h2>

        {/* Comment form - Only shown to premium users */}
        {canComment ? (
          <form className="mb-4">
            <textarea
              placeholder="Add a comment..."
              className="w-full p-2 border rounded"
            />
            <button
              type="submit"
              className="mt-2 bg-blue-500 text-white px-4 py-2 rounded"
            >
              Post Comment
            </button>
          </form>
        ) : (
          <div className="bg-gray-100 p-4 rounded mb-4">
            Upgrade to premium to join the discussion
          </div>
        )}

        {/* Comments list */}
        <div className="space-y-4">
          {comments.map((comment: any) => (
            <div key={comment.id} className="border p-4 rounded">
              <div>{comment.content}</div>

              {/* Moderation controls - Only shown to moderators */}
              {comment.canModerate && (
                <div className="mt-2 space-x-2">
                  <button className="text-green-500">Approve</button>
                  <button className="text-red-500">Reject</button>
                </div>
              )}
            </div>
          ))}
        </div>
      </div>
    );
  }
We've successfully extended our Strapi RBAC policy and implemented and enforced both ReBAC and ABAC rules through the API, shown/hide UI elements based on permissions, handled premium content restrictions, implemented comment moderation, and considered user location and subscription status.
Each component checks permissions before rendering sensitive controls, and the API layer enforces these permissions server-side.
Testing the ReBAC and ABAC Policy
Now run your front end with the command below:
npm run dev
Then navigate to http://localhost:3000 and log in with one of the users we created earlier.
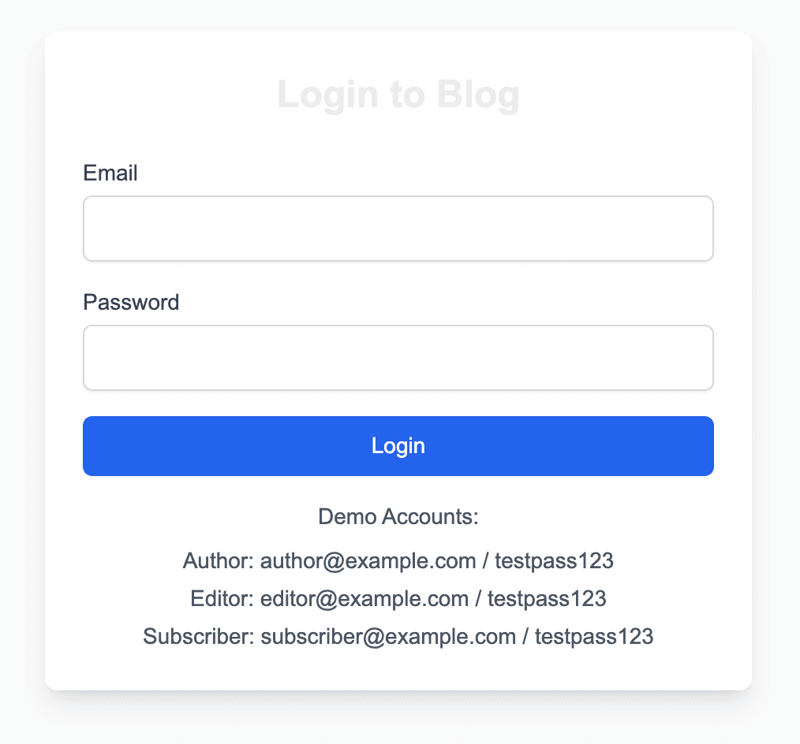
Now, you will be able to see all the blogs and the kind of blogs they are.

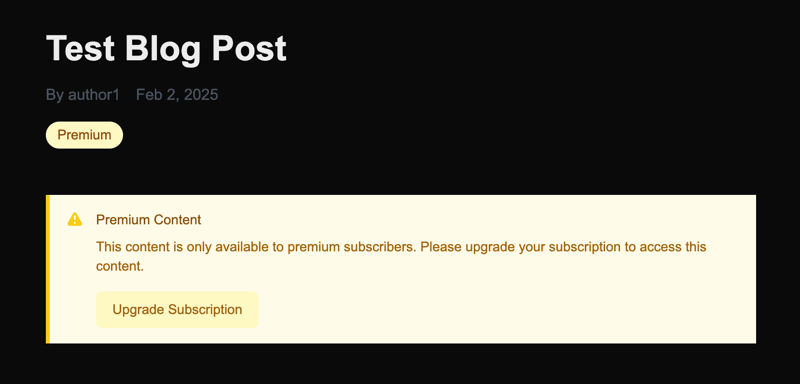
If a user who has not subscribed tries viewing the premium blog, they will get a warning message like in the screenshot below:
Conclusion
Throughout this tutorial, we've upgraded our basic blog platform into a robust content management system by implementing Permit.io's ReBAC and ABAC authorization. We've moved beyond Strapi's basic RBAC.
We extended the application authorization policies beyond Strapi's basic RBAC to relationship-based permissions where authors can moderate comments on their posts and dynamic attribute-based rules that consider subscription status and regional restrictions; we’ve also made content permissions based on user subscription tiers.
After this, we connected Strapi’s backend to Permit.io for permission management, added auto-syncing of user and role based on lifecycles, and made a Next.js frontend respecting these complex permissions.
This approach simplifies building your permission rules and will allow you to keep your code clean and maintainable, whether writing a blog, a learning platform, or any content-driven application.
Build modern websites with the most customizable Headless CMS. Get started with Strapi 5!


Top comments (0)