A side project of mine requires automating my Google Nest thermostat so I decided to try out the Smart Device Management (SDM) API.
Setup
I began with Nest's Get Started Guide. That walks through the process in detail so I'll just recap it here and provide more context in places.
Registration created a project in the Nest Device Access Console where I initially skipped the OAuth Client Id and Pub/Sub events setup.
Next I created a GCP project to access the SDM API through. Afterwards I went to APIs & Services > Credentials and clicked Create Credentials > OAuth client ID and set it up as a Web application with URIs including https://www.google.com, https://www.getpostman.com/oauth2/callback, and http://localhost:8080/.
With the OAuth credentials created, I copied the Client ID into the Device Access Console project.
The last step was linking my Nest Google account to the Device Access project, opening this URL:
https://nestservices.google.com/partnerconnections/{project-id}/auth
    ?redirect_uri=https://www.google.com
    &access_type=offline
    &prompt=consent
    &client_id={oauth2-client-id}
    &response_type=code
    &scope=https://www.googleapis.com/auth/sdm.service
Postman Configuration
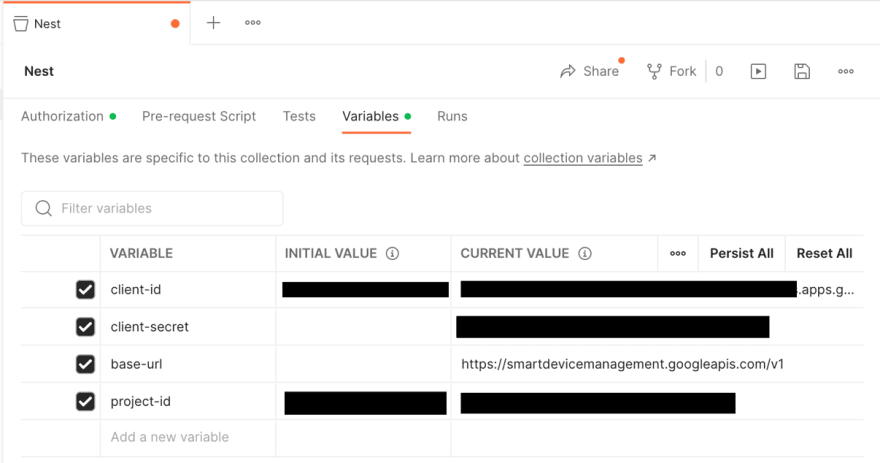
For simplicity I started off with Postman to test API calls. First I setup some variables at the collection level to reduce later repetition and hardcoding.
-
{{base-url}}: https://smartdevicemanagement.googleapis.com/v1 -
{{client-id}}: from GCP OAuth credentials -
{{client-secret}}: from GCP OAuth credentials -
{{project-id}}: from Device Access Console
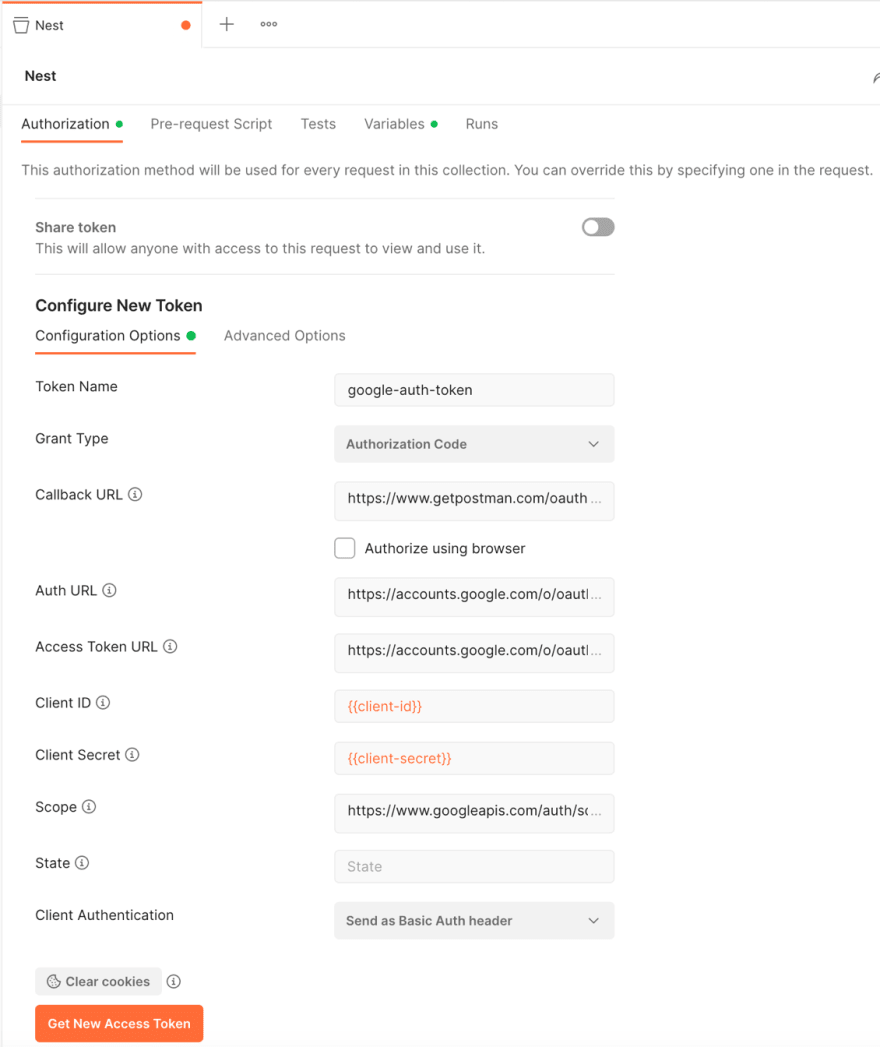
Likewise, authorization was setup at the collection level:
- Grant Type: Authorization Code
- Callback URL: https://www.getpostman.com/oauth2/callback
- Auth URL: https://accounts.google.com/o/oauth2/auth
- Access Token URL: https://accounts.google.com/o/oauth2/token
- Client ID:
{{client-id}}variable from GCP OAuth credentials - Client Secret:
{{client-secret}}variable from GCP OAuth credentials - Scope: https://www.googleapis.com/auth/sdm.service
Postman Tests
With the auth token in use, the first logical SDM endpoint to call was Device list, {{base-url}}/enterprises/{{project-id}}/devices/ to retrieve authorized device(s).
Device list produced output similar to the following.
{
    "devices": [
        {
            "name": "enterprises/{{project-id}}/devices/{{device-id}}",
            "type": "sdm.devices.types.THERMOSTAT",
            "assignee": "enterprises/{{project-id}}/structures/{{structure-id}}/rooms/{{room-id}}",
            "traits": {
                "sdm.devices.traits.Info": {
                    "customName": ""
                },
                "sdm.devices.traits.Humidity": {
                    "ambientHumidityPercent": 45
                },
                "sdm.devices.traits.Connectivity": {
                    "status": "ONLINE"
                },
                "sdm.devices.traits.Fan": {
                    "timerMode": "OFF"
                },
                "sdm.devices.traits.ThermostatMode": {
                    "mode": "HEAT",
                    "availableModes": [
                        "HEAT",
                        "COOL",
                        "HEATCOOL",
                        "OFF"
                    ]
                },
                "sdm.devices.traits.ThermostatEco": {
                    "availableModes": [
                        "OFF",
                        "MANUAL_ECO"
                    ],
                    "mode": "OFF",
                    "heatCelsius": 15.458176,
                    "coolCelsius": 26.784546
                },
                "sdm.devices.traits.ThermostatHvac": {
                    "status": "OFF"
                },
                "sdm.devices.traits.Settings": {
                    "temperatureScale": "FAHRENHEIT"
                },
                "sdm.devices.traits.ThermostatTemperatureSetpoint": {
                    "heatCelsius": 24.473785
                },
                "sdm.devices.traits.Temperature": {
                    "ambientTemperatureCelsius": 24.709991
                }
            },
            "parentRelations": [
                {
                    "parent": "enterprises/{{project-id}}/structures/{{structure-id}}/rooms/{{room-id}}",
                    "displayName": "Thermostat"
                }
            ]
        }
    ]
}
The {{device-id}} in the {{name}} field of the list response I then used as the key to make API calls against the thermostat, plugging the value into a new {{device-id}} Postman collection variable.
Changing the temperature was the next logical test for me: POST {{base-url}}/enterprises/{{project-id}}/devices/{{device-id}}:executeCommand
Coding it up
With requests working in Postman, it was time to write some code. My project idea involves the use of a Raspberry Pi and a Python library so I decided to start with Python. I'll preface this by saying I've done very little Python and it probably shows, plus this is only discovery work.
I started off with pip3 install for these key packages:
The main script makes use of Click for a quick command line interface. This allowed me to quickly run commands like: python3 main.py temp 75 --mode Cool
import click

from env import get_project_id
from thermostat import Thermostat, ThermostatMode

@click.group()
@click.option('--debug/--no-debug', default=False)
@click.pass_context
def cli(ctx, debug):
    ctx.ensure_object(dict)
    ctx.obj['DEBUG'] = debug

    thermostat = Thermostat(projectId=get_project_id(), deviceName=None, debug=debug)
    thermostat.initialize()
    ctx.obj['thermostat'] = thermostat

    pass

@cli.command()
@click.pass_context
@click.option('--mode', required=True,
              type=click.Choice(['Cool', 'Heat'], case_sensitive=True))
@click.argument('temp', nargs=1, type=click.FLOAT)
def temp(ctx, temp: float, mode):
    modeType = ThermostatMode[mode]
    ctx.obj['thermostat'].set_temp(modeType, temp)

cli.add_command(temp)

if __name__ == '__main__':
    cli()
The main functionality is handled by the Thermostat class. On creation it creates a service object using the Google Python API Client. That's used later to help build and execute API requests. At app exit the service object is closed.
import atexit
import json

from credentials import get_credentials_installed
from enum import Enum
from googleapiclient.discovery import build
from temperature import celsius_to_fahrenheit, fahrenheit_to_celsius
from urllib.error import HTTPError

ThermostatMode = Enum('ThermostatMode', ['Cool', 'Heat'])

class Thermostat:
  def __init__(self, projectId, deviceName, debug):
    self.projectId = projectId
    self.projectParent = f"enterprises/{projectId}"
    self.deviceName = deviceName
    self.debug = debug
    credentials = get_credentials_installed()
    self.service = build(serviceName='smartdevicemanagement', version='v1', credentials=credentials)
    atexit.register(self.cleanup)

  def cleanup(self):
    self.service.close()
    print('Service closed')

# ...
Thermostat creation also kicks off credentials setup. There are different OAuth flows available. To start with I chose Installed App Flow, downloading OAuth Credentials from GCP OAuth credentials to a Git ignored ./secrets/client_secret.json file. The first time it runs there's an interactive login step. After that the credentials are pickled into a secrets directory file.
import pickle
import os
from google_auth_oauthlib.flow import InstalledAppFlow
from google.auth.transport.requests import Request

def get_credentials_installed():
  SCOPES = ['https://www.googleapis.com/auth/sdm.service']

  credentials = None

  pickle_file = './secrets/token.pickle'

  if os.path.exists(pickle_file):
        with open(pickle_file, 'rb') as token:
            credentials = pickle.load(token)

  if not credentials or not credentials.valid:
        if credentials and credentials.expired and credentials.refresh_token:
            credentials.refresh(Request())
        else:
            flow = InstalledAppFlow.from_client_secrets_file('./secrets/client_secret.json', SCOPES)
            credentials = flow.run_local_server()

        with open(pickle_file, 'wb') as token:
            pickle.dump(credentials, token)

  return credentials
Later I plan to look into a service account more but for now Installed App Flow fits my needs.
After Thermostat creation, initialization gets the list of devices, resolves the target device, and reads and prints current thermostat settings.
def initialize(self):
    request = self.service.enterprises().devices().list(parent=self.projectParent)
    response = self.__execute(request)
    device = self.__get_device(response)

    traits = device['traits']
    self.deviceName = device['name']
    self.mode = traits['sdm.devices.traits.ThermostatMode']['mode']
    self.tempC = traits['sdm.devices.traits.Temperature']['ambientTemperatureCelsius']
    self.tempF = celsius_to_fahrenheit(self.tempC)

    setpointTrait = traits['sdm.devices.traits.ThermostatTemperatureSetpoint']
    key = f'{self.mode.lower()}Celsius'
    self.setpointC = setpointTrait[key]
    self.setpointF = celsius_to_fahrenheit(self.setpointC)

    print(f'Nest mode is {self.mode}, ' +
          f'temp is {round(self.tempF, 0)} °F, ' +
          f'setpoint is {round(self.setpointF, 0)} °F')
Initialization calls a couple helper functions. First is a wrapper around executing service requests.
def __execute(self, request):
try:
  response = request.execute()

  if self.debug:
    print(json.dumps(response, sort_keys=True, indent=4))

  return response

except HTTPError as e:
  if self.debug:
    print('Error response status code : {0}, reason : {1}'.format(e.status_code, e.error_details))
  raise e
Second is one to resolve the thermostat device among the authorized device(s). If a device name is specified during creation, it looks for that name. If no device was specified it'll default the first device if there's only one.
def __get_device(self, response):
    device = None
    device_count = len(response['devices'])

    if (self.deviceName) is not None:
      full_device_name = f"{self.projectParent}/devices/{self.deviceName}"

      for d in response['devices']:
        if d['name'] == full_device_name:
          device = d
          break

      if device is None:
        raise Exception("Failed find device by name")

    else:
      if device_count == 1:
        device = response['devices'][0]
      else:
        raise Exception(f'Found ${device_count} devices, expected 1')

    return device
Finally the more interesting bits include changing the thermostat mode...
def set_mode(self, mode: ThermostatMode):
    data = {
      "command": "sdm.devices.commands.ThermostatMode.SetMode",
      "params": {
        "mode": mode.name.upper()
      }
    }

    request = self.service.enterprises().devices().executeCommand(name=self.deviceName, body=data)
    response = self.__execute(request)
    print(f'Nest set to mode {mode.name}')
... and of most interest, commands to set the temperature. It's worth noting that changing the temperature requires the thermostat to be in the correct mode so that needs to be changed or checked first.
def set_temp(self, mode: ThermostatMode, tempF: float):
    self.set_mode(mode)
    tempC = fahrenheit_to_celsius(tempF)

    data = {
      "command": f"sdm.devices.commands.ThermostatTemperatureSetpoint.Set{mode.name}",
      "params": {
        f"{mode.name}Celsius": tempC
      }
    }

    request = self.service.enterprises().devices().executeCommand(name=self.deviceName, body=data)
    response = self.__execute(request)

    print(f'Nest set to temp {round(tempF, 0)} °F ({round(tempC, 0)} °C) for mode {mode.name}')
The full code can be found at github.com/thnk2wn/google-nest-sandbox.
A sample test looked like this. There are also some launch configurations in the .vscode folder of the repo. That's it for now, more interesting Nest integrations are in progress.


Top comments (0)