Notification 1 : All code related to this blog can be found at https://github.com/turjachaudhuri/aws-sam
So , I had really enjoyed creating a serverless app in AWS based on AWS SAM and deploying it to my AWS account .
You can find all details at - https://dev.to/turjachaudhuri/my-first-application-in-aws-serverless-application-repository-1ahc
However , I wanted to take it a step further . I wanted to create a CI/CD pipeline so that every time I commit any changes to my serverless app on git , it would be automatically deployed to AWS using a build/delivery pipeline.
So , What should we do?
As usual , I first googled to see what other developers were using . I found that TravisCI was obviously very popular in the open source world.
"Travis CI is a hosted, distributed continuous integration service used to build and test software projects hosted at GitHub. Open source projects may be tested at no charge via travis-ci.org. Private projects may be tested at travis-ci.com on a fee basis."
I found a few blog posts on how to set up a CI/CD pipeline using Git and Travis CI but all of them were for NodeJS apps ,and none of them suited my exact use case . So , I decided to work on it on my own.
How to get started?
The assumption here is that we have a fully tested Serverless app based on the SAM template that can be individually deployed using SAM CLI , and we just want to hook it up to some sort of continuous integration pipeline .
Ok, so let's get started.
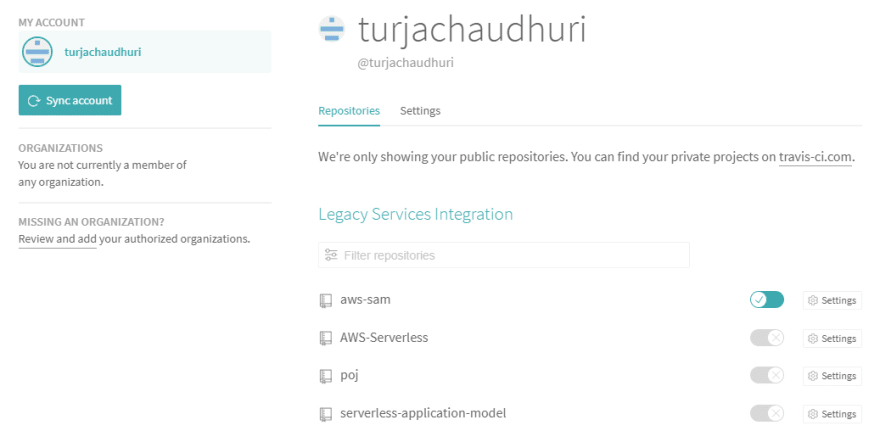
Sign in to TravisCI with your GitHub account . The service will automatically retrieve all your public repositories from GitHub and display them in a list like this :
Enable the radio button next to the repo that you want to configure with TravisCI , and click on that repo to navigate to the TravisCI details page . This page shows the details of the builds , their status and so on . TravisCI is designed to seamlessly integrate with Github.
Gotcha 1: Just after configuring TravisCI to work with your repo , you will find that the details page is empty . It might feel like you have misconfigured something , but actually , nothing will happen unless the git repo has a .travis.yml file . As soon as the .travis.yml file is pushed into git , automatic build will start.
What is .travis.yml ?
This is the yaml file that TravisCI uses to start your builds . It is basically a series of steps that guides TravisCI as to what process to follow to build and finally deploy your artifacts. It needs to be present at the root of your project . You can essentially think of it as a script containing the same commands that you otherwise used yourself to deploy the app from your personal machine.
My .travis.yml file looks like this , I have added comments to make it easier to understand.
# this is the language of the solution . i am using csharp
language: csharp
mono: none
# here we tell the version of dotnet sdk that the app uses
dotnet: 2.0
# here we identify the solution that needs to be built
solution: S3ToDynamo.sln
# this tells that only updates in master branch will be considered for build
branches:
  only: master
# here we need to install all our dependencies to enable the future steps
install:
- pip install --user awscli
- pip install --user aws-sam-cli
# here the commands needed to build the solution are provided
script:
- dotnet restore
- dotnet publish
- sam validate --template template.json
- sam package --template-file template.json --s3-bucket aws-sam-test-1 --output-template-file serverless-output.yaml
# here the commands needed to deploy the solution are provided
deploy:
  provider: script
  script: sam deploy --template-file serverless-output.yaml --stack-name aws-sam-trial-1 --capabilities CAPABILITY_IAM
  skip_cleanup: true
  on:
    branch: master
notifications:
  email:
    on_failure: always
# here we provide the variables that are set globally for the build+deploy
env:
  global:
  - AWS_DEFAULT_REGION=ap-south-1
Gotcha 2: One important thing to keep in mind to get any sort of CI/CD pipeline running is you need to understand the premise of the setup you are running . CI/CD pipelines are nothing but glorified build and deploy servers (simplistically speaking) . Whenever a build is triggered (say via a source control push) , the CI/CD framework simply downloads the source code from the source control repo into a blank VM(say running Linux) . So , we need to keep in mind that the server will not have many of the packages/dependencies that we otherwise take for granted . That is why in the .travis.yml file you need to specify everything that is needed , even the bare-metal installations that you might take for granted .
For example , in my .travis.yml file , we mentioned
pip install --user awscli
This step is not needed every time in your local build process , but it is needed for TravisCI as the server where the build is running is simply a blank canvas.
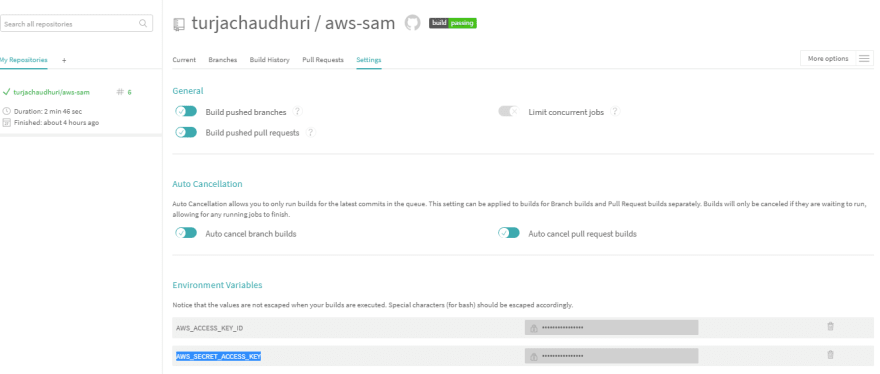
Gotcha 3: In case of AWS deployments , one crucial thing we need is AccessKeyID and SecretAccessKey and the region we need to deploy the solution to . In the above .travis.yml you can see the AWS_DEFAULT_REGION has been set . However , AWS_ACCESS_KEY_ID and AWS_SECRET_ACCESS_KEY are not mentioned there . Then , how will TravisCI deploy to AWS without this vital information ?
This is because I had setup secure parameters/variables from the TravisCI console . This can be done using the settings section of the GitHub repo in the TravisCI . I believe this is a good practice , since , the .travis.yml file will be a part of your public git repo , and exposing secrets in a source control is a very bad practice.
Screenshot showing the Environment Variables section of the TravisCI page.
All done , now what?
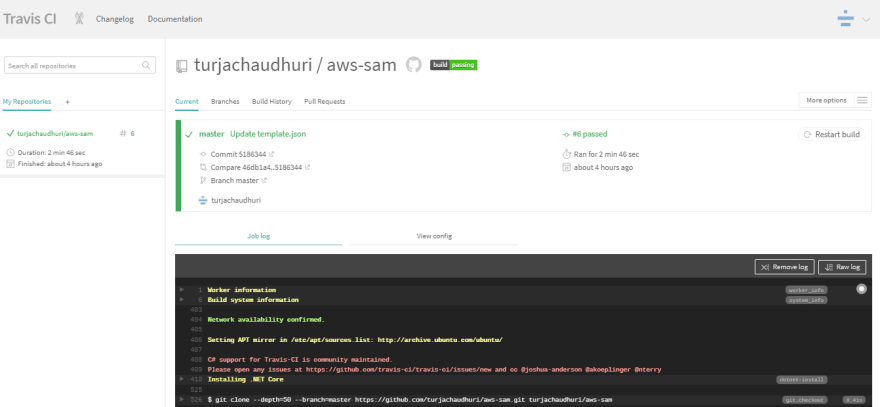
As soon as the .travis.yml file is pushed into the git repo , in a minute or two a build will start in TravisCI console . You can check the logs there to monitor what is happening in the build .
If the .travis.yml file is well written , and the project builds properly , you will see a screen like this:
Where to go from here?
Setup a CI/CD pipeline for your serverless project and let me know how it turned out . Check out https://docs.travis-ci.com/ for details instructions on how to get started and customize workflows.


Top comments (0)