Ok, let's begin. My main intention is to play around with Docker containers and see if there are any benefits for Automation testers.
Given that the world is moving from a VM world to a container world it's kinda obvious that one has to move towards containers but it's not necessary for all.
In this article, I am going to explain how one can configure WebdriverIO to run the test scripts in a docker container using Selenium-hub.
What do we need
- An automation script
- Docker
- Official docker images from {See below for github details}
- Selenium Hub
- Nodes of the browser {chrome, firefox, opera}
- VNC Server/viewer (Optional)
 SeleniumHQ
/
docker-selenium
Docker images for the Selenium Grid Server
Docker images for the Selenium Grid Server
The project is made possible by volunteer contributors who have put in thousands of hours of their own time and made the source code freely available under the Apache License 2.0.
👉 Status: Grid 4 is under development and on a Beta stage
We are doing prereleases on a regular basis to get early feedback. This means that all other Selenium components can be currently at a different alpha version (e.g. bindings on Beta 1, and Docker images on prerelease Beta 2).
Docker images for Grid 4 come with a handful of tags to simplify its usage, have a look at them in one of our prereleases
To get notifications of new prereleases, add yourself as a watcher of "Releases only".
Doubts or questions? Please get in touch through the different communication channels available in the Community section.
Looking for Grid 3…
Note:
- There is no official node for IE.
- Docker cannot be installed directly on a few versions of windows.
You can watch this entire article in a video in the below link as well.
Step 1:
Ensure you have the automation script working on your local machine. In case you don't have it ready you can download this from this repository.
WDIO6_Docker (GRID + NODE)
This is a sample script to run WebdriverIO Automation scripts in docker. I have added the compose file and the package.json You can clone this repository and do an npm install to get going.
Pre-requirements
- Docker client should be installed on your machine
- node.js v12.16.1 or greater
You can watch a video of how we can use docker to run automation scripts in the below link. https://youtu.be/NDt4alzH5E0
Thank you
Points to consider:
You must have Node.js version v12.16.1 or higher as mentioned on the official site for WDIO v6
Ensure the Browser and chrome driver are compatible.
Step 2:
Changes to the configuration file
In your WebdriverIO config file, you have to make 2 changes
Add the location where you are planning to run your Selenium hub. Here I am running on the default port 4444 as shown in the screenshot.
Specify the runner to be docker.
That's the configuration part.
Points to consider:
- If you have cloned the repository from the above git link, I have already made that change.
Step 3:
Create the containers for Selenium Hub and Node
Selenium Hub:
You can consider this to be the brains of the execution.
Selenium Hub will control which node should run which spec file/feature file and will distribute the unexecuted files based on the availability of the nodes.
Chrome Node
This is a simple Linux system with all that we need to run out Automation scripts i.e. browsers
You can do so in 2 ways
Option 1:
Manually run the commands on your terminal and kind of establish the communication between the hub and the nodes
Please refer Docker networking section in the git hub link provided above.
Option 2:(Recommended approach)
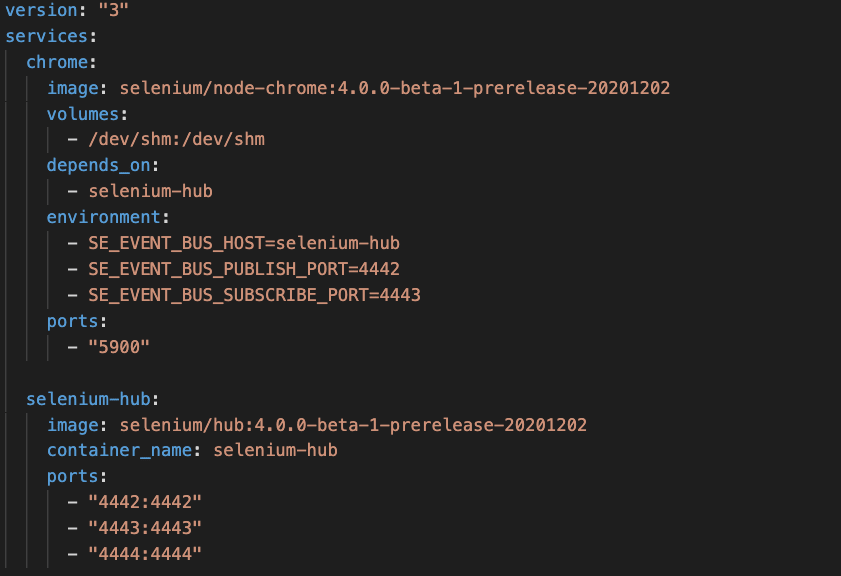
Simply just create a docker-compose file and save it as docker-compose.yml in the same location where you have your config file.
If you want to know more about the Docker compose file and what you should know please refer to step 7.
Step 4:
Running your docker container. This can be done again in 2 ways based on what you have chosen in step 3.
If you have chosen Option 1, then follow the commands provided in the description provided in the same URL. This is definitely a viable option if you just want to experiment but this has its limitation and inconveniences
- You will have to run the same command every time you want to bring the setup
- Scaling could be not as simple as it should be. And many more.
That's why I would always recommend Option 2 which is through docker-compose. If you have chosen this option, All you have to do is type one command after going to the location where you have placed the docker-compose.yml file.
docker-compose up -d
In case you have the filename as something else e.g. abcd.yml then
docker-compose -f abcd.yml up -d
Note: -d here is to run the container in a detached mode.
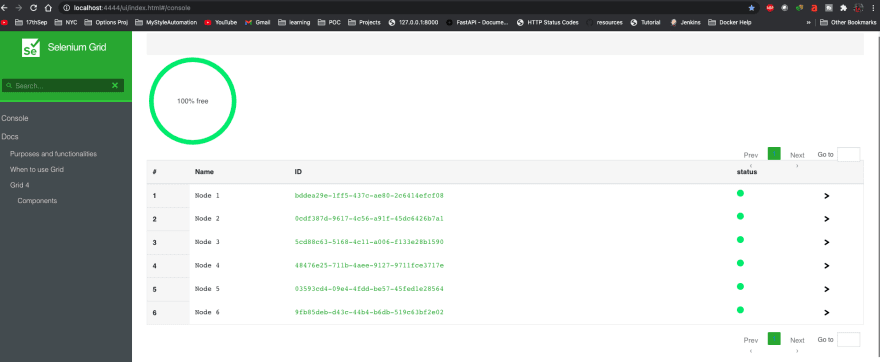
To verify if you have the nodes and selenium hub up and running you can verify by going to the URL Click here from the machine where you are running you selenium hub
If the setup is successful it should like this
Step 5:
Running you automation script
Now, all the setup is done. You can see 3 chrome nodes in the Selenium hub and once you trigger the scripts you can see the execution will begin in the containers.
If you want to see how the scripts are triggered visually, you can do so by setting up your VNC server and VNC viewer.
The command below shows all the containers that are running and their IP address and the ports.
So to see a specific container take up the port and enter in VNC viewer and then it will ask for a password.
The password is secret
Step 6:
Analyzing your Results
Depending upon whether you want to get as an HTML file or as a JSON file you can choose from the list that WebdriverIO is providing
Step 7:
Docker compose
There are a lot of things that one can learn about docker-compose but I will limit this to what we should from an automation perspective.
We need 2 main things
- Flexibility to scale the number of nodes so parallel execution can be faster
- The order in which the images should be
When we scale the nodes it's kind of imminent that we don't use the same port number more than once. To avoid that, we have 2 options,
- we can leave it to docker for the ports from the local machine and specify the ports inside the container. (Recommended)
- we can specify a range of ports that we want to allocate for the nodes.
If we want to spend less time troubleshooting different ports that are currently in use, I would strongly suggest to leave it to docker.
However, in the second part where we specify the port inside the docker container that's what the official image has but you change it or leave it as it is.
I will stop here, hope you found this useful!
Thanks


Top comments (0)