HTML
.
Requirement
- Text Editor
- Browser
in this walk through tutorial will be build a complete functional frontend web application (a GPA calculator). for this guide i am using Sublime text editor for writing code and Chrome browser for testing my code. without wasting much time talking let jump into our code.
Table Of Content
.
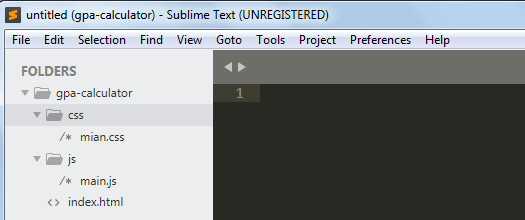
Below is the folder structure

inside the folder there are three files
-
index.htmlroot folder -
main.csscss folder -
main.jsjs folder
Let start with create a file index.html and open it up in your prefered text editor to add the main elements the page requires
Step 1
<!DOCTYPE html>
<html>
<head>
    <title>GPA Calculator</title>

    <meta charset="utf-8">
    <meta name="viewport" content="width=device-width, initial-scale=1.0" />

    <link rel="stylesheet" type="text/css" href="css/main.css">

    <script src="js/main.js" type="text/javascript"></script>
</head>
<body>

</body>
</html>
from line 7 and 8 we referenced the external stylesheet holding our css rules, and javascript files holding the app functionalities
.
Step 2:
inside the body <body> tag
<header>
<h1 style="text-align: center;">GPA Calculator</h1>
</header>
<main>
<section class='section-con'>
</section>
<section class='section-con'>
</section>
<section class='section-con'>
</section>
</main>
<footer class="footer">
<p> © 2020. Made with love by mdjibril</p>
</footer>
.
Step 3:
inside the first section <section>tag add a <form> element and a <table> element
<form name="formBody" id="formdata" method="post" onSubmit="addUpCreditsGpa; return false">
<table class="table-con">
<thead>
<tr>
<td>Course</td>
<td>Unit</td>
<td>Grade</td>
</tr>
</thead>
<tbody id="tableBody">
<tr>
<td>
<input type="text" name="courseCode" class="code-input">
</td>
<td>
<select name="creditUnit" class="select" onchange="addUpCreditsGpa()">
<option value="6">6</option>
<option value="5">5</option>
<option value="4">4</option>
<option value="3">3</option>
<option value="2">2</option>
<option value="1">1</option>
</select>
</td>
<td>
<select name="grade" class="select" onchange="addUpCreditsGpa()">
<option value="A">A</option>
<option value="B">B</option>
<option value="C">C</option>
<option value="D">D</option>
<option value="E">E</option>
<option value="F">F</option>
</select>
</td>
</tr>
</tbody>
</table>
</form>
Inside the opening tag of the <form> element we have a javascript function that is been referenced from main.js, in the opening tag of the <select> element this function is repeated again addUpCreditsGpa()
.
Step 4:
inside the second <section> element add two html button
<button form="formdata" onclick="addNewRow()"> Add </button>
<button form="formresult" onclick="addUpCreditsGpa()">Calculate</button>
in this path we have a new function addNewRow() when a user click on it, it will automattically add new row to the form.
.
Step 5:
in the last <section> element add another <form> with a <table> element embeded.
<form id="formresult" name="results" method="post" onSubmit="return false">
                <table class="table-con-result">
                    <thead>
                        <tr>
                            <td>Total CU</td>
                            <td>GPA</td>
                        </tr>
                    </thead>
                    <tbody>
                        <tr>
                            <td>
                                <input type="text" name="totalUnit" class="result-input" onchange="addUpCreditsGpa()"">
                            </td>
                            <td>
                                <input type="text" name="gpa" class="result-input" onchange="addUpCreditsGpa()">
                            </td>
                        </tr>
                    </tbody>
                </table>
            </form>
.
From this your index.html should be complete,save and open it up in your browser, how does it look? this will lead us to our section series how we are going to style the web page to look more prettier than it is.
.
Github repo
 mdjibril
/
spya-dev-crash-course
two week web development crash course
"# spya-dev-crash-course"
. Happy Coding


Top comments (0)