Hey! o/
I will share some options to install the OpenShift in AWS using manual authentication mode with with AWS Secure Token Service (STS).
An overview of how the AWS STS authentication flow works on OpenShift
Getting credentials assuming an IAM role is the best way to provide credentials to access AWS resources as it uses short-lived tokens, easy to expire, and fine-tuned the access through trusted relationship statements.
When the application which wants to consume AWS services is the other AWS service (EC2, ECS, Lambda, etc) or an application running in almost all AWS infrastructure, usually it uses temporary credentials provided by the authentication service (example for EC2: metadata services, IMDS) to assume the role and get the temporary credentials from STS.
When the service is external from AWS (example mobile App), or it uses shared resources (like Kubernetes/OpenShift cluster running in EC2) it needs an extra layer of authentication to avoid any application being able to assume the role allowed by the service (example EC2 instance profile).
For that reason, there is the managed service IAM OIDC (which implements OpenID Connect spec) to allow external services federating access to AWS services through STS when assuming the AWS IAM Role. That is the IRSA: IAM Role for Service Accounts.
The Kubernetes API Server (KAS) signs the service account tokens (JWT) with OIDC and IAM Role information. The service uses that token to authenticate on STS API calling the method AssumeRoleWithWebIdentity informing the IAM Role ARN desired to be assumed. The STS service access the OIDC to validate it by accessing the JWKS (JSON Web Key Sets) files stored on the public URL, once the token is validated, the IAM Role will be assumed, returning the short-lived credentials to the caller (pod). The service can authenticate on the API for the target service (S3, EC2, etc).
In OpenShift, every cluster component that needs to interact with AWS has one different token signed by KAS, each one associated exclusively with one IAM Role. Example of services:
- Machine API to create EC2
- Image Registry to create S3 Buckets
- CSI to create EBS block storage
Said that, let’s recap the steps to install OpenShift on AWS with STS:
- Create installer config
- Set the
credentialsModetoManual - Create installer manifests
- Generate the OIDC keys
- Create the bucket to store JWKS
- Upload the OIDC config and keys to Bucket
- Create the IAM OIDC service
- Set the issuerURL with the bucket URL address on custom resource
Authentication - Extract the credentials request from the OpenShift release image
- Process the custom resources
CredentialRequests, creating the all the IAM roles - Copy the manifests dor secrets and authentication custom resource to the installer manifests directory
- Install a cluster
The flow is something like this:
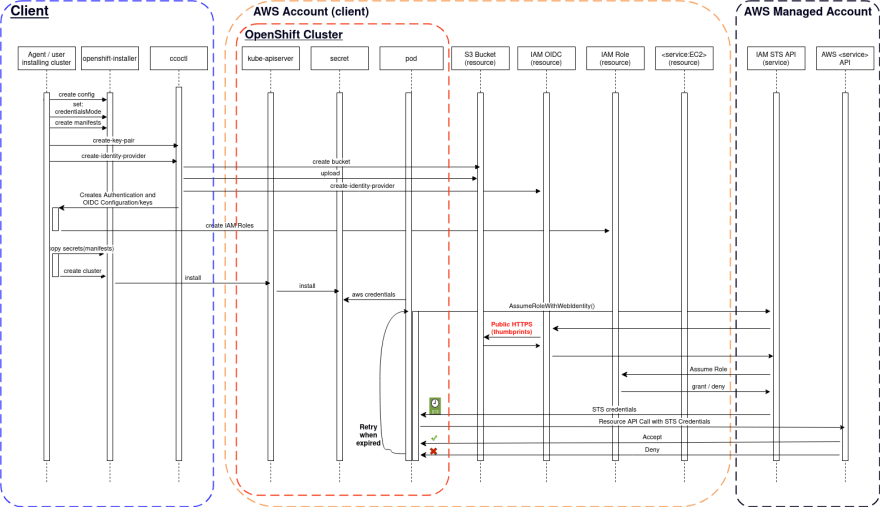
Installing a cluster with AWS STS
Now let’s walk through all the commands used to create a cluster.
Steps described on Official documentation
Requirements:
- Export the following environment variables
export CLUSTER_NAME="my-cluster"
export BASE_DOMAIN="mydomain.example.com"
export CLUSTER_REGION=us-east-1
export VERSION=4.10.16
export PULL_SECRET_FILE=${HOME}/.openshift/pull-secret-latest.json

export SSH_PUB_KEY_FILE="${HOME}/.ssh/id_rsa.pub"
export OUTPUT_DIR_CCO="${PWD}/${CLUSTER_NAME}-cco/"
export INSTALL_DIR="${PWD}/${CLUSTER_NAME}-installer"
Steps:
- Get the clients (installer + oc)
oc adm release extract \
    --tools quay.io/openshift-release-dev/ocp-release:${VERSION}-x86_64 \
    -a ${PULL_SECRET_FILE}

tar xvfz openshift-client-linux-${VERSION}.tar.gz
tar xvfz openshift-install-linux-${VERSION}.tar.gz
- Get the
ccoctlutility
RELEASE_IMAGE=$(./openshift-install version | awk '/release image/ {print $3}')
CCO_IMAGE=$(oc adm release info --image-for='cloud-credential-operator' $RELEASE_IMAGE)
./oc image extract $CCO_IMAGE --file="/usr/bin/ccoctl" -a ${PULL_SECRET_FILE}
chmod 775 ccoctl
./ccoctl --help
- Setup the OIDC files
mkdir -p ${OUTPUT_DIR_CCO}
./ccoctl aws create-key-pair \
  --output-dir ${OUTPUT_DIR_CCO}
- Create the OIDC
./ccoctl aws create-identity-provider \
    --name=${CLUSTER_NAME} \
    --region=${CLUSTER_REGION} \
    --public-key-file=${OUTPUT_DIR_CCO}/serviceaccount-signer.public \
    --output-dir=${OUTPUT_DIR_CCO}/
A new bucket will be created
/keys.jsonobject will be generated and uploaded to the bucket. This contains public information on OpenID and JWKS Keys. More info about JWK Key Object
/.well-know/openid-configurationobject will also upload with public information
The file$OUTPUT_DIR_CCO/manifests/cluster-authentication-02-config.yamlwill be created containing the IAM OIDC Issuer URI
- Extract the
CredentialRequests
./oc adm release extract --credentials-requests \
    --cloud=aws \
    --to=${OUTPUT_DIR_CCO}/credrequests \
    ${RELEASE_IMAGE}
- Create the IAM Roles
AWS_IAM_OIDP_ARN=$(aws iam list-open-id-connect-providers \
    | jq -r ".OpenIDConnectProviderList[] | \
        select(.Arn | contains(\"${CLUSTER_NAME}-oidc\") ).Arn")
./ccoctl aws create-iam-roles \
    --name=${CLUSTER_NAME} \
    --region=${CLUSTER_REGION}\
    --credentials-requests-dir=${OUTPUT_DIR_CCO}/credrequests \
    --identity-provider-arn=${AWS_IAM_OIDP_ARN} \
    --output-dir ${OUTPUT_DIR_CCO}
- Generate the install config
mkdir -p ${INSTALL_DIR}
cat <<EOF > ${INSTALL_DIR}/install-config.yaml
apiVersion: v1
baseDomain: ${BASE_DOMAIN}
credentialsMode: Manual
compute:
- name: worker
  replicas: 2
metadata:
  name: "${CLUSTER_NAME}"
platform:
  aws:
    region: ${CLUSTER_REGION}
    defaultMachinePlatform:
      zones:
      - ${CLUSTER_REGION}a
publish: External
pullSecret: '$(cat ${PULL_SECRET_FILE} |awk -v ORS= -v OFS= '{$1=$1}1')'
sshKey: |
  $(cat ${SSH_PUB_KEY_FILE})
EOF
./openshift-install create manifests --dir $INSTALL_DIR
- Copy manifests to install-dir
cp -rvf ${OUTPUT_DIR_CCO}/manifests/* \
  ${INSTALL_DIR}/manifests
cp -rvf ${OUTPUT_DIR_CCO}/tls \
  ${INSTALL_DIR}/
- Create a cluster
./openshift-install create cluster \
  --dir $INSTALL_DIR
Post-install review
Installer overview
Wait for the cluster to complete the installation
Check the
authenticationresource
$ oc get authentication cluster -o json \
>     | jq .spec.serviceAccountIssuer
"https://my-cluster-oidc.s3.us-east-1.amazonaws.com"
- Check if all Cluster Operators are available
# COs Available
$ oc get co  -o json \
    | jq -r ".items[].status.conditions[] | select(.type==\"Available\").status" \
    | sort |uniq -c
32 True

# COs Degraded
$ oc get co -o json \
    | jq -r ".items[].status.conditions[] | select(.type==\"Degraded\").status" \
    | sort |uniq -c
32 False
Inspect the credentials
- Check the credentials projected to machine-API controllers
$ oc get secrets aws-cloud-credentials \
    -n openshift-machine-api \
    -o jsonpath='{.data.credentials}' \
    | base64 -d
[default]
role_arn = arn:aws:iam::${ACCOUNT_ID}:role/oidc-def-openshift-machine-api-aws-cloud-credentials
web_identity_token_file = /var/run/secrets/openshift/serviceaccount/token
# Get Token path from AWS credentials mounted to pod
TOKEN_PATH=$(oc get secrets aws-cloud-credentials \
    -n openshift-machine-api \
    -o jsonpath='{.data.credentials}' |\
    base64 -d |\
    grep ^web_identity_token_file |\
    awk '{print$3}')

# Get Controler's pod
CAPI_POD=$(oc get pods -n openshift-machine-api \
    -l api=clusterapi \
    -o jsonpath='{.items[*].metadata.name}')

# Extract tokens from the pod
TOKEN=$(oc exec -n openshift-machine-api ${CAPI_POD} \
    -c machine-controller -- cat ${TOKEN_PATH})
- Inspect the token - Key ID
$ echo $TOKEN | awk -F. '{ print $1 }' | base64 -d 2>/dev/null | jq .alg
"RS256"
- Inspect token - Issuer URI
$ echo $TOKEN | awk -F. '{ print $2 }' | base64 -d 2>/dev/null | jq .iss
"https://my-cluster-oidc.s3.us-east-1.amazonaws.com"
troubleshoot
Assuming that you exported the token to the environment variable TOKEN, let's assume the role and check if you can get the short-lived credentials:
- Extract the IAM Role ARN from secret
IAM_ROLE=$(oc get secrets aws-cloud-credentials \
    -n openshift-machine-api \
    -o jsonpath='{.data.credentials}' |\
    base64 -d |\
    grep ^role_arn |\
    awk '{print$3}')
- Assume the IAM Role with the previously extracted token
aws sts assume-role-with-web-identity \
    --role-arn "${IAM_ROLE}" \
    --role-session-name "my-session" \
    --web-identity-token "${TOKEN}"
- You should be able to see the credentials on the output. Something like this:
{
    "Credentials": {
        "AccessKeyId": "ASIAT[redacted]",
        "SecretAccessKey": "[redacted]",
        "SessionToken": "[redacted]",
        "Expiration": "2022-06-08T06:59:11Z"
    },
    "SubjectFromWebIdentityToken": "system:serviceaccount:openshift-machine-api:machine-api-controllers",
    "AssumedRoleUser": {
        "AssumedRoleId": "AROAT[redacted]:my-session",
        "Arn": "arn:aws:sts::[redacted]:assumed-role/my-cluster-openshift-machine-api-aws-cloud-credentials/my-session"
    },
    "Provider": "arn:aws:iam::[redacted]:oidc-provider/my-cluster-oidc.s3.us-east-1.amazonaws.com",
    "Audience": "openshift"
}
That's how the SDK automatically loads/refreshes the credentials to controllers.
Problem statement
The endpoint which stores the JWKS files should be public, as the IAM OIDC will access the endpoint available on the JWT token when it is sent by STS API call AssumeRoleWithWebIdentity. You can take a look at the request arriving at the bucket when:
- Enable the S3 bucket access log
- Filter the events to access the Bucket on the CloudTrail
The main motivation to write this article is to share the current flow to help to understand the solution when any of the components is not working as expected, then share further ideas to workaround to expose the public S3 Bucket to the internet when using IAM OpenID Connector to provide authentication to OpenShift clusters.
Let me share some options to install a cluster using different approaches that should not impact the IAM OIDC managed service requirements:
- Expose the JWKS files through CloudFront Distribution URL in a Private Bucket, restricted to Distribution through OAI (Origin Access Identity)
- Lambda function serving JWKS files directly or reading from S3 bucket restricted to function's ARN, using one option below as URL entry point*:
- a) dedicated HTTPS endpoint;
- b) API Gateway proxying to the function;
- c) ALB as Lamdda's target group;type
- directly from a hosted web server public on the internet
FAQ
Q: Why are my cluster operator in a Degraded state, and installation does not finish successfully?
Check the logs of related components (operators and controllers). If any component has no access to the Cloud API, you may have credentials problems. The first step is to validate if the credentials provided to the component are working as expected. (Steps described in the Troubleshooting section)
Q: Why my private cluster is not completing the installation due to authentication errors?
Every component which should access the AWS service API to manage components should have valid AWS credentials. When you set the CredentialsMode to Manual on install-config.yaml, you should provide the credentials. When the provided credential is a projected token from the ServiceAccount, the components described in this should have the right permissions. A very common mistake is creating one restrictive Bucket Policy to restrict access within the VPC, avoiding the S3 bucket exposure from the internet, and impacting the IAM OIDC to retrieve the public keys and configuration.
Important to remember: IAM OpenID Connect service is not a service hosted inside your VPC, thus does not have an internal IP Address, also the service does not support (at the moment this post was published) federate authentication to retrieve files to the bucket.
Q: Why I am seeing a lot of errors InvalidIdentityToken on the logs?
(InvalidIdentityToken) when calling the AssumeRoleWithWebIdentity operation: Couldn't retrieve the verification key from your identity provider
The managed service OIDC should access a public endpoint to retrieve the public keys, on it’s unable to access when doing the AssumeRoleWithWebIdentity, the STS API will raise the error above to the caller.
Q: Can I restrict the OIDC's bucket policy to restrict access publicly?
No. The IAM OIDC requires a public endpoint HTTPS to retrieve the JWKS. If you want to use a private bucket, you should choose one option, as described in the problem statement, to expose those configurations and public keys.
Q: How can I make sure the service account's token is working to access AWS resources?
Steps described in the troubleshooting section above:
- Get the ServiceAccount token
- Make the API call AssumeRoleWithWebIdentity
- Use the STS tokens to call AWS resource APIs
Conclusion
As you can see, the OpenShift provides a powerful mechanism to enhance the security of your AWS account by using short-lived credentials through STS, instead of static User credentials (Access Keys).
It is also possible to expose the public endpoint used to IAM identity provider OpenID Connect using other alternatives, like CloudFront Distribution accessing privately the S3 Bucket.
The ccoctl provides all the flexibility to build your solution if you are operating in a more restrictive environment.
A few ideas for the next step using the ccoctl utility:
- create a CloudFront Distribution to expose the JWKS
- centralize the OIDC files management by creating a generic CloudFront Distribution and S3 Bucket to store JwKS files from different clusters.
- create a custom DNS name to host the OIDC endpoint using CloudFront Distribution and ACM (Certification Manager)
References
- OpenID Connect specifications
- RFC3986
- OpenShift doc: Installing an OpenShift Container Platform cluster configured for manual mode with STS
- AWS Blog: Fine-grained IAM roles for Red Hat OpenShift Service on AWS (ROSA) workloads with STS
- AWS doc: Restricting access to Amazon S3 content by using an origin access identity (OAI)
- AWS Doc: S3 best practices
- EKS Workshop: IAM Roles for Service Account
- AWS STS API: AssumeRoleWithWebIdentity


Top comments (0)