Starters 🏁
Welcome back to another series of the "Project" series, where I delve into the technical components of the projects I've undertaken. This week, I'll discuss a course project I completed for COMP 2800 at BCIT. If you're unfamiliar with me, please refer to my introductory post.
COMP 2800 🤖
COMP 2800 is a five-week-long project course for all first and second-term Computer Systems Technology (CST) students at the British Columbia Institute of Technology (BCIT). This year, the project theme was Impactful Intelligence - AI Powered Web Solutions, challenging students to harness artificial intelligence for benevolent purposes or assistance. You can read the full project details here.
Agile scrum methodology 🔄
For this project, we adopted the agile scrum methodology, a blend of agile philosophy and the scrum framework. "Agile" denotes an incremental approach, allowing teams to develop projects in small increments. Scrum, a specific type of agile methodology, is renowned for segmenting projects into sizable chunks known as "sprints." In essence, we employed the agile methodology through weekly sprints and daily scrum meetings.
To learn more about the agile methodology, please refer here 👇

COMP 1800 - A Simple Full-Stack Web Application 🌱
David ・ Sep 11
Project overview 🙆
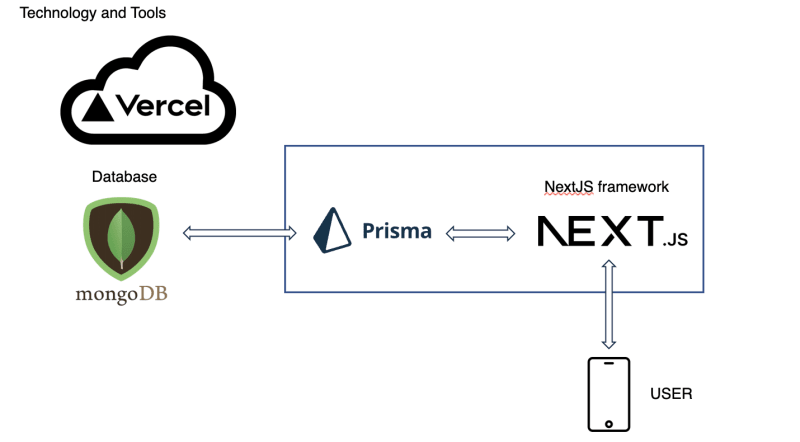
Our team, comprising four members (including myself), chose to develop a community platform connecting writers and readers. This platform facilitates the crafting of unique stories with the assistance of the OpenAI API. We opted to use the modern technology framework, Next.js. Below, I've outlined our entire tech stack for the project.
- Language: JavaScript
- Frameworks: Next.js, Node.js, Prisma ORM
- Database: MongoDB
- Hosting: Vercel
Code review 🔍
However, using ORM, we can simplify that process, for example: Prisma's journey begins with its schema, where we define database models and their relationships using the Prisma schema language. One can either craft the Prisma schema from scratch or link it to an existing database. Below is an example of a user model crafted with the Prisma schema. Based on the established Prisma schema, we can commence our database queries using the ORM. I'll delve deeper into this in the API routes section. In this project, I was tasked with backend responsibilities. This involved crafting database queries in form of utility function using the Prisma ORM and developing API route handlers for various HTTP methods. I specifically focused on the branch queries and route handlers. Below, I'll present examples of (1) returning main threads and (2) returning main threads by user id. (1) Returning main threads (2) Returning main threads by userId As evident, the components of these two codes encompass the function signature (name, parameters, return type), functionality (e.g., findMany, include, where), and error handling. For (1) Returning main threads, it's clear that it doesn't require parameters, unlike (2) Returning main threads by userId, which necessitates the userId parameter. Additionally, the database query employs findMany, distinguishing between the 'include' option (which fetches related data) and the 'where' option (filtering based on the provided parameter). From the utility functions created, such as createMainThread, I had to create handlers for the API route. In our repository, we organized the api routes in Then we have to declare the request and respond of our api route which involves the HTTP method. For example: In this code, if the request method is GET, the queries for search, genre, and tag are executed.Backend
"SELECT id, name, email, country, phone_number FROM users WHERE id = 20"
users.GetById(20)
model User {
  id            String    @id @default(auto()) @map("_id") @db.ObjectId
  name          String?
  penName       String     @default("")
  email         String?    @unique
  emailVerified DateTime?
  image         String?
  voteBranchThreads String[] @default([])
  likeThreads   Json @default("{}")
  accounts      Account[]
  sessions      Session[]
  mainThread    MainThread[]
  branchThread  BranchThread[]
}
/**
 * getMainThreads
 *
 * @returns {Promise<{threads: any}>}
 */
export async function getMainThreads() {
  try {
    const threads = await prisma.mainThread.findMany({
      include: {
        branchThread: true,
      },
    });
    return { threads };
  } catch (error) {
    return { error };
  } finally {
  }
}
/**
 * getMainThreadsById
 *
 * @param {ObjectId} id
 * @returns {Promise<{mainThreads}>}
 */
export async function getMainThreadsById(userId) {
  try {
    const mainThreads = await prisma.mainThread.findMany({
      where: { userId },
    });

    return { mainThreads };
  } catch (error) {
    return { error };
  }
}
pages/api folder. Below, I will provide an example of an api route handler using createMainThread utility function. To begin, we have to import the necessary utility function.
import {
  createMainThread,
  getRandomMainThreads,
  getSearchMainThreads,
} from "@/lib/prisma/mainThreads";
const handler = async (req, res) => {
  if (req.method === "GET") {
    try {
      const searchParam = req.query.search;
      const genreParam = req.query.genre;
      const tagParam = req.query.tag;

      const getMainThread =
        searchParam || genreParam || tagParam
          ? getSearchMainThreads(searchParam, genreParam, tagParam)
          : getRandomMainThreads();

      const { randomMainThreads, error } = await getMainThread;

      if (error) throw new Error(error);
      return res.status(200).json({ randomMainThreads });
    } catch (error) {
      return res.status(500).json({ error: error.message });
    }
  }
}
const {randomMainThreads, error} = await getMainThread;
This line awaits the result of the getMainThread function, which is expected to return a Promise. It then destructures the result to extract the randomMainThreads and error properties. If any errors are present, an error message will be returned. If there are no errors, the function sends a response with a status code of 200 (OK) and a JSON body containing the randomMainThreads data.
As I was mainly tasked with backend, I did not contribute much to the design in the frontend. However, there was a few that I worked on, such as the easter eggs, and the main thread renders, and OpenAI API calls. In the render react hooks, the key points are the useState, useEffect, and useCallback hooks. Breakdown of the code above:Frontend
const [mainThread, setMainThread] = useState({}));
 useEffect(() => {
    if (mainThread.phase === 6) {
      handleAIGenreGenerate();
    }
  }, [mainThread.phase]);
 const handleAIGenreGenerate = useCallback(async () => {
    const contentBody = mainThread.contentBody;
    const endpoint = "https://api.openai.com/v1/completions";

    const options = {
      method: "POST",
      headers: {
        "Content-Type": "application/json",
        Authorization: `Bearer ${process.env.NEXT_PUBLIC_OPENAI_API_KEY}`,
      },
      body: JSON.stringify({
        model: "ada:ft-personal-2023-05-02-07-34-38",
        prompt: `${contentBody} \n\n###\n\n`,
        temperature: 0.5,
        max_tokens: 2000,
      }),
    };
const response = await fetch(endpoint, options);
const { choices, error } = await response.json();
Endpoint: The function targets the https://api.openai.com/v1/completions URL, which is OpenAI's endpoint for generating completions based on a given prompt.
Headers & Body: The request method is POST. The headers specify the content type as application/json and include an authorization token from the environment variables. The body of the request contains a JSON string with several parameters.
Fetching Data: The function uses the fetch API to make the request to the endpoint with the specified options. Once the response is received, it is converted to JSON format.
Response Handling: The function extracts choices and error from the JSON response. The choices typically contain the generated text from OpenAI, while error would contain any error messages if the request failed.
Kaggle dataset OpenAI GPT Installation of openai using pip install Obtaining API key Prepare training data in JSONL format and in "prompt", "completion" format CLI data prepartion and upload Fine-tuning.Finetuning
One of the requirements for the project was to make use of a dataset. Since our application was based on story building, we decide to use book genre dataset to implement genre prediction.
For finetuning based on the dataset, I followed the documentations.
The steps in fine-tuning involve:
For more information on finetuning, you can check out my research repository.
Conclusion ⛳️
Thank you for taking the time to read and I would appreciate any suggestions to improve the quality of my blog. Stay tuned for future posts. 🤠
Check out the project embedded repository below! 👇
 MiSaengg
/
2800-202310BBY19
A community platform that connects writers and readers, enabling the creation of unique stories with the help of the OpenAI API. 🤖
Table of Contents

Stories of Million
A community platform that connects writers and readers, fosters collaboration, provides feedback, and assists in creating unique stories leveraging the OpenAI API.
Explore the docs »
See Project
·
Report Bug
·
Request Feature
Contributors
| Jasper | David | Noel | Juan |
|---|---|---|---|
| _Hi, My name is Jasper, Let's do this! _ | _Hi, my name is David, time to harness the power of AI :D _ | _Hi, my name is Noel, We got this o2o _ | _Hi, my name is Juan! _ |
Team Lead Fullstack |
Fullstack |
Fullstack |
Fullstack |
How to use?
Technology used
How did we use AI?
- AI played a pivotal role in the creation of our app, particularly in the coding phase. We employed OpenAI's…


Top comments (5)
Glad you were utilizing OpenAI in your project 🔥
Very cool!
Thank you, Khairunnisaas!
LGTM!🔥
Thank you, Jasper 🤠