
In my first post in the series there where a lot of people that were concerned about exposing local network to public internet, or actually might have a problem with doing that due to ISP limitations like dynamic IP or reverse lookup. That might not be a problem if you order a static IP from your ISP, but not all ISPs make it easy or cheap. There are also several reasons you might want to avoid that.
Current setup
In my initial post I suggested using Intel NUC to host every tool in the closed off local network that only you have access too. Basically you can install server version of Ubuntu, setup ssh access, install docker, and run any tool you need on that docker (I will post extensive guide in the future). I'm using also Portainer and Traefik as my main containers to actually bind any local address to a new service, so I don't have to jump on different ports, depending on what I want. Now your local address becomes something like portainer.home.local.

Moving to public
Now, this type of routing can be incorporated in public environment if you had domain pointing to your static IP, port-forwarded 80 and 443 to your intel NUC from router, and let Traefik take over routing over subdomains. That's classic way of routing traffic. In fact, that's not so different from spinning up EC2 with docker and doing that yourself on external network. Definitely it's safer this way.

But we are going the economic way, and actually the best of both worlds: tunneling. That's right, we will make a bridge between the domain and our container. This way traffic comes from indirect source instead of directly through our router and local network. You can even set up docker network so it's closed off from the rest of your internal network.
There are several tools that allows tunneling like ngrok or tunnelmole, however, best option is actually Cloudflare. It's free for small amounts of traffic, and works best in docker environment.
Step 1. Get the domain
Honestly, you can't go public without domain, if you don't have one, you have to grab one. Keep in mind that you need to point DNS towards Cloudflare nameservers so you can't use one that already is occupied by something else. Best services that provide domains for me are:
- GoDaddy - I've been using them for years. I had good experience with their customer service, and most of my domains sits there.
-
NameCheap - Name says it all. Solid alternative, some domains comes cheaper then GoDaddy, some don't. But one of the main benefit is - they have
.xyzdomains for $1 a year!
Step 2. Set up a domain on cloudflare.
Now let's create account on cloudflare and add our domain. Go to websites and add new domain.

After you provide domain you already own, you will be asked to subscribe... don't worry, there is free tier, scroll down:

Do the quick domain scan, click on next, until you get to activation page:

Scroll down until you see nameservers:

Set up DNS records to point to your cloudflare nameservers (don't copy from me, these can be different for you)

Now, you need to wait until domain propagates correctly. Depending on where you have your own DNS servers set up, it can take between 5 minutes up to 24 hours.
Step 3: Tunnel your traffic.
Alright, we have cloudflare account and domain set and ready. Let's setup our proxy bridge. Go to "Zero Trust" section:

Now expand "Networks" section and select "Tunnels":

Now click on "Create a tunnel" and on the next screen select "Cloudflared". Name your tunnel on the next screen.

Your tunnel is created, now you have to install it in your docker. But before we do that, we need to setup our network.

$ docker network create -d bridge public_services
$ docker run --network=public_services cloudflare/cloudflared:latest tunnel --no-autoupdate run --token <your-token>
$ docker run --name hello-world --network=public_services -d -p 80:80 strm/helloworld-http
$ docker inspect -f '{{range.NetworkSettings.Networks}}{{.IPAddress}}{{end}}' hello-world
$ # 172.17.0.3
This way your tunnel will have access only to services that run on the same network. Last command is what you need to get internal networks container ip. We will need that for tunneling.
Let's get back to cloudflare and let's make new routes. Edit your tunnel and go to "Private Network"

Here set up which networks should be visible in your tunnel. Set up CIDR accordingly to your container's IP.

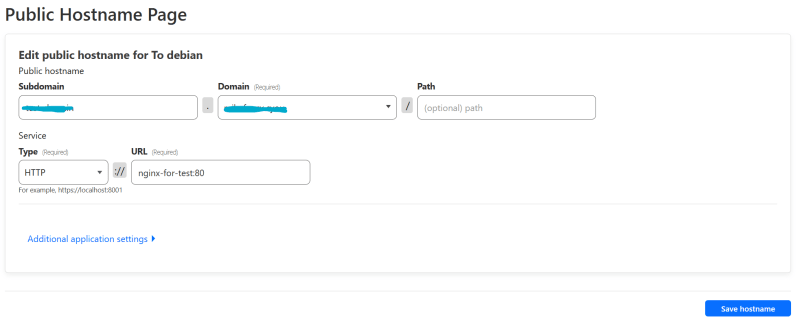
Now go to "Public Hostname" tab, and click "Add a public hostname"

Here we set up our routing to a specific domain. We can run multiple services this way, each with it's own specific subdomain, or we can set up our personal website. The best thing is - there are no limitations to technology you want to use, as long as it's dockerized.
Conclusion
Setting up a personal domain and hosting your own services can be a daunting task, especially if you're concerned about security and exposing your local network to the public internet. With docker and Cloudflare however it can be actually quite rewarding and fairly safe. It is good extension of your homelab if you have one, without a need to resort to traditional hosting.
With this setup, you can host a variety of services, from personal websites to custom applications, all while maintaining a secure and isolated environment. The possibilities are endless, and the best part is that you have complete control over your data and services.
So, if you've been hesitant to explore the world of self-hosting due to security concerns or technical challenges, give this method a try. You might be surprised at how easy and rewarding it can be to have your own little corner of the internet, all while keeping your local network safe and sound.


Top comments (10)
Can I use the assigned domain name instead of the internal IP in the internal docker bridge network ? Because the internal IP can re-assign upon container restart, especially if you have watchtower to periodically update all containers
Worth checking, I didn’t test it myself
Just did a quick POC and it works:
Here is the compose.yml file:
And here is the tunnel's config:
As you can see, you are free to use the domain assigned by docker demons to connect to other containers within the same bridge network
That’s good to hear! Thanks for sharing!
Thank you for writing all 3 articles in this list. Please continue writing about the docker setup you have. The containers you run and how you deployed them and what are you using them for. Please add how they are different from legacy VM setup. I'm new to self hosting. Can you suggest some articles/videos/blogs to follow and get more information.
The support is it for all technology?
What do you mean? If you can run something in docker, then yes.
ok great thanks
You could also add a Nginx Proxy Manager after the Cloudflare Tunnel to better secure all ports AND to have multiple sites using the same domain but with different subdomains.
you don't need that, you can have multiple public hostname on CloudFlare without it, simply by adding new entry in CloudFlare. It's just matter of preference, however CloudFlare Tunnel already does most if not all what Proxy Manager, or Traefik of anything else does.